Original Link: https://www.anandtech.com/show/7604/asrock-m8
ASRock M8 Barebones Review: My Steam Box
by Ian Cutress on January 2, 2014 10:00 AM EST- Posted in
- Intel
- ASRock
- Motherboards
- Cases/Cooling/PSUs
- Z87
- Barebones

Beauty is in the eye of the beholder, or so the saying goes. Most development in home computers veers toward the ultra large (high impact gaming machines for 4K resolutions/multi-monitor immersive experiences) or the ultra-tiny (Intel NUC, Raspberry Pi). The downside of these two extremes is usually cost, and most regular Joes go for something in the middle trading one side for the other. One popular build right now is mini-ITX in a Bitfenix Prodigy chassis, as it offers space for a full on GPU or many 2.5” storage drives. ASRock now come to the market with the M8 barebones based on a BMW design for the Z87 platform, at half the width of the Bitfenix Prodigy and a high build quality. It mirrors what we are seeing with the latest consoles, and thus offers a prime opportunity as a Steam Box.
ASRock M8 Overview
We saw the ASRock M8 on show at Computex – both Anand and I’s initial reaction to the look of the device was visibly positive, as I am sure was most peoples response at the event. At that point there were many details to be refined, but from that point in time to now, the ASRock M8 includes:
- The Chassis
- A slim optical disk drive, preinstalled
- The ASRock Z87-M8 motherboard designed for the chassis
- A 450W 80 PLUS power supply designed by FSP
- Top and bottom fans along with appropriate cabling preinstalled
- A multi-card reader
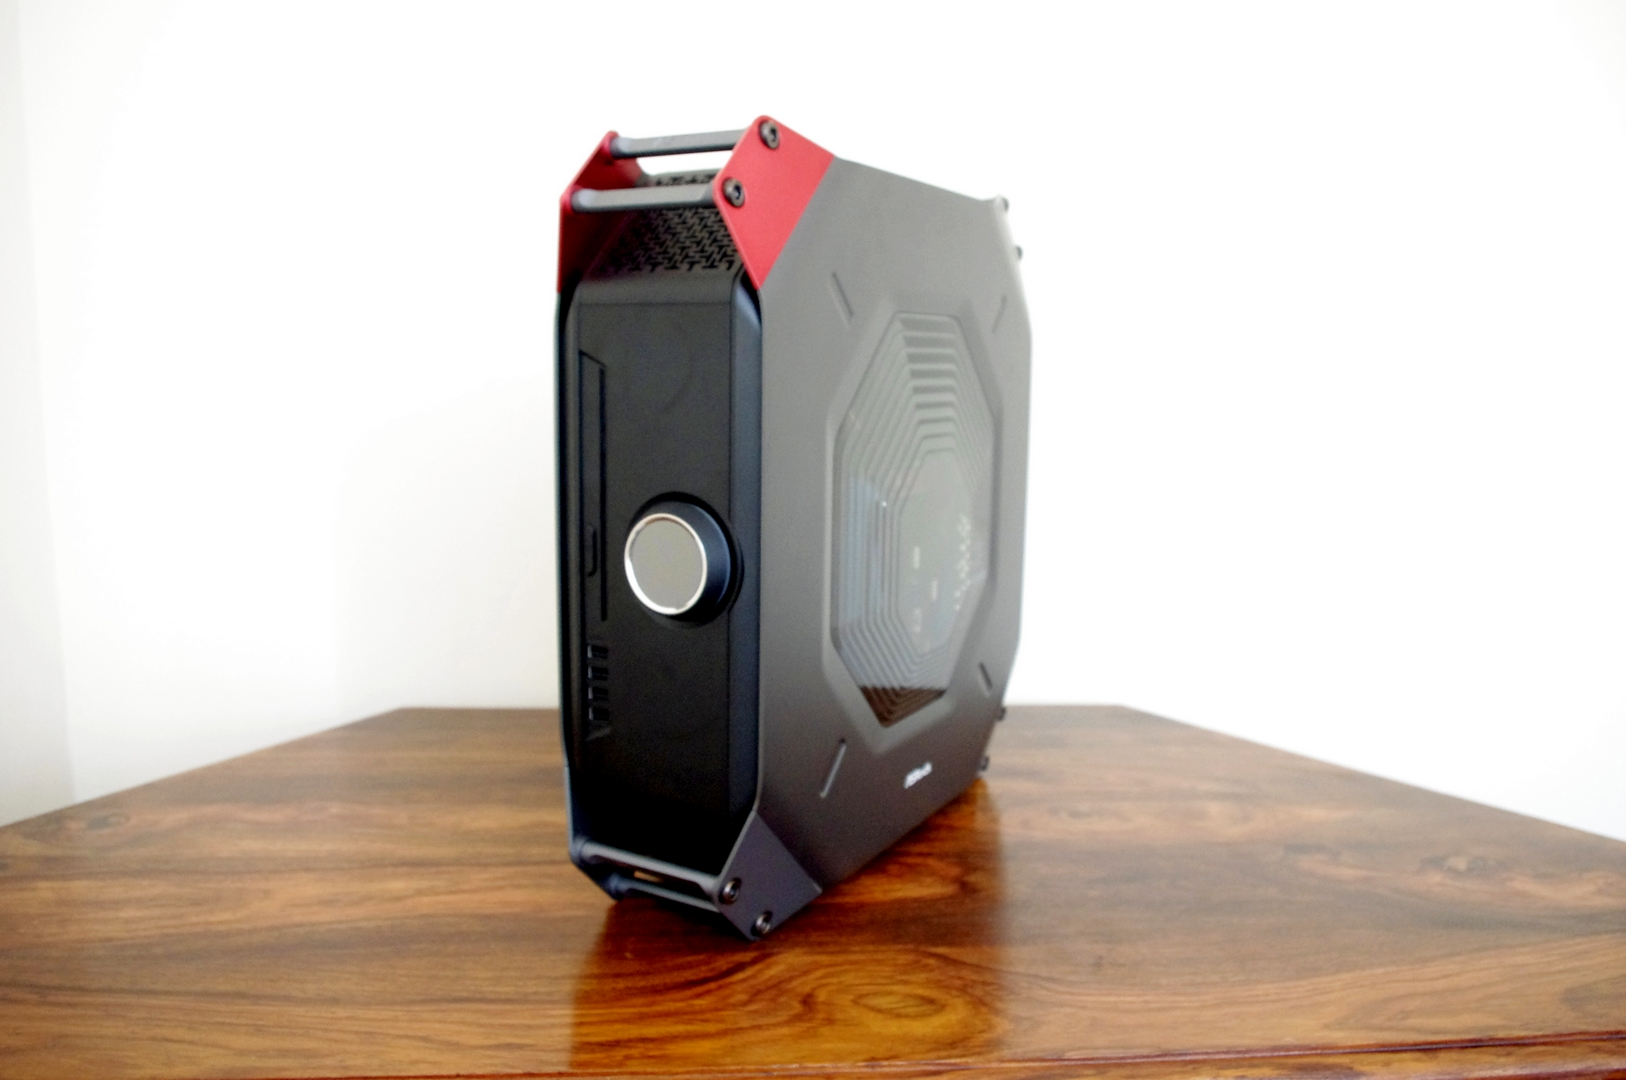
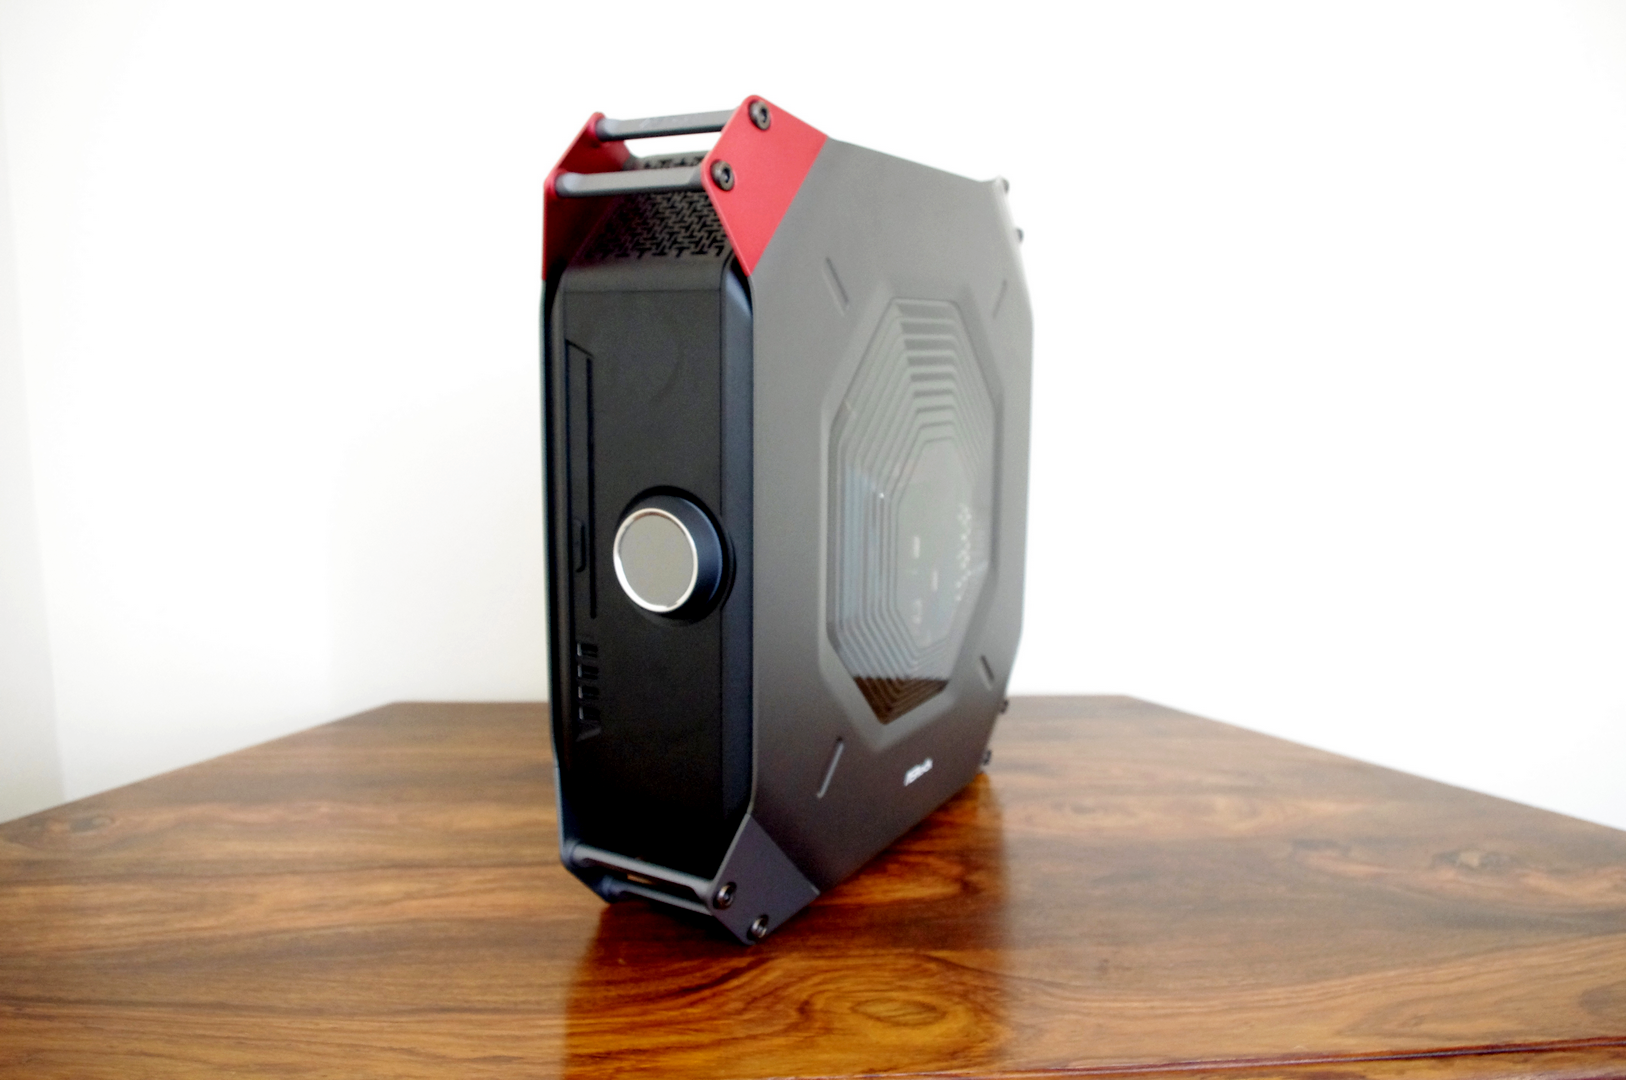
In terms of the chassis, ASRock lay on the aesthetics of an engineering loving person, dealing in straight lines and edges, metallic shades of color including grey and red, with the only real circular part of the design being the front knob that sparks recall to the BMW i-Drive system in their recent range of high end vehicles. In fact this chassis is co-designed with the BMW Group DesignworksUSA team. The chassis comes with handles for easy movement, and is lightweight due to the steel frame/aluminum + plastic construction, which is also nice to touch, making it suitable for a thin and portable gaming PC or Steam Box.
Due to the barebones nature of how ASRock will sell the M8, performance will depend on exactly what extra hardware is added. The chassis has space for one 3.5” drive or four 2.5” drives, combined with the single ODD which makes the six SATA ports on the motherboard more than adequate. The motherboard uses SO-DIMM memory, which is now being released in faster and faster speeds for users to go above DDR3-1600 CAS9, and the PCIe slot uses a riser card to allow a GPU to be mounted in-line with the motherboard. Due to the space available for GPUs, the power supply and the cooling power of the chassis, ASRock suggest a maximum of a 200W GPU – this means up to a HD 7950 or a GTX 760. There are provisions for the tall non-reference designs, although ASRock state maximum GPU dimensions of 290mm x 137mm x 43.5mm. So no triple slot cards here.
The mini-ITX motherboard designed specifically for the chassis forgoes any significant power delivery and heatsink design, which is perhaps an oversight – for this build I went for a an i7 CPU but a low power 'T' model SKU so as not to overload or burn out the power delivery. ASRock state that the fans they supply below the motherboard help with the VRM cooling and thus nothing should stop a user placing an i7-4770K into the system, but overclocking longevity might be limited. I decided to apply some brain and use common sense for our test build here.
Due to the mobile gaming nature of the system, the motherboard also includes an Intel NIC and dual band 802.11ac WiFi (with BT 4.0 support), whereby the antenna use the case to help increase the signal – this has benefits (the lack of a visible antenna) but downsides (optimization of antenna placement). ASRock are using a Creative Sound Core3D audio codec, with software combined therein, along with a three month subscription to XSplit (game broadcasting software) included in the package.
Now obviously the final question always comes down to price. ASRock are treating the M8 barebones as something of true industrial design (which might increase costs), but have no plans to make it a limited run and will make as many as people will be prepared to buy (thus reducing any additional exclusivity cost). For the chassis, the motherboard, the ODD and the power supply, the M8 is listed on Newegg for $550.
If we were to break this down into regular mini-ITX build costs:
- Motherboard would be $150,
- 450W SFF Bronze PSU for $50 (they seem really cheap in the US),
- Slim-line DVD-RW ODD for $70,
- A chassis (like the Prodigy) is around $80,
Thus a total of $350-ish. So in essence, the ASRock M8 offers a slim-line industrial design that looks (in my opinion) quite good, is easy to carry and can provide a powerful gaming box for a $200 / ~57% price premium. That can be a bitter pill to swallow, especially when you add the cost of a processor (i3 4130T, dual core w/HT 2.9 GHz 35W, $140), a GPU (NVIDIA GTX 760, 170W, $270), a 120GB SSD (Samsung 840 Evo, $110), 8GB of DDR3-1600 C9 DRAM (G.Skill, $75) and a 1TB 2.5” storage drive (Seagate Momentus STBD1000100 1TB 5400 RPM, $82), which would total ~$1225.
The build we’re using today consists of the i7-4675T (~$400), an AMD HD 7950 (~$320), an OCZ Vertex 3 480GB ($485), 16GB of G.Skill 1866 C10 memory ($160) and a 750GB storage drive ($74), giving a total build price of ~$2000 for a quad core i7 with hyperthreading but low power, along with a top end GPU and a large boot drive SSD, with room still for two 2.5” SSDs for storage.
In terms of all this pricing, the ASRock M8 comes off as steep in terms of ‘just having a console’, but as something high powered, mobile, and nice to look at that will blow any console out of the water, it makes a nice self-present or investment into a miniature system.
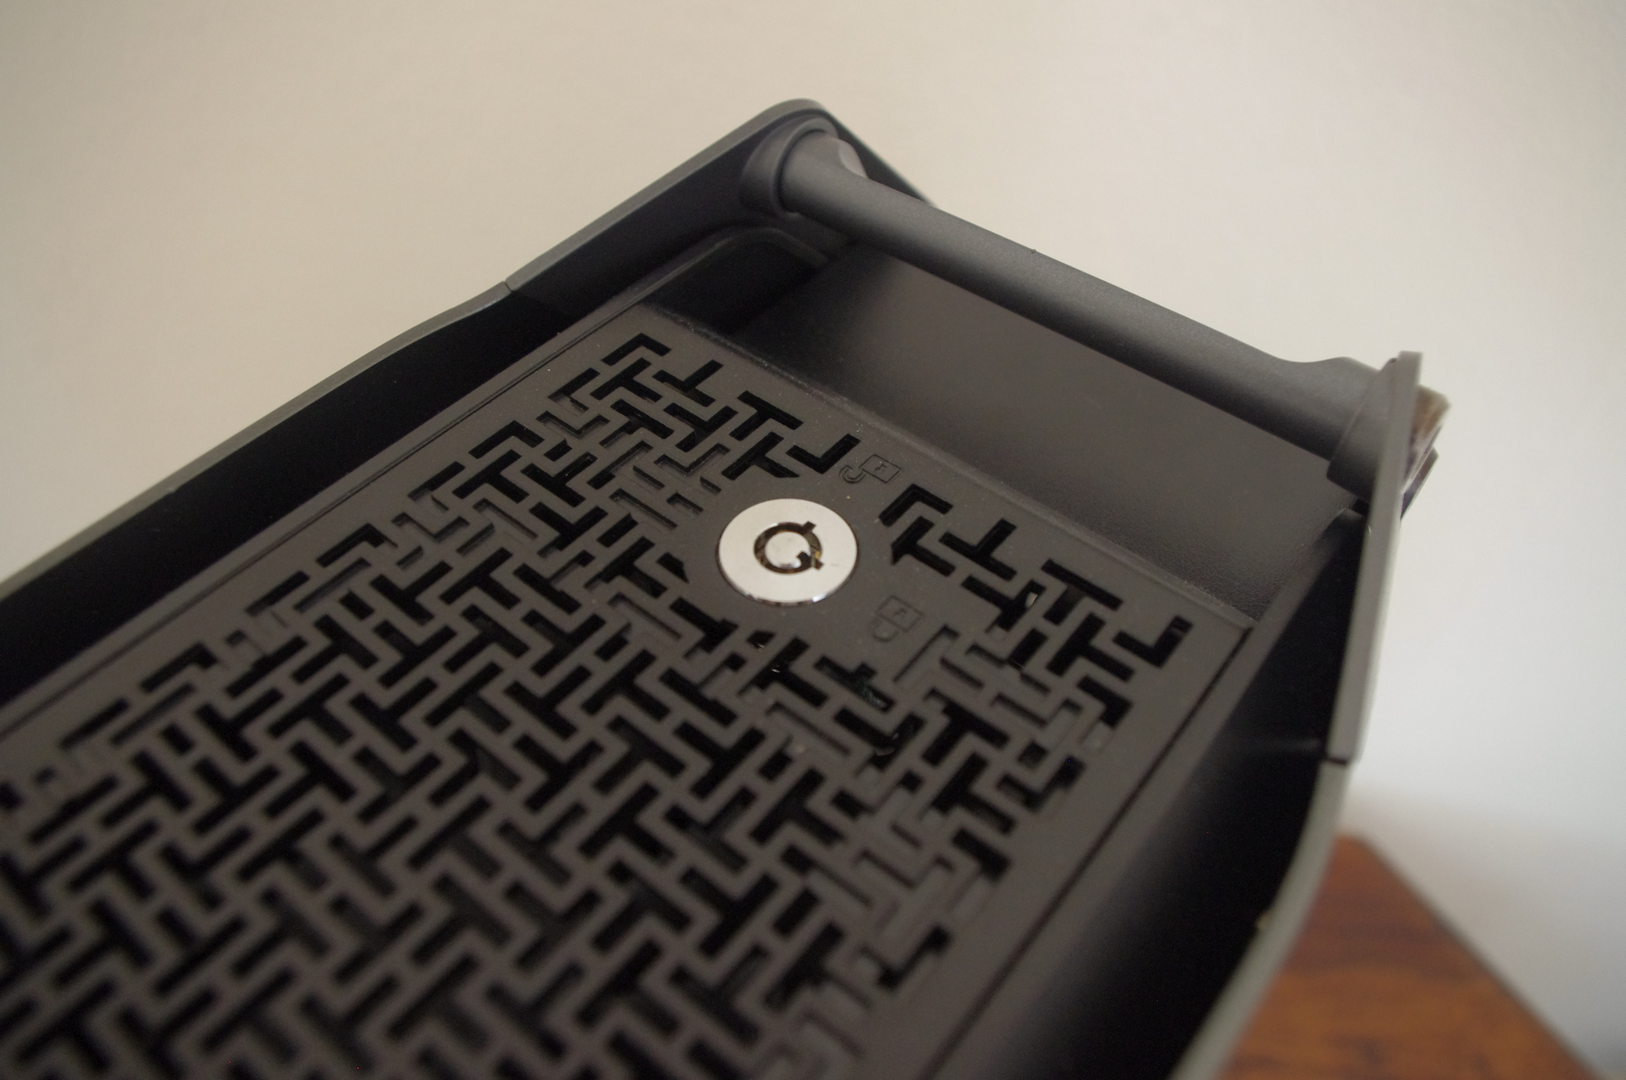
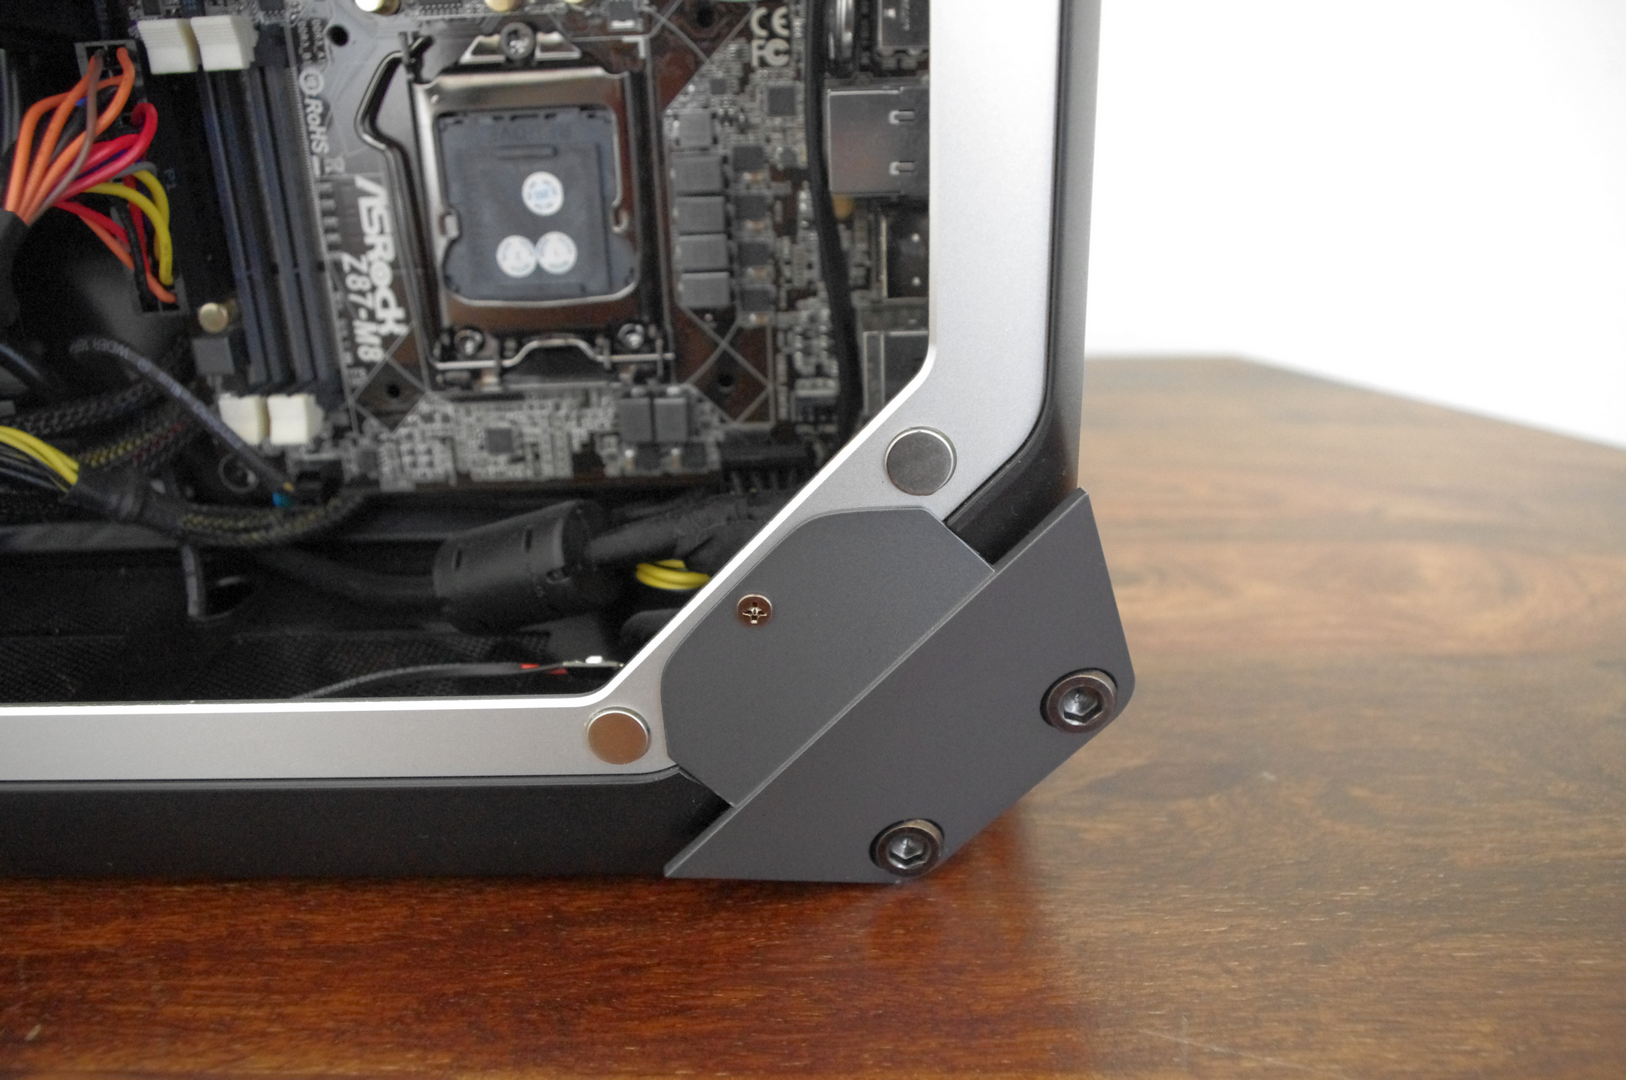
The first thing that struck both Anand and I when we first saw this case back at Computex was most likely size and handles. Handles on a PC case are a hard thing to get right – the case needs to be thick enough to support the weight of an entire PC going through what is usually a hinge (think Lian Li TU-200/TU-100). Bitfenix went a different route with the Prodigy by building the handles into the case itself and placing them on the corners – ASRock, with design from BMW Group, have done something similar with their M8. Rather than making the handles out of something strong but flexible, here we have a firm fixed grip to play with.
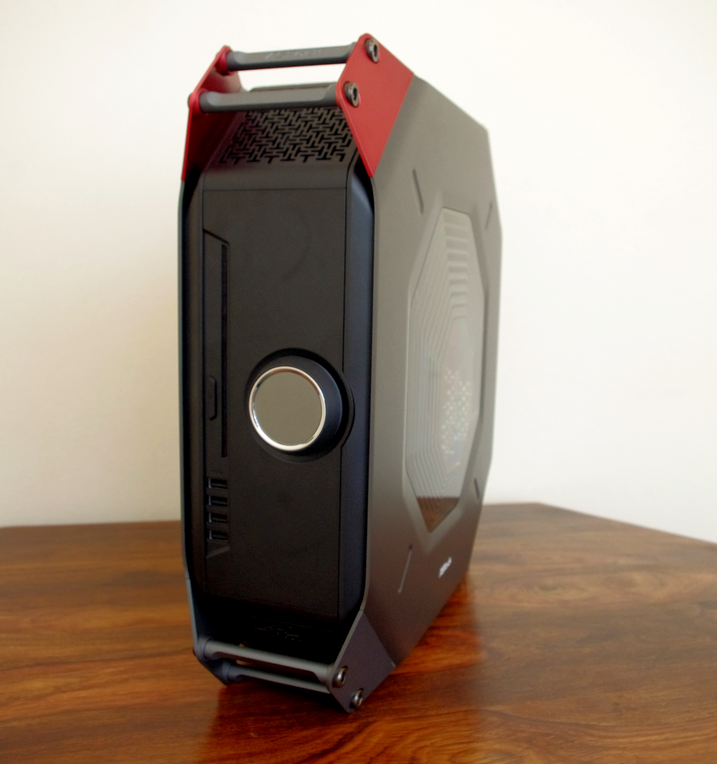
On the front of the case is a side-loading slim line ODD, which comes preinstalled into the chassis, followed by four USB 3.0 ports derived from a USB hub and connected into the motherboard. The circular device in the center is akin to the i-Drive button seen on certain BMW cars – this is the button to turn the PC on. It also shows the date and time, and when in the OS (with the appropriate drivers installed) can be used to adjust the OS volume, implement different power modes, or turn the machine off.
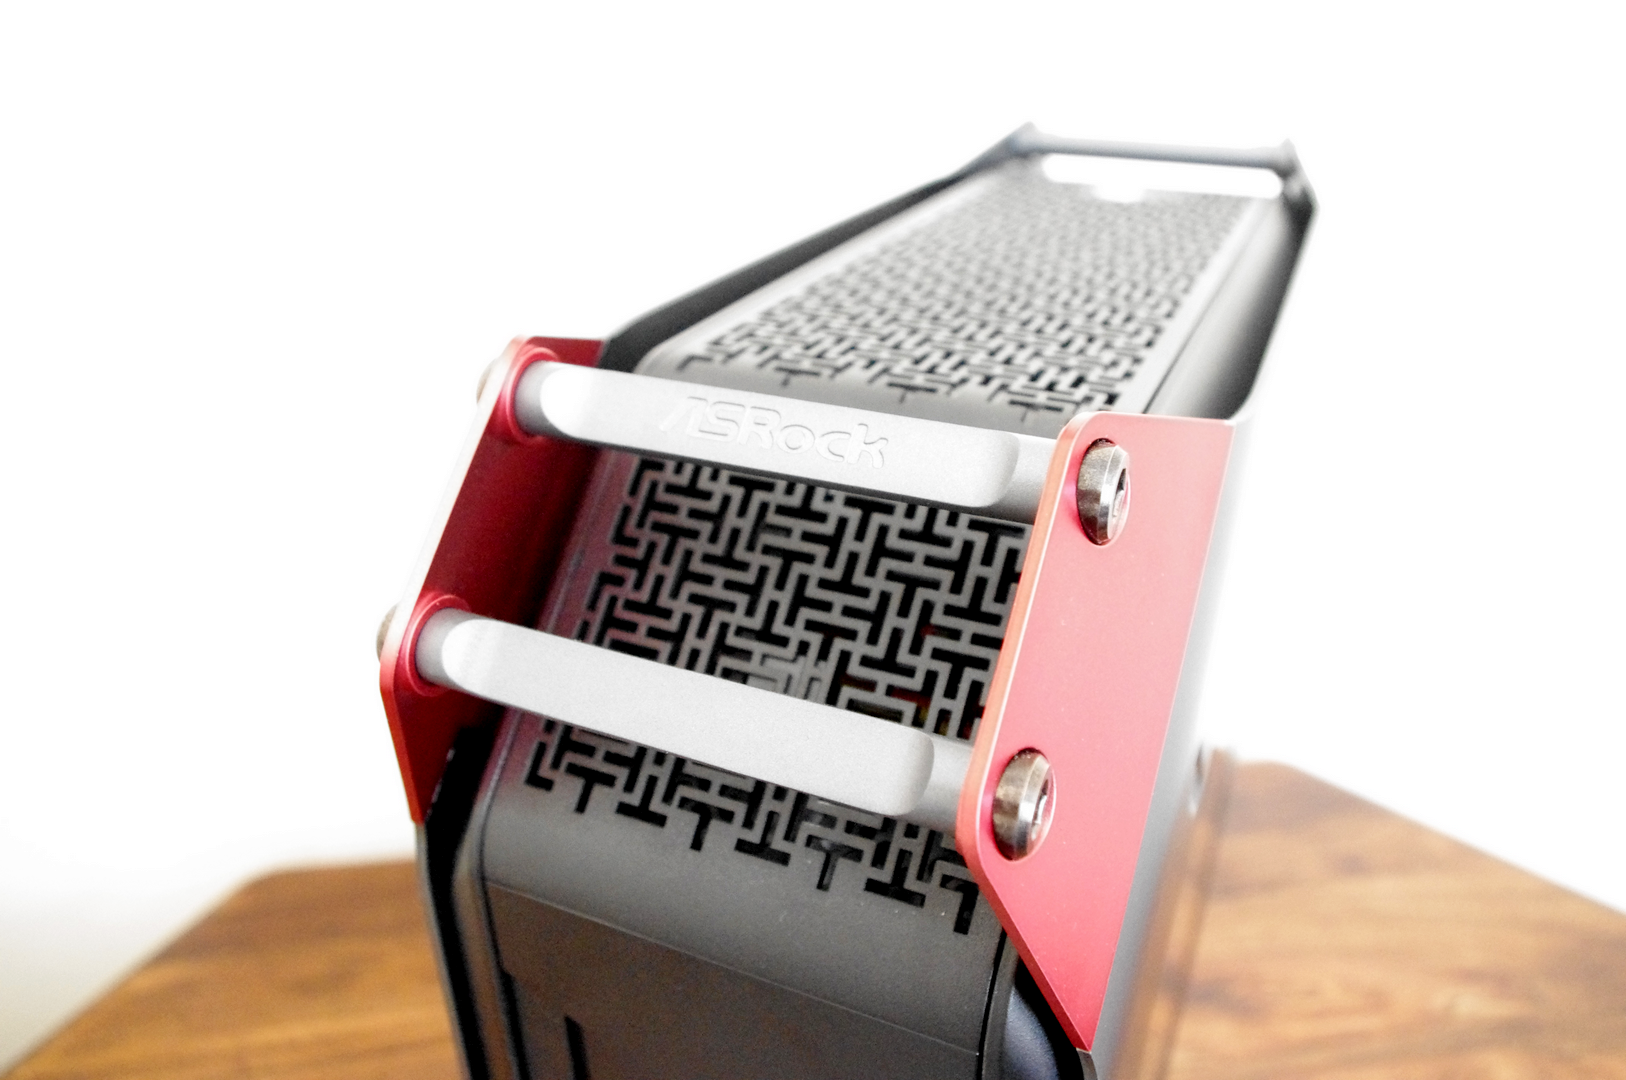
The grip feels sturdy, and in order to install the graphics card some of these have to be removed – ASRock provide the appropriate tools in the case in order to do so.

At the bottom of the front of the case is our card reader – this pops out of the case and can be shut when needed. The audio connections are also here, and these are all pre-connected into the system as purchased.
On the top of the case is a locking mechanism for the side panels. While this may stop any stray LAN goer casually trying to dismantle the case, the key is very standard and will not deter the most ardent of key owners.
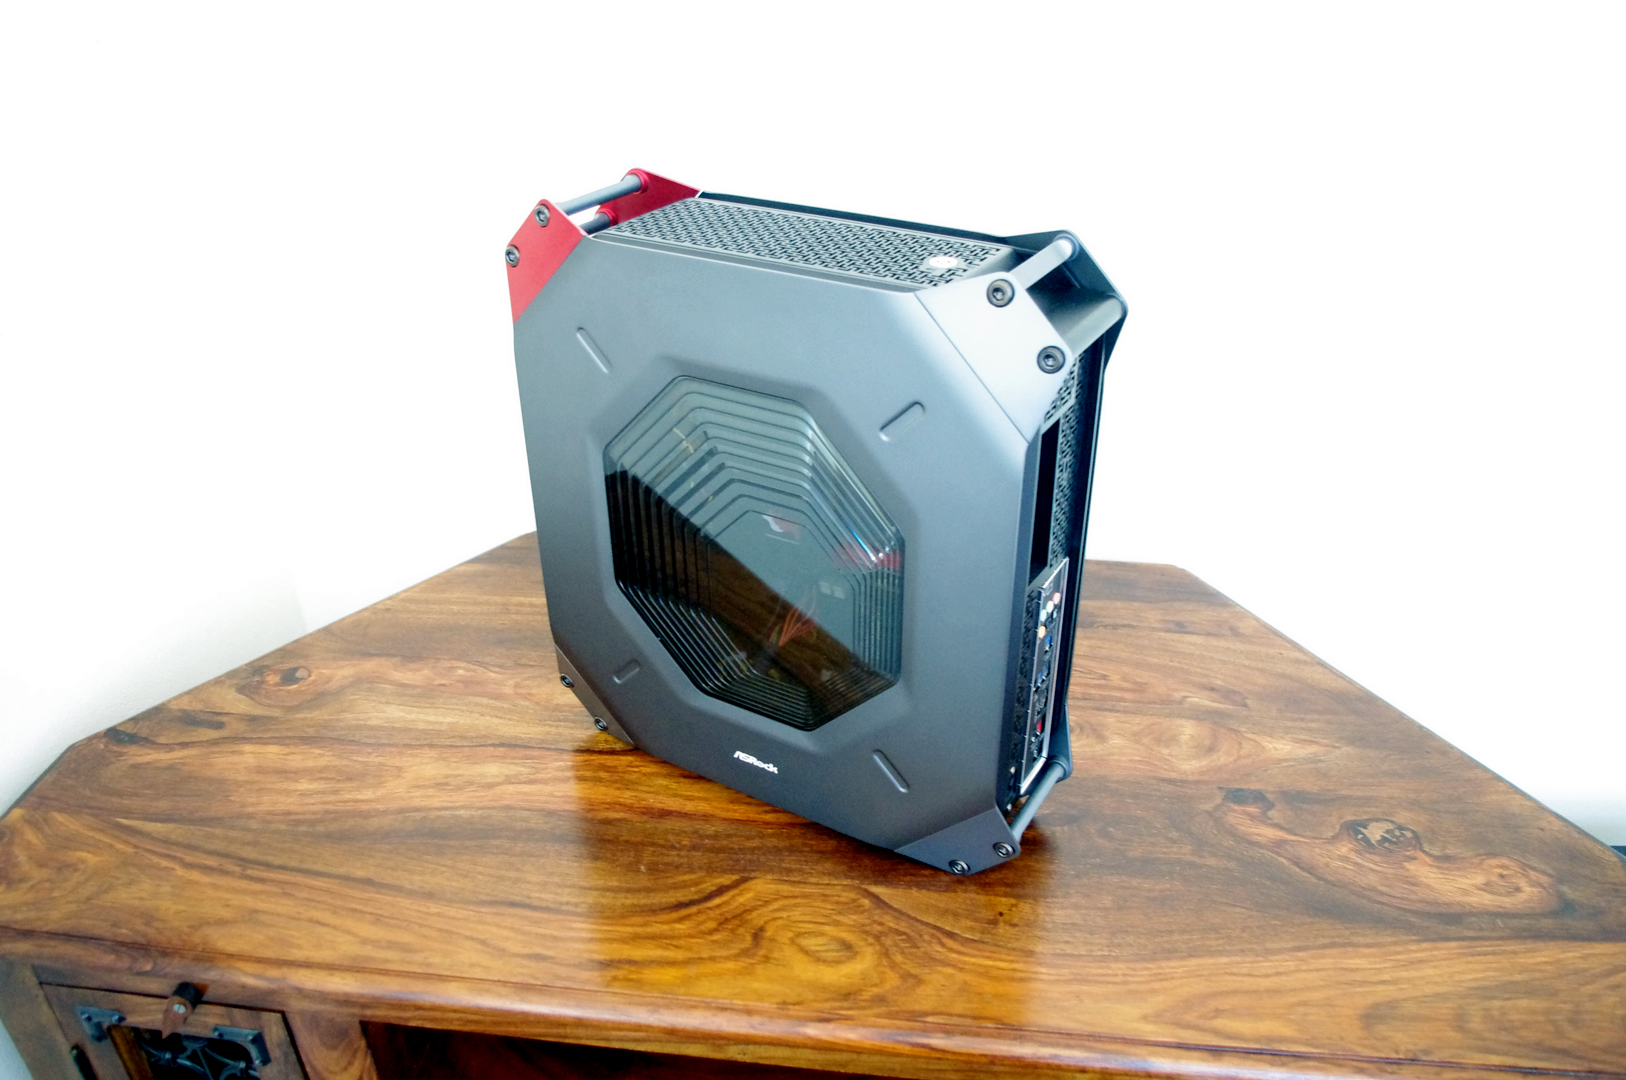
The main view for looking into the case is the one shown above, with the Perspex side window featuring a gradation down into the motherboard area. The system has a number of LED lights that can be turned on with the wheel at the front of the case, although in a brightly lit room the insides are too dark to look into. Then again, not many of the LANs I have ever been to have been brightly lit.
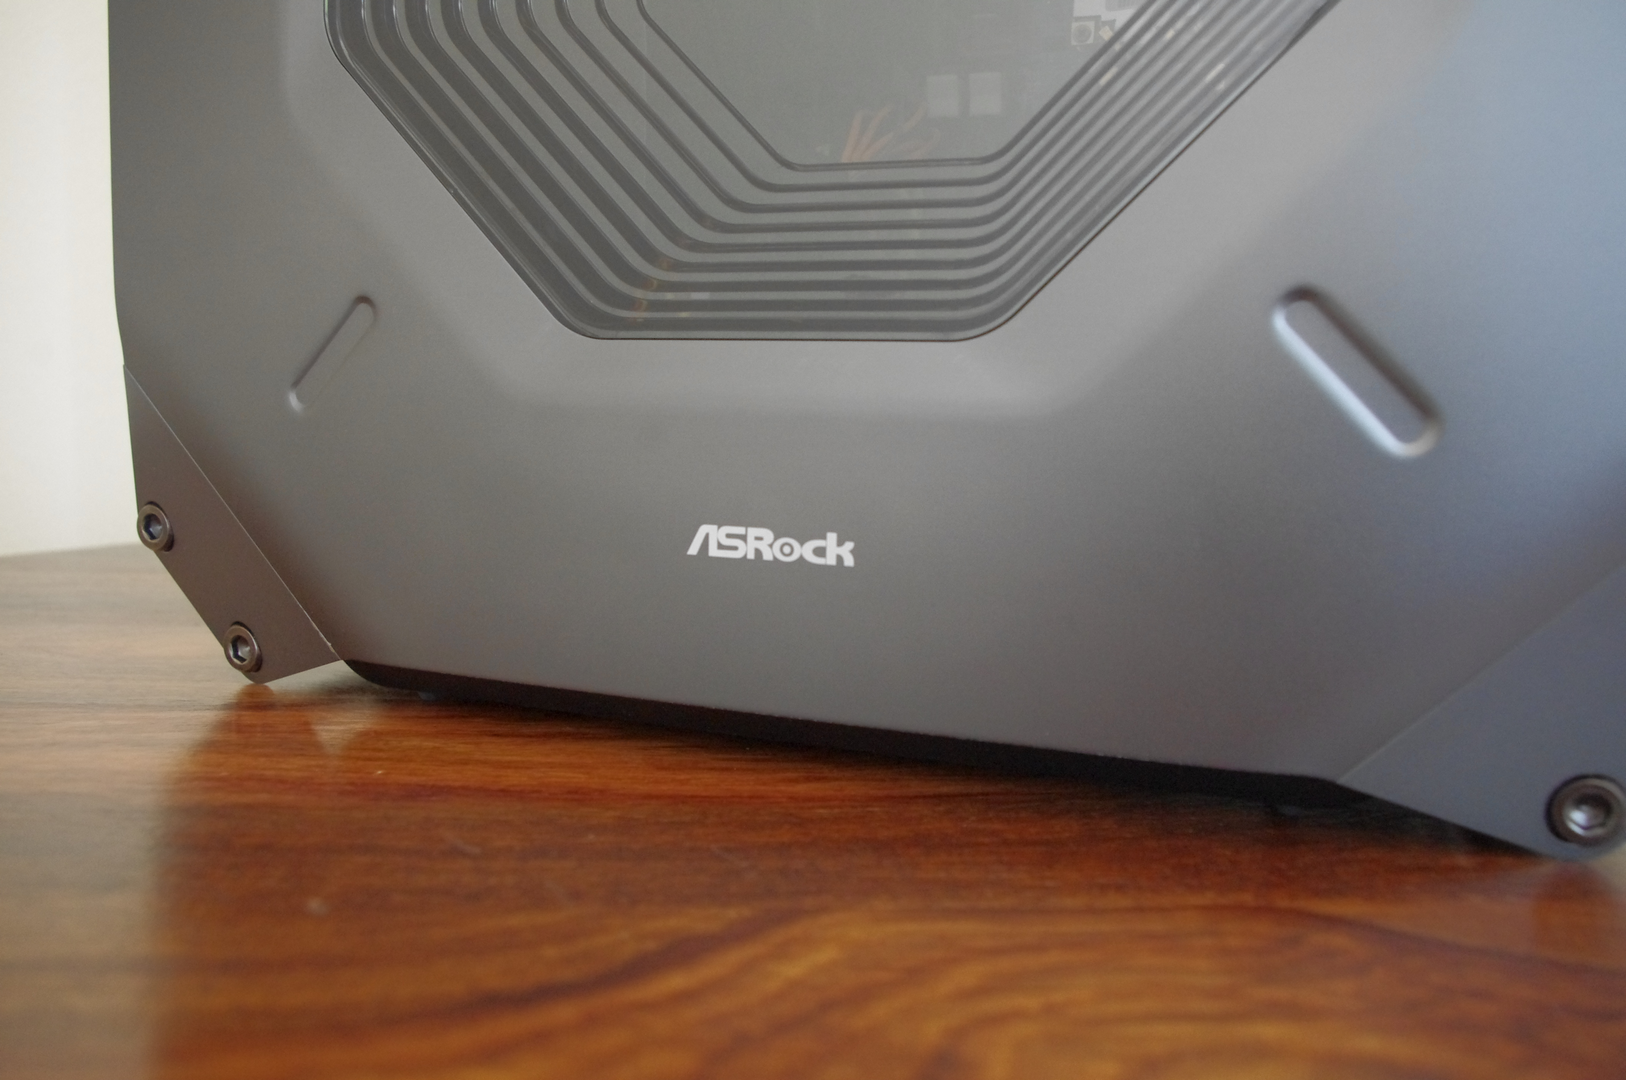
Just in case the logo on the handle was not enough, the side panels also feature the branding.
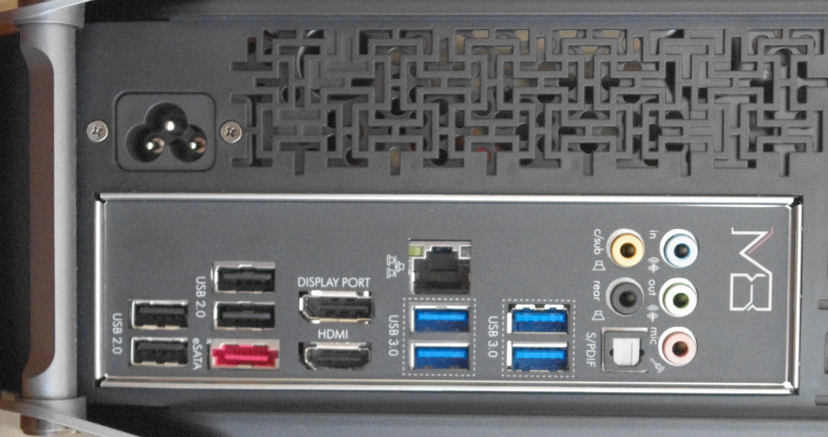
The rear IO is dictated by the motherboard of course, although next to it we see the 3-pin power cable used for the power supply. Rather frustratingly this is not the normal 3-pin ‘kettle lead’ (as I like to call them) we see with standard power supplies, meaning that users with multiple machines will have to take care and not misplace the one for the M8. In terms of connectivity for the M8 on the rear IO, we get a wealth of USB ports (four USB 2.0 and four USB 3.0) to compliment the four USB 3.0 on the front, and if users end up using the IGP there are HDMI and Displayport also. The Z87-M8 motherboard uses an Intel NIC for our Ethernet connection, and Creative Sound Core3D for the audio codec which supplies the audio jacks.
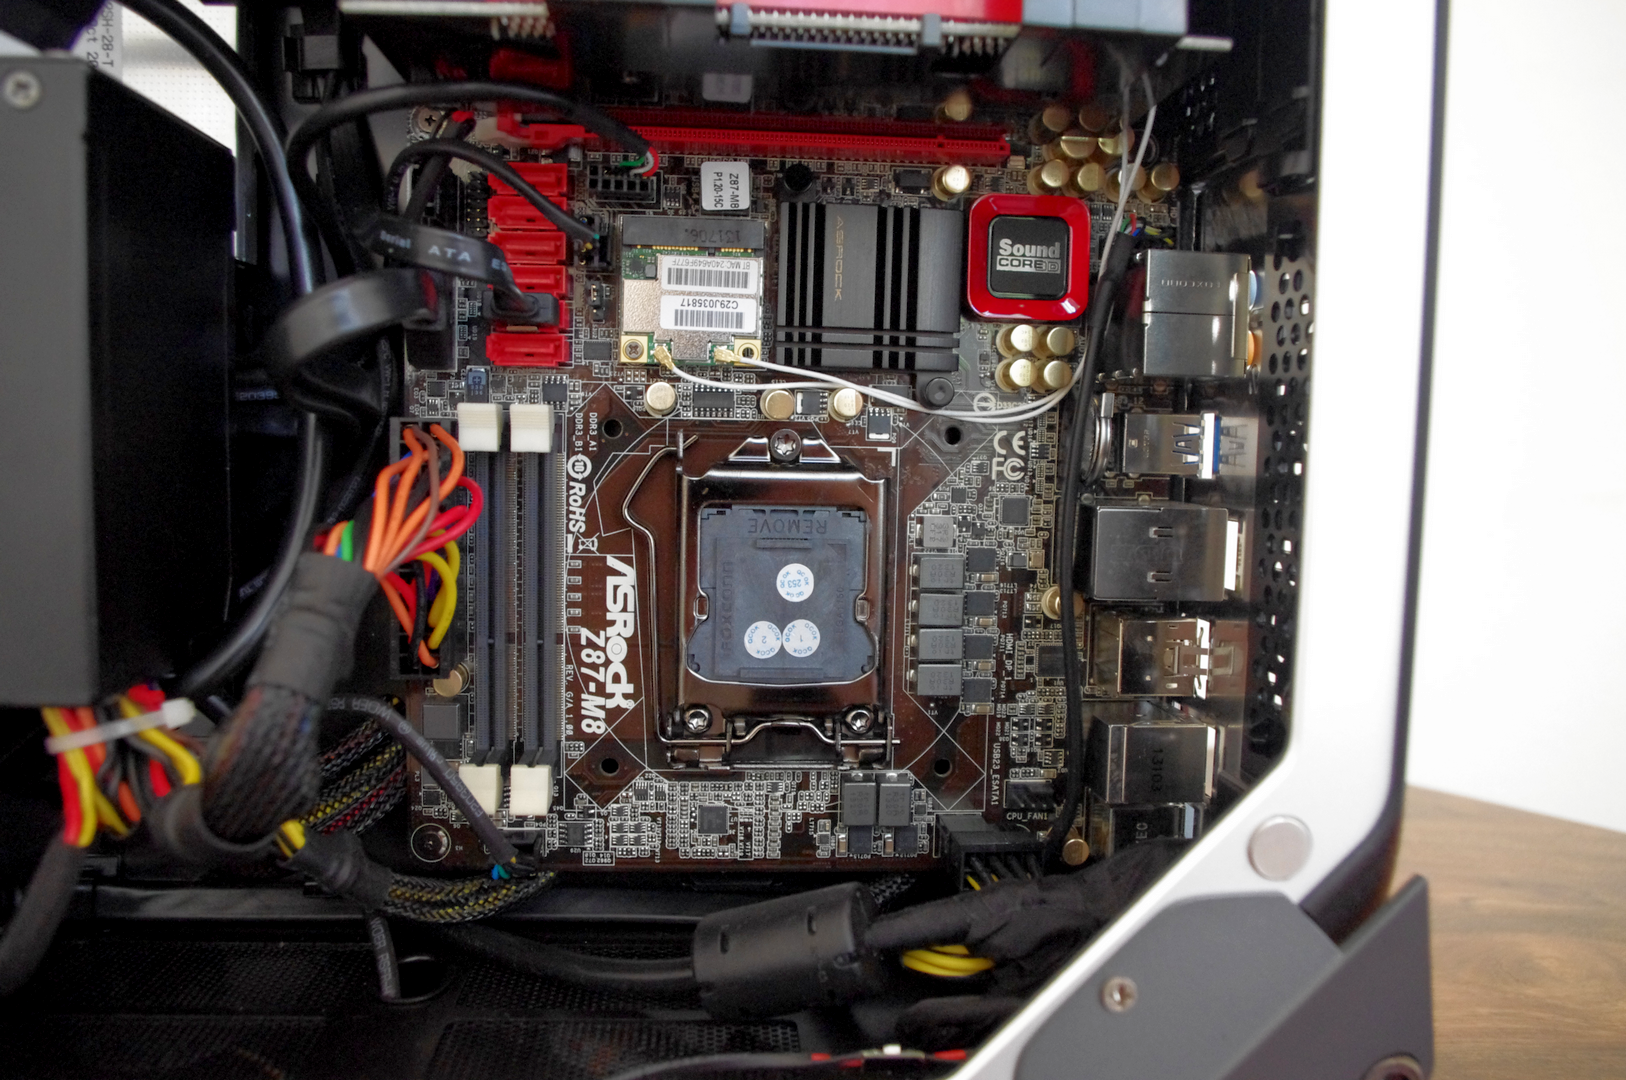
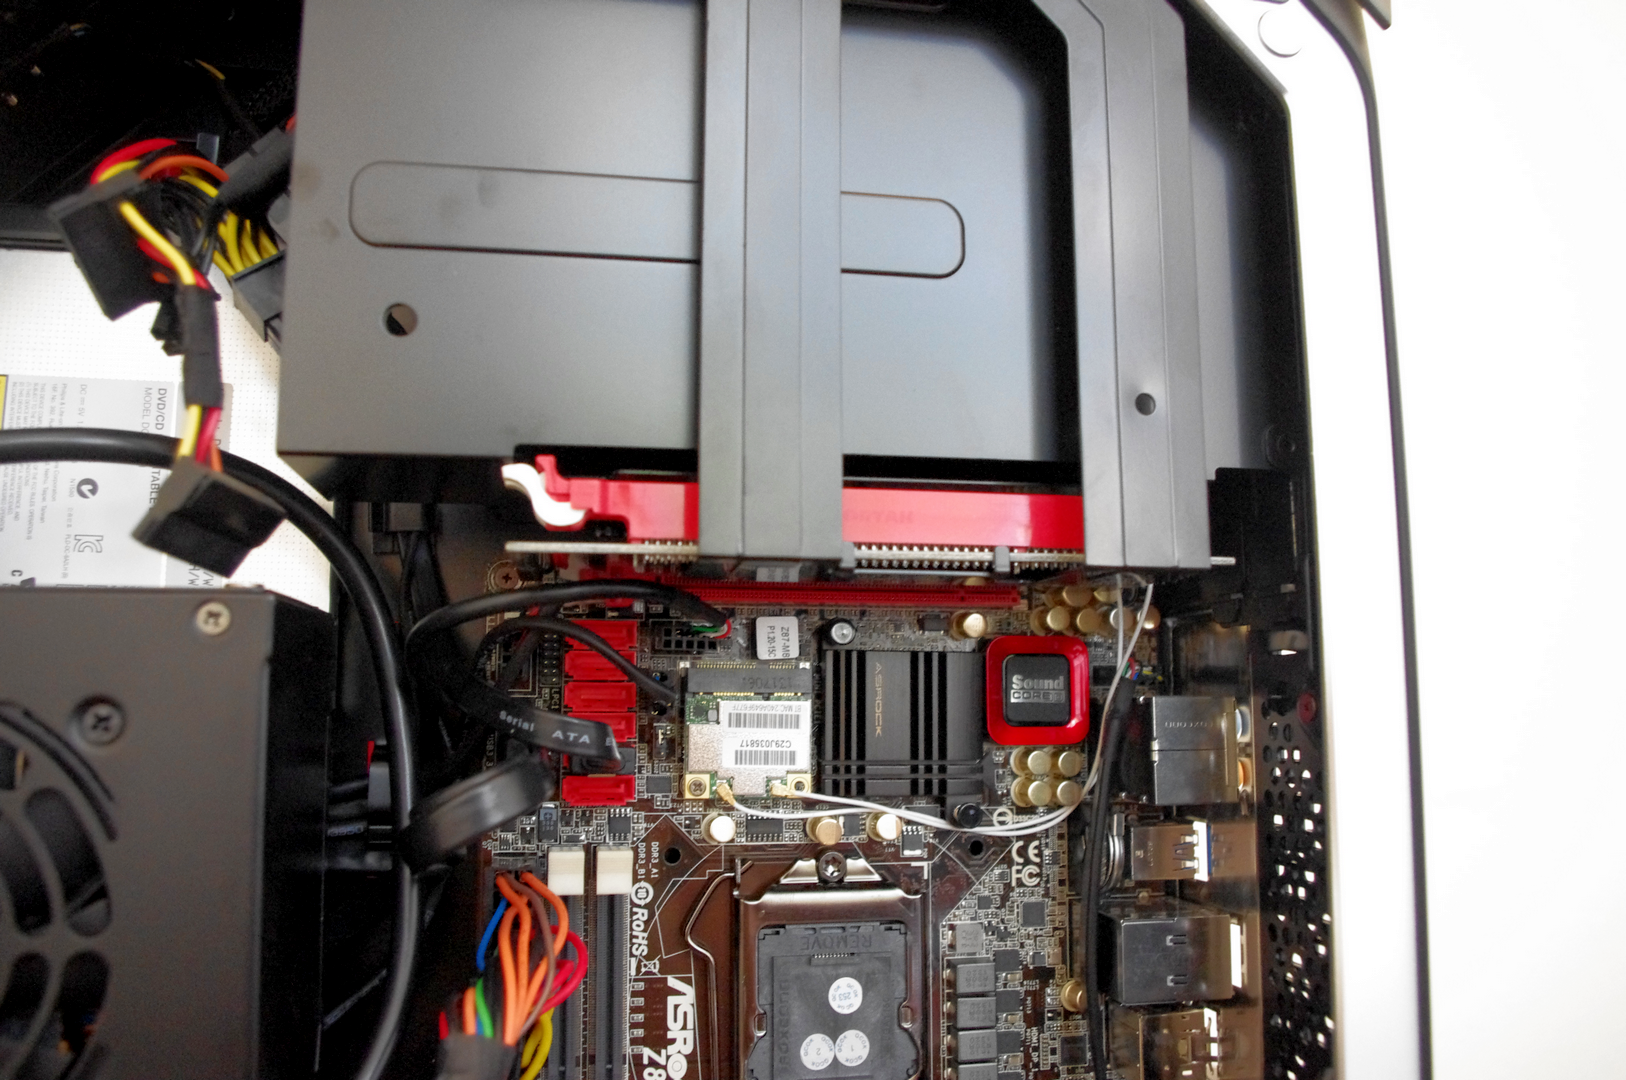
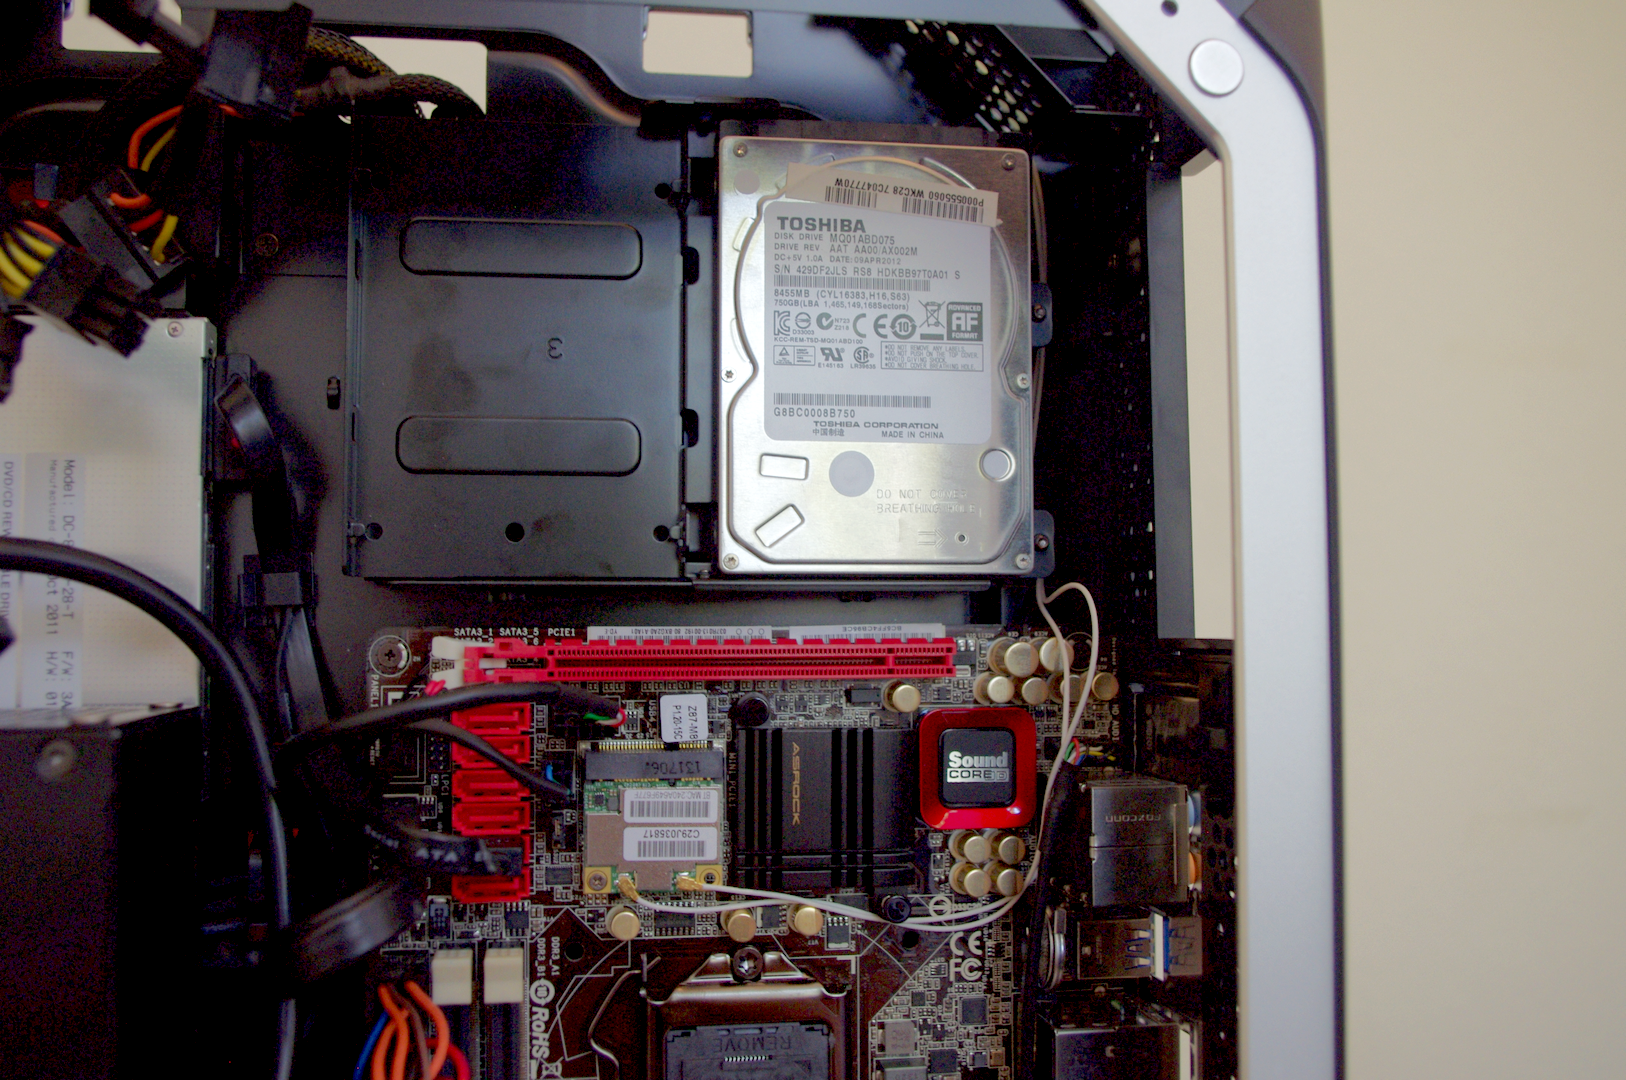
Inside the system we have the motherboard as shown. A couple of points might immediately jump out at you – the use of SO-DIMM memory, and the low number of power phases without a heatsink. On the first point, regarding SO-DIMM, this technically should allow more space on the motherboard for other components. Unfortunately the market for SO-DIMM is actually fairly regular and small, especially for a gaming build: very few memory kits go above 1600 C9 (such as 1866 C10 or 2133 C11), meaning there is potential to be limited, and also potential for memory to be more expensive – for example the G.Skill 1866 C10 2x8GB 1.35V kit we are using comes in at $160.
The second point is actually something I have discussed with ASRock, because it seemed odd. Few mini-ITX motherboards come with only a 4+2 PWM power phase design, especially ones oriented at gaming. 4+2 is plenty enough of even the high end Haswell chips, however if you want to factor in perhaps a little bit of overclocking then there is the potential to be struggling with longevity. The fact that there is not a heatsink on these phases also compounds the issue. ASRock have told me that these issues are dealt with two-fold: due to the fan placement (two fans in the base of the chassis pointing onto the VRMs, two fans at the top of the chassis blowing air out) and the size of the chassis, high end super overclocked builds are not the focus of the ASRock M8. Those are applicable answers, though it would get a more positive remark if it were perhaps 6+2 with a small heatsink.
Also on the motherboard we have the WiFi solution, which is an 802.11ac dual band 2T2R Broadcom chip. The antenna cables in the image show that the system is designed to use the chassis as the antenna – this has a couple of possible outcomes: incredible range, or lack of directional uptake. Unfortunately I found it was more of the latter, but on a $550 system I would expect 802.11ac to be the norm so it is good to see it implemented here.
The SATA 6 Gbps ports on the top left are pre-populated with the ODD, and as the chassis can support another four 2.5” SSDs or one 3.5” HDD, there should be no serious issues in terms of lack of SATA 6 Gbps ports. ASRock supply the system with six SATA cables, one of which can be used for the eSATA port on the rear IO.
Normally with motherboards I will discuss the fan headers, or inclusion/lack of power/reset buttons. Thankfully in this barebones case that is all taken care of – I cannot imagine a situation where a user would buy this barebones in order to use the motherboard in a separate build.
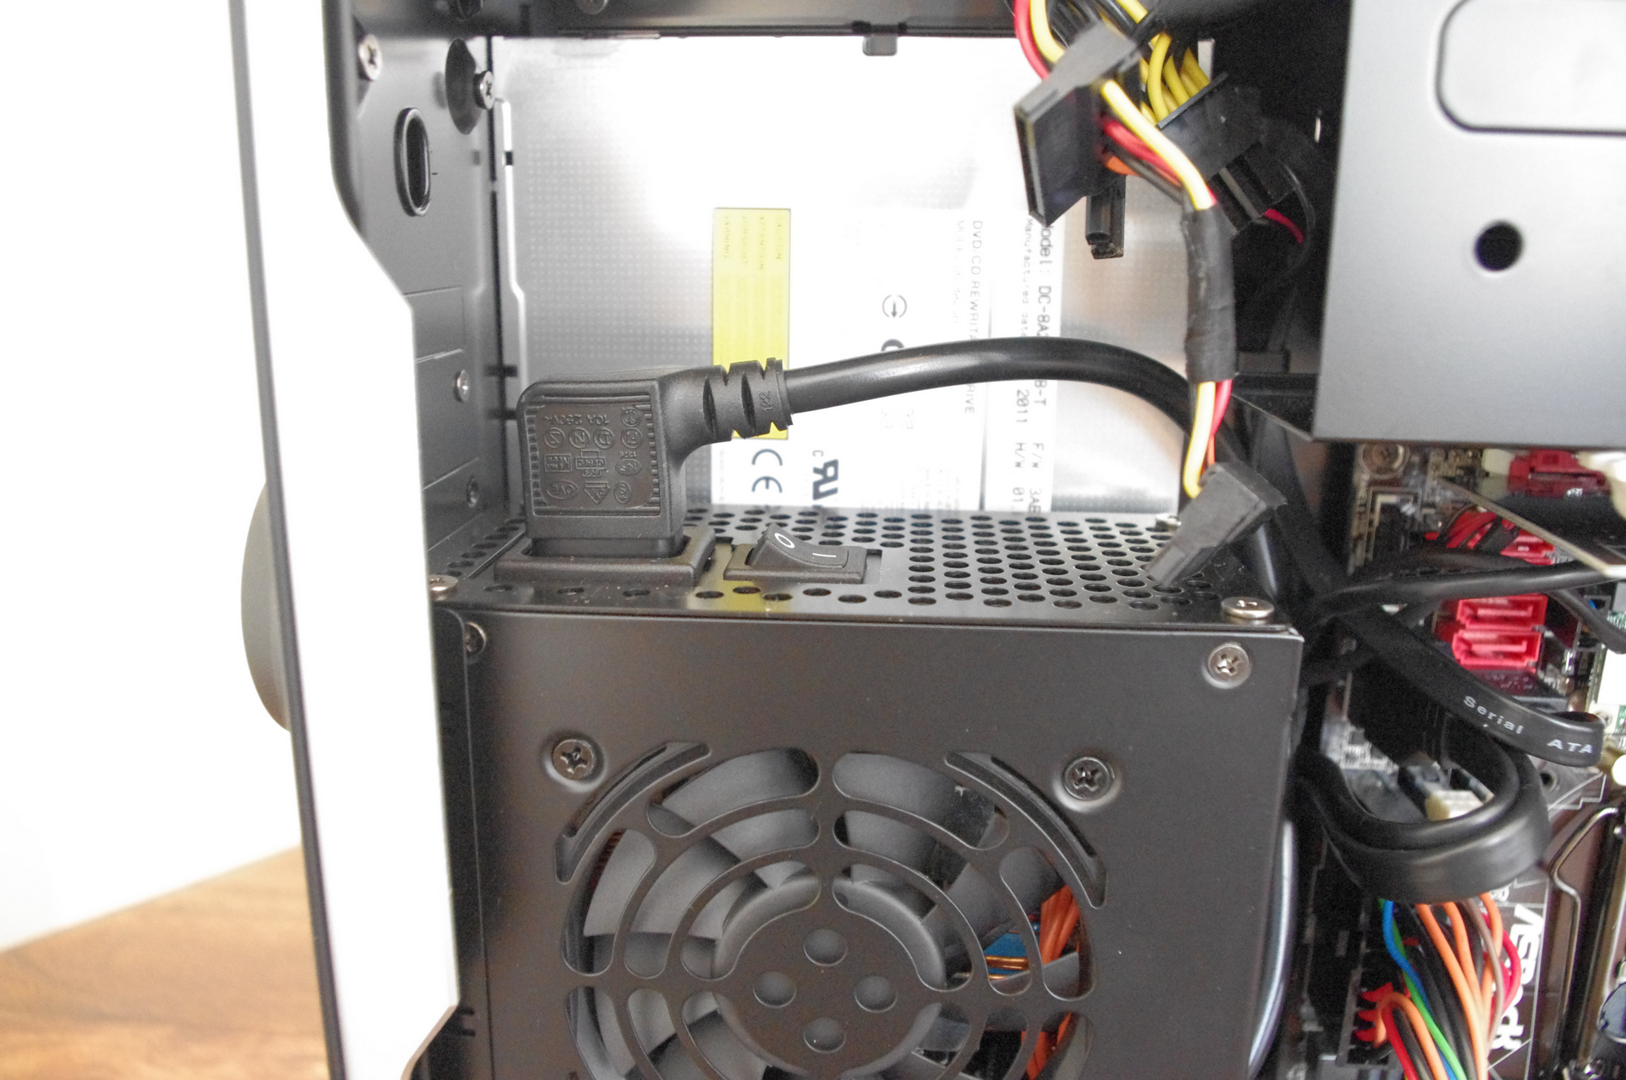
The ODD and power supply is situated towards the front of the case, which means that ASRock have routed the PSU power cable down the bottom of the case into the rear so users can plug it in. The power supply is a 450W bronze model that provides enough SATA ports for drives and two 6+2 pin GPU power connectors for the graphics card (ASRock recommends a 200W GPU at maximum due to thermal and power limitations of the case). The silver backed ODD looks slightly out of place here – I feel ASRock should have sourced ones in a black theme in order to complement the rest of the barebones.
One point I have not touched on are the side panels – these are not screw ins like other chassis, but held in place by magnets. These specifically are N48 Neodymium magnets (Nd2Fe14B, i.e. a permanent magnet made from an alloy of neodymium, iron and boron), designed to have a high resistance to demagnetization. Specifically N48 magnets are designed to interact at 1.38 Tesla (assuming I am reading the literature correctly), strong enough to need a small amount of force to pull apart (for comparison the Earth has a magnetic field strength of 0.05 Tesla), and are some of the more popular strong commercial grade magnets available. If these were on all my cases, life would be a lot easier.
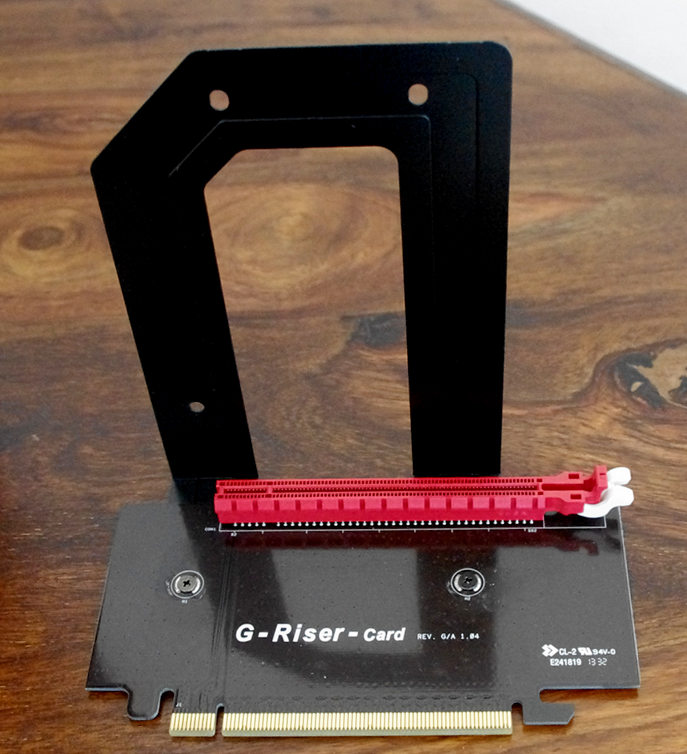
In order to slim up the ASRock M8 and still have a beefy power system, the only option for ASRock and BMW was to add in a PCIe riser, such as the one in the picture. This is merely a simple PCB designed to adjust where the PCI slot is:
The best way to remove this trinket is to go in through the top, which involves removing one of the handles and disconnecting the fan system on top.
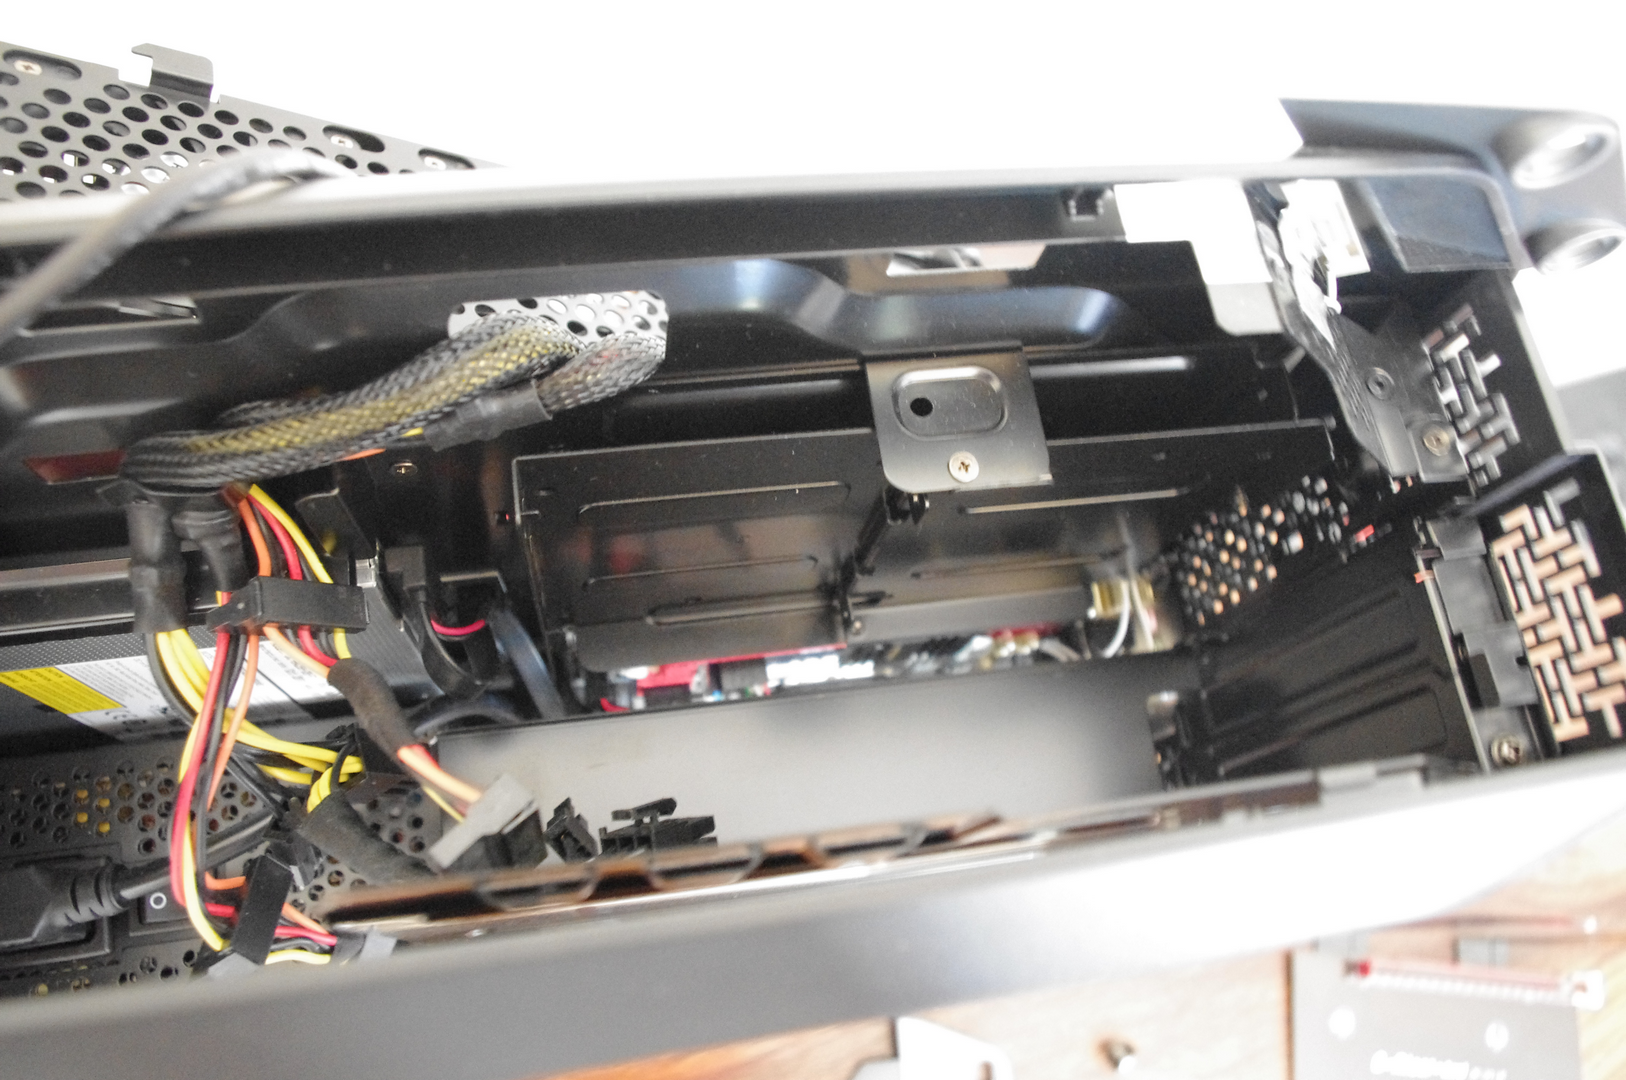
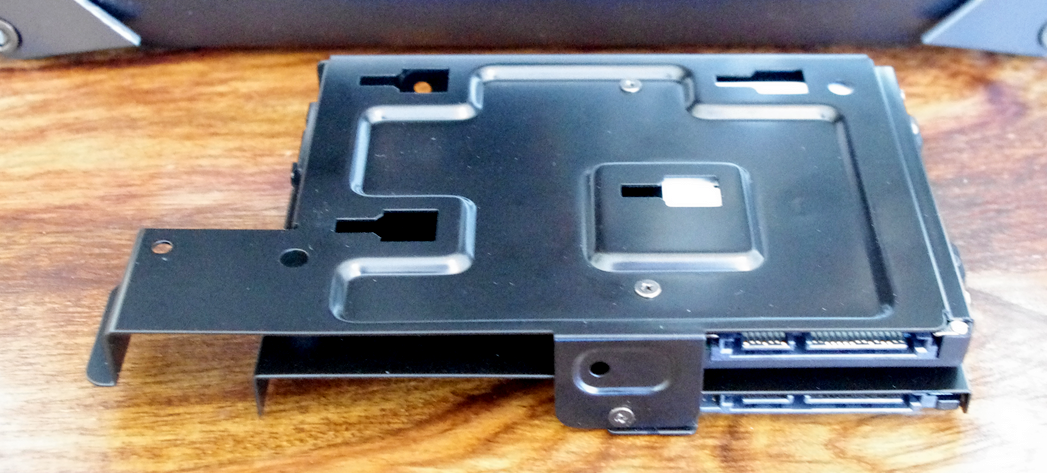
Here we have where the GPU will go, along with the SATA drives. Following the manual and removing several screws releases both the GPU bracket and the SATA drive holder. The system is designed to hold up to four 2.5” drives or one 3.5” drives – I placed the SSD and a mechanical 2.5” drive into the bracket:
This leaves space for two further drives to be added, although due to the nature of the case the GPU will have to be removed temporarily to add more.
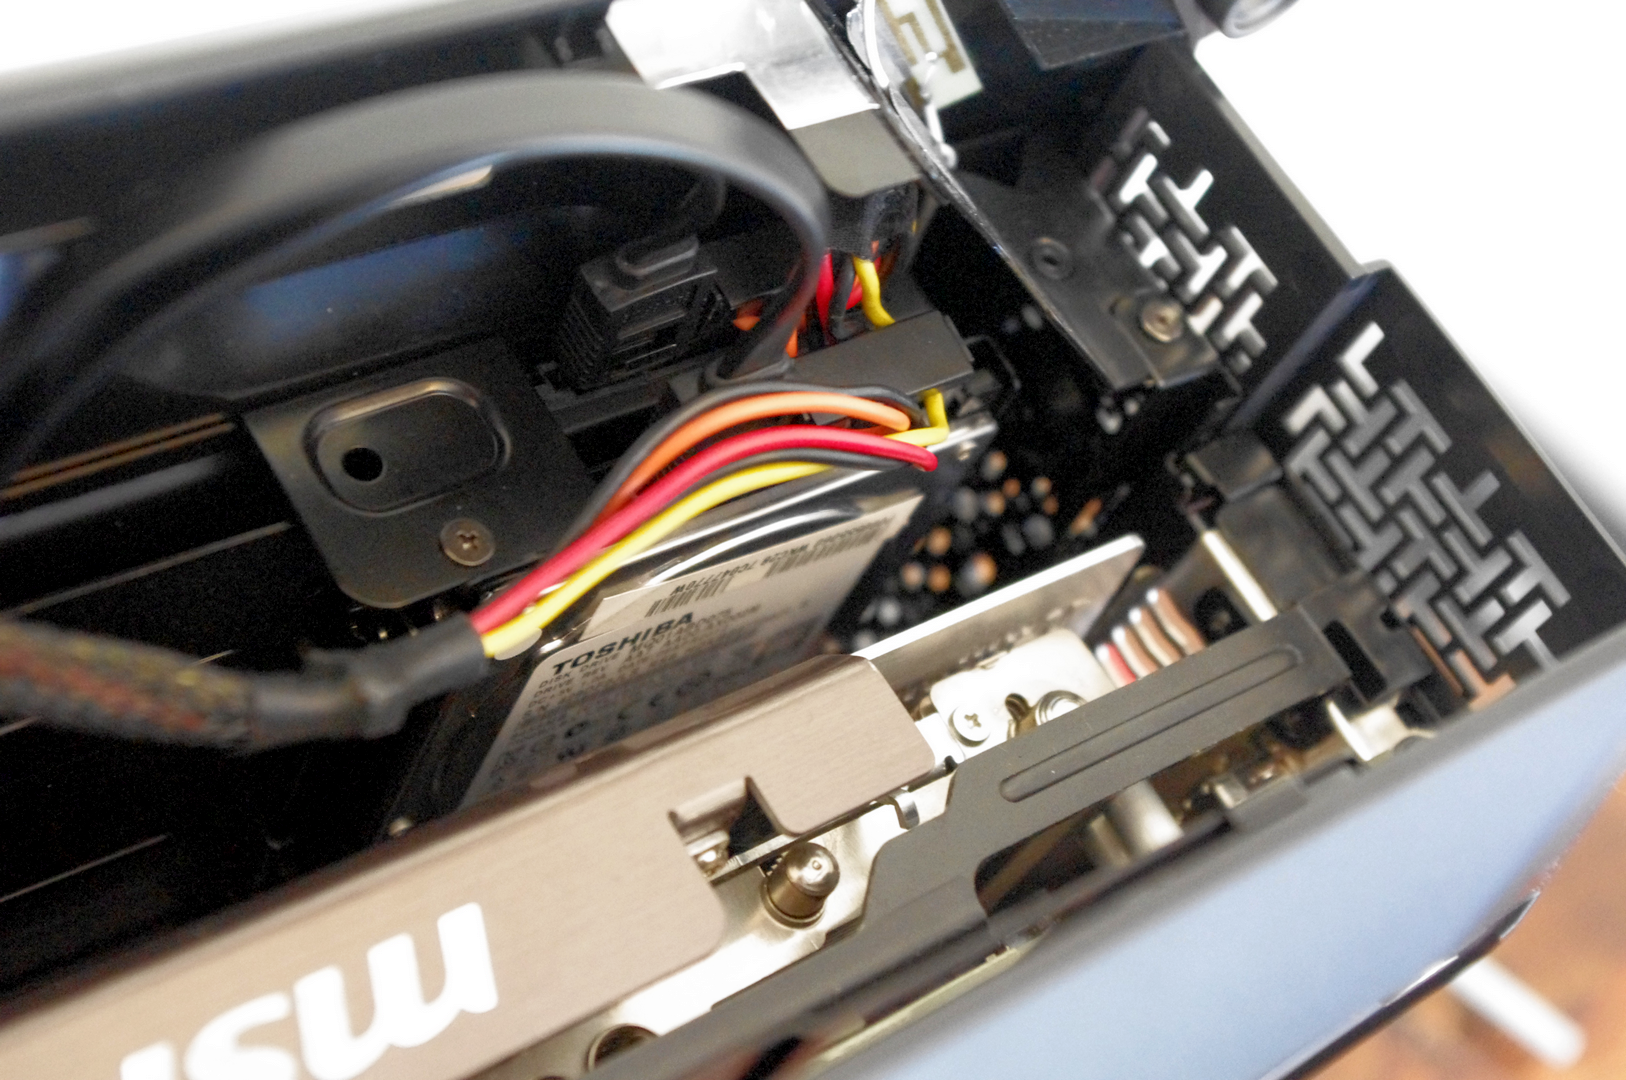
With the SSDs and the GPU fitted, there ends up being a number of cables along the top panel that could arguably start to block some airflow moving through the case, however there was still an amount of room to move the cables about, allowing for air flow optimization. The SATA power cables were a little stiff in my review sample, and it pays dividends to make sure the drive arrangement will not be affected by this.
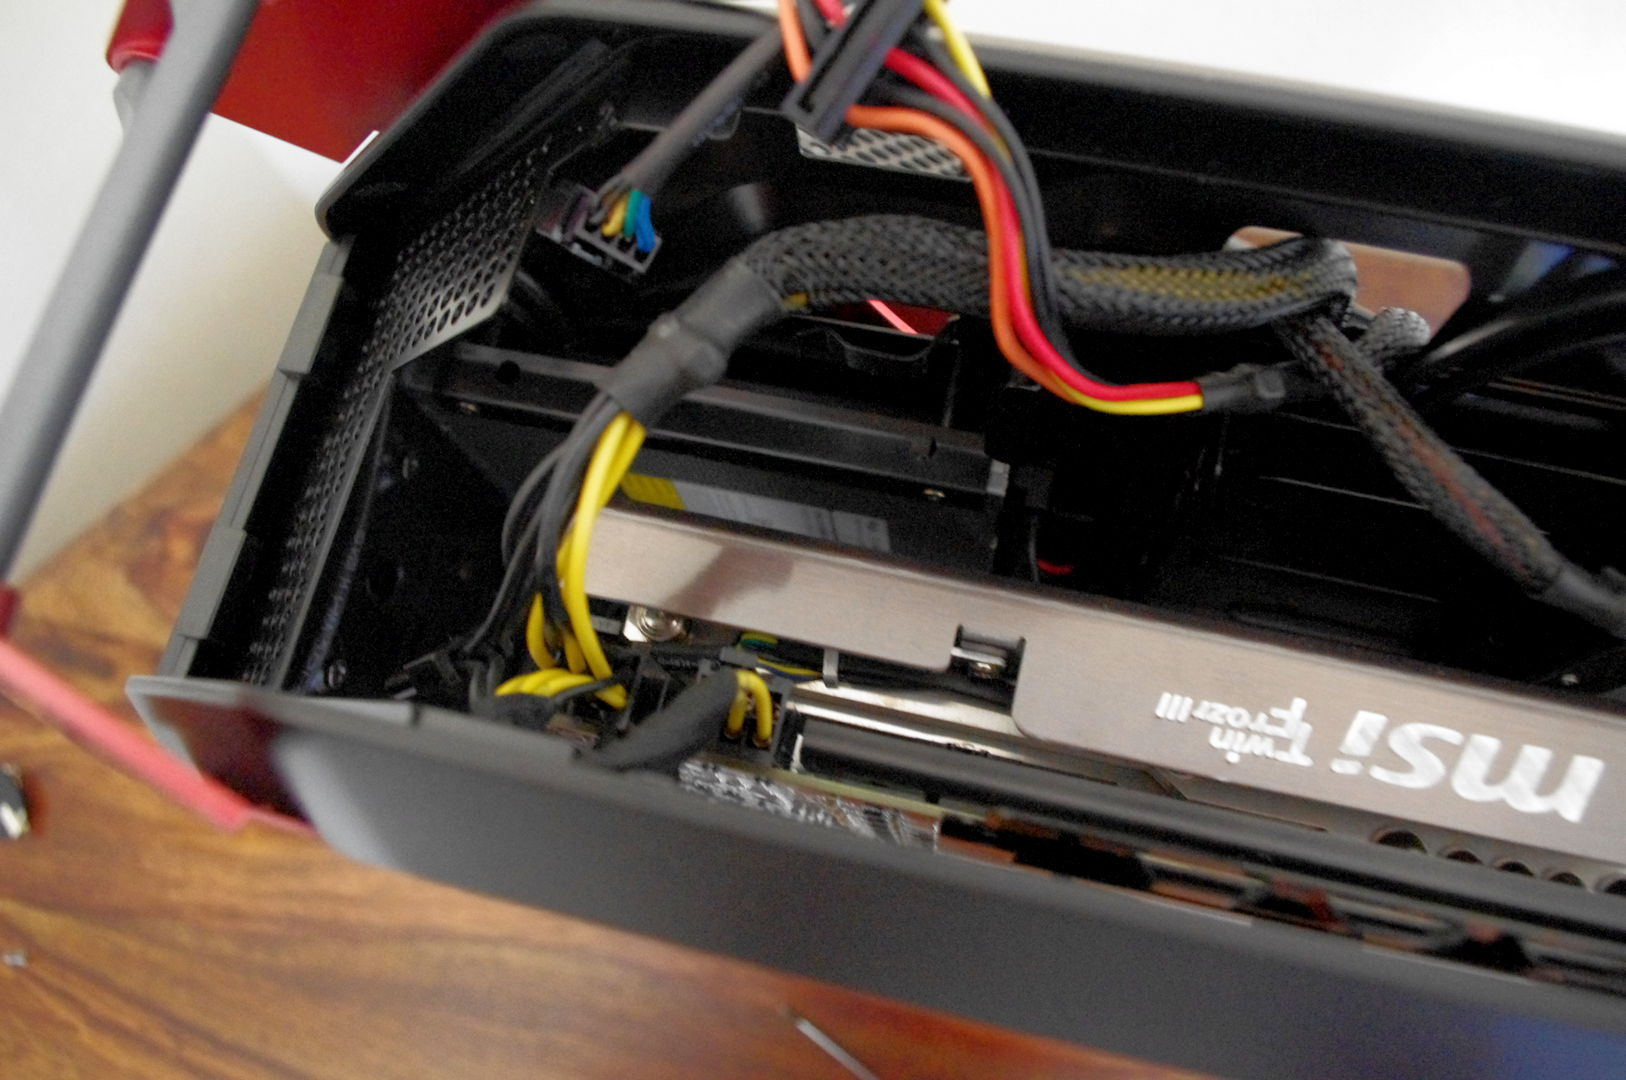
Looking down on the GPU fitted shows where the cables at the top come from – ASRock have routed them in through the rear of the case using a custom design:
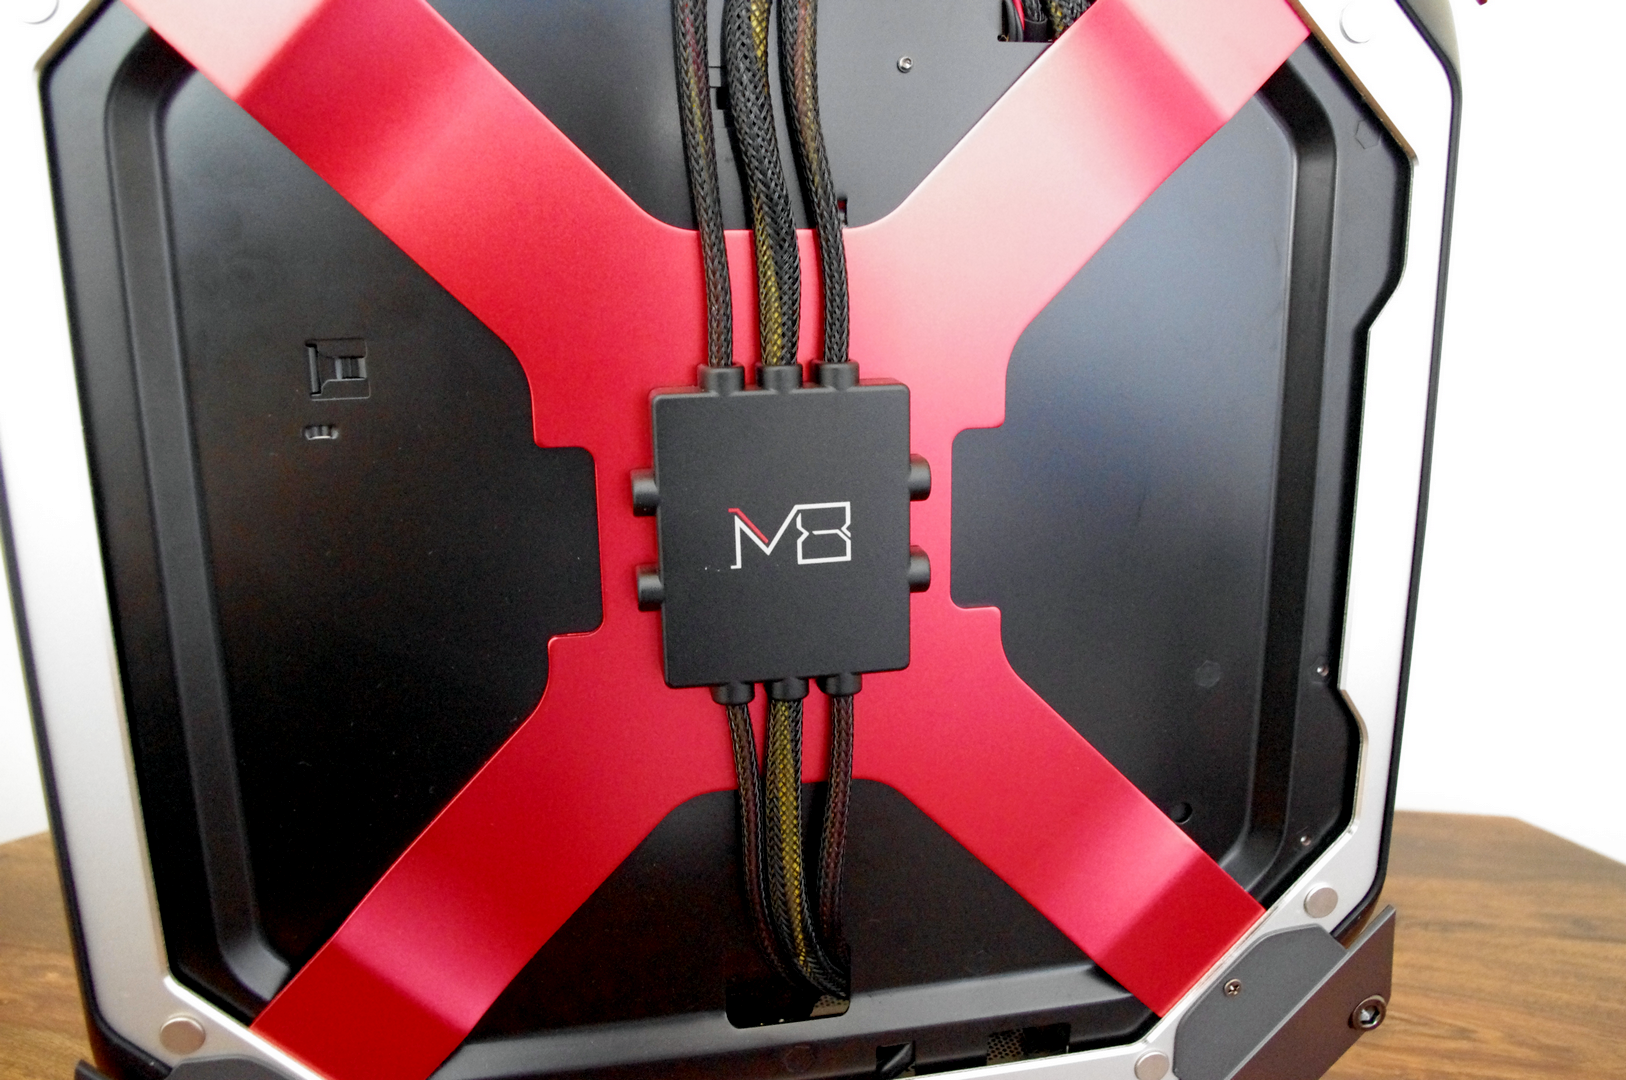
This image is with the rear panel removed – actually I would have preferred if this side lit up as well when the option to turn the lights on inside the case was enabled, but unfortunately the panel has to be taken off to see this clearly.
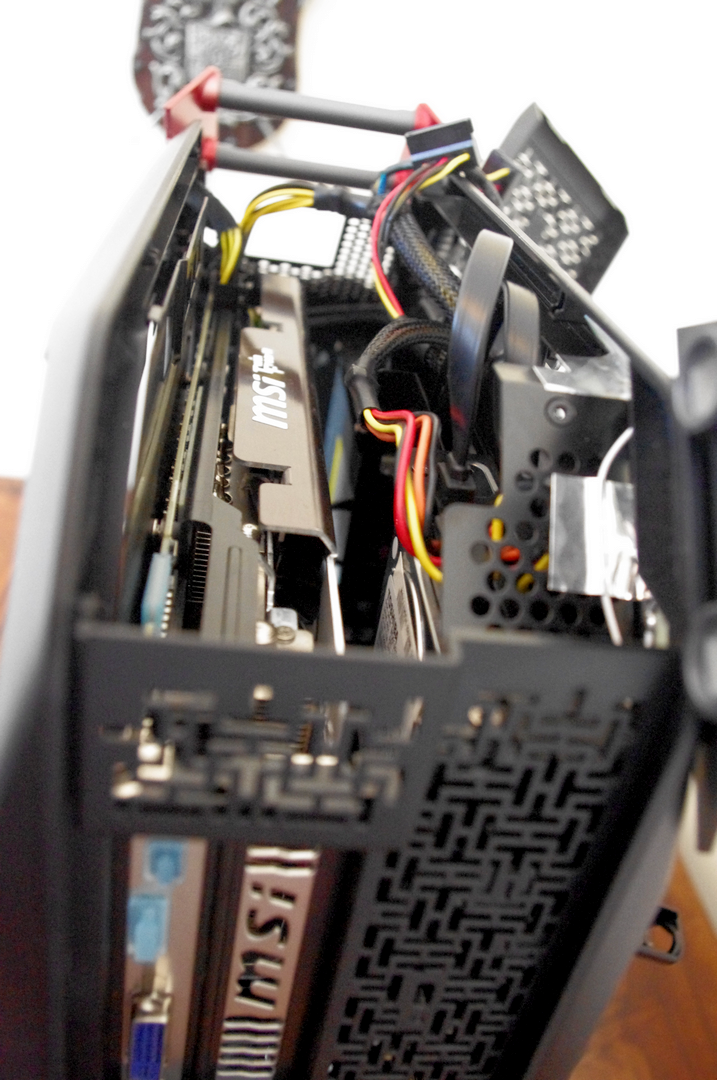
With the GPU and SSDs installed, here is what the system looks like before the top fan panel is reattached.
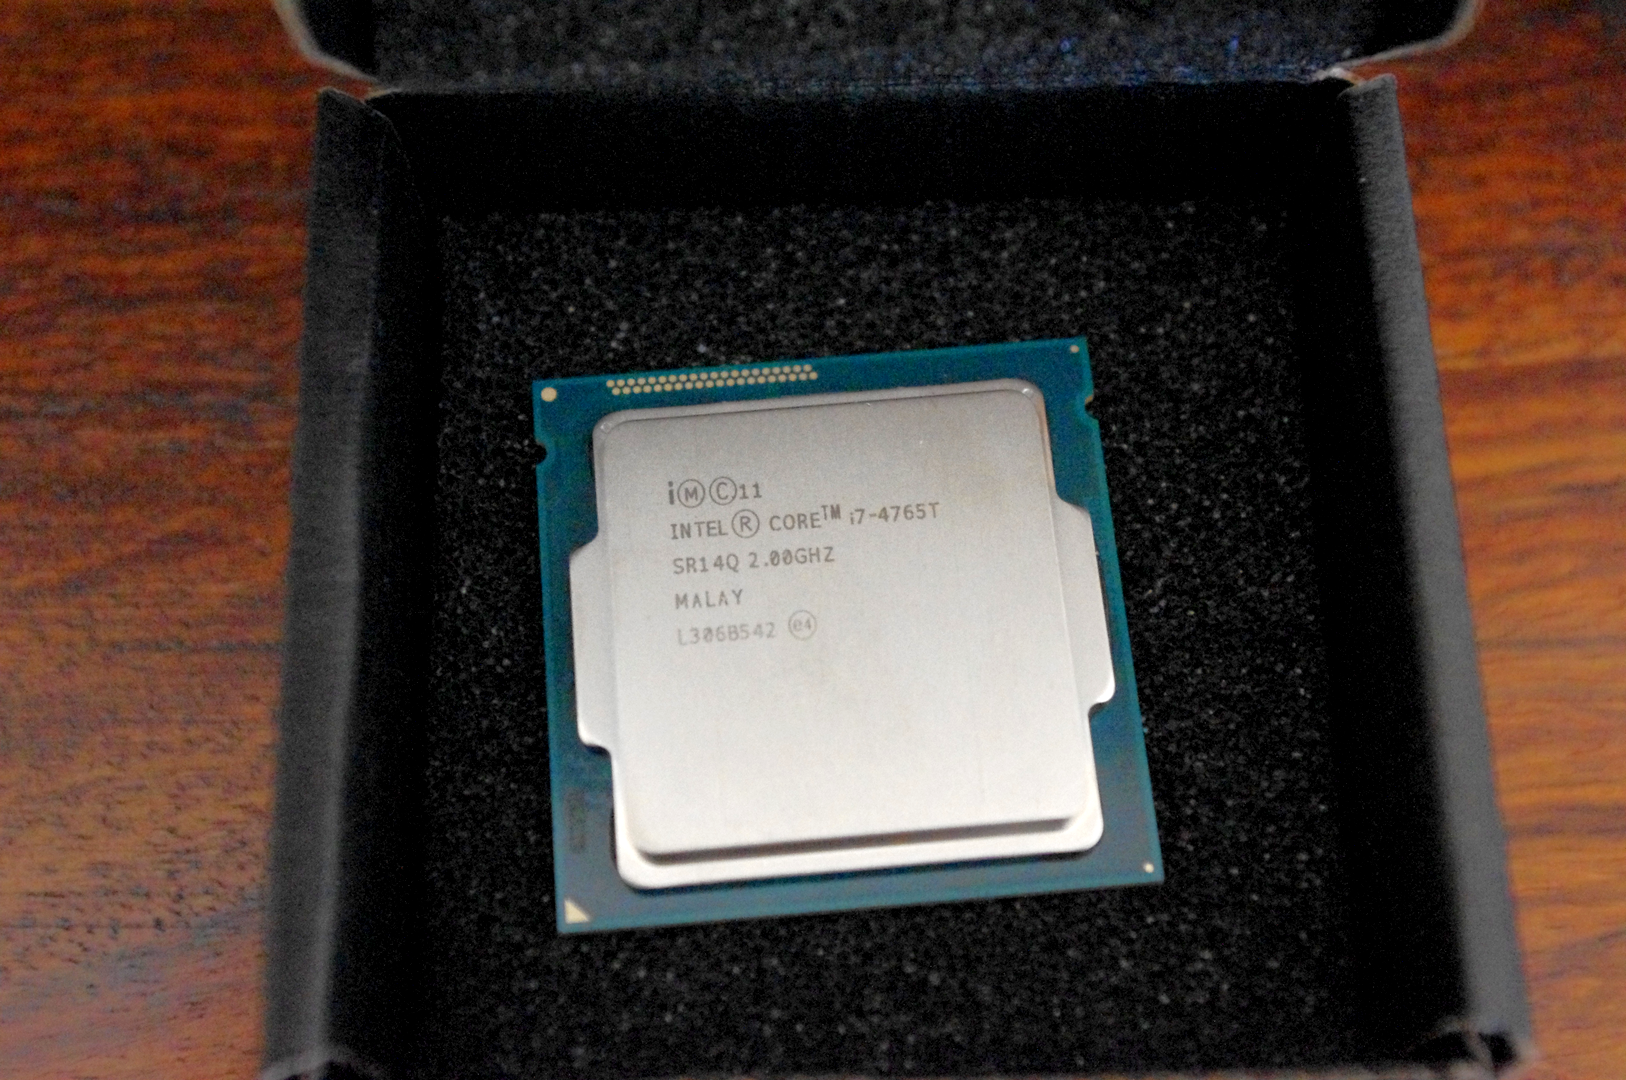
Intel was kind enough to source us one of their ultra-low powered CPUs for this build. I requested the Xeon E3-1230L V3, a CPU listed as a 25W part set at 1.8 GHz (2.8 GHz Turbo) which is a quad core with hyperthreading. Unfortunately my contact was not able to source this (perhaps due to its OEM status) and was able to send on the i7-4765T, a similar part (35W, 2.0 GHz turbo to 3.0 GHz, quad core with hyperthreading) which should be going on sale soon. Due to the power delivery of the system I was aiming for high performance and low power usage – you might be surprised to hear that the best binned CPUs are not the –K SKUs. Often they are the –T models or low powered Xeons, due to their low power draw.
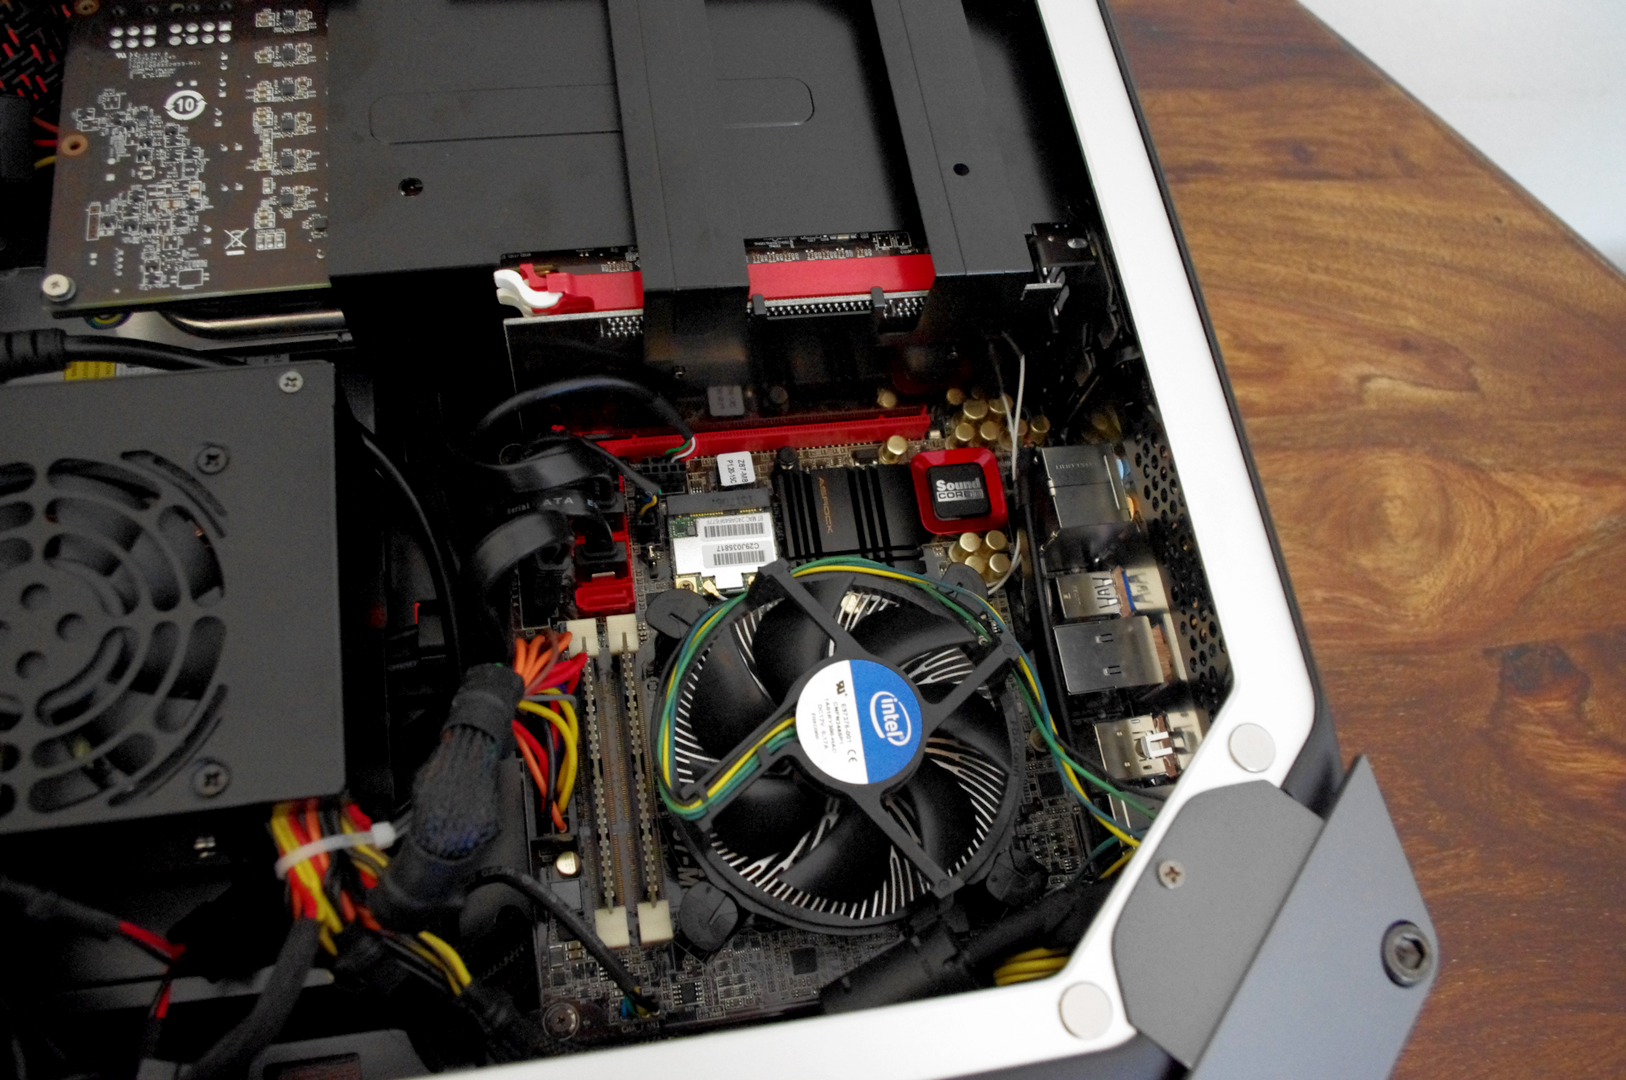
With all that said and done the only suitable cooler I own to fit in this case is the Intel stock cooler. Dealing with a 35W CPU should be a walk in the park for it, although there are some mini-ITX specific coolers that would be appropriate here. Due to the use of SO-DIMMs there should be no issues with tall memory either.
Overall, the system built is as follows:
| ASRock M8 Barebones Build | ||
| Component | Price | |
| Chassis | ASRock M8 | $550 |
| CPU | Intel i7-4765T 4C/8T 35W 2.0 GHz (3.0 GHz Turbo) | $400 |
| Motherboard | ASRock Z87-M8 | |
| Memory | G.Skill SO-DIMM DDR3-1866 C9 1.35V 2x8 GB Kit | $160 |
| GPU | MSI HD7950 Twin Frozr II | $320 |
| Power Supply | ASRock M8 450W Bronze made by FSP | |
| SSD | OCZ Vertex 3 480GB | $485 |
| Storage | Toshiba 750GB 2.5" HDD | $67 |
| ODD | ASRock M8 | |
|
|
||
| Total | $1982 | |
Clearly there is extra expense in terms of the SSD and CPU than perhaps is normal – a dirt cheap build in this case could come in as low as $750-$800 (low end Haswell CPU, integrated GPU, 8GB 1600 C9 memory, small HDD), depending on what components are used.


Because the motherboard comes part of the set for the barebones, there is scope for analysis of the BIOS and included software in the build. It is perhaps unsurprising that ASRock does not venture far from the normal Z87 package here, although there was scope for custom designs in the software and BIOS to make the experience of the M8 that more unique. On the one hand there would be consistency for users of other ASRock Z87 products, and on the other the BMW linkup could have been pushed a bit more.
ASRock Z87-M8 BIOS
Typically a motherboard from ASRock comes with BIOS 1.20, or a 1.13B beta version, and when I go to update it for a review, 1.30 or 1.40 might be available. I would normally suggest that users update their BIOSes on a fresh build when starting (as long as you are comfortable with the procedure), due to bug fixes or compatibility improvements.
Aesthetically speaking, ASRock have one of the better BIOSes on the market. A fair number of users (and reviewers) berated the starry background that in some versions twinkle and others actually causes a noise, but the BIOS uses a nice font and a deep contrast between background and text that makes it easy to navigate. The icons are suitably high definition as well; there are still a number of BIOSes on the market that feel and look blocky.
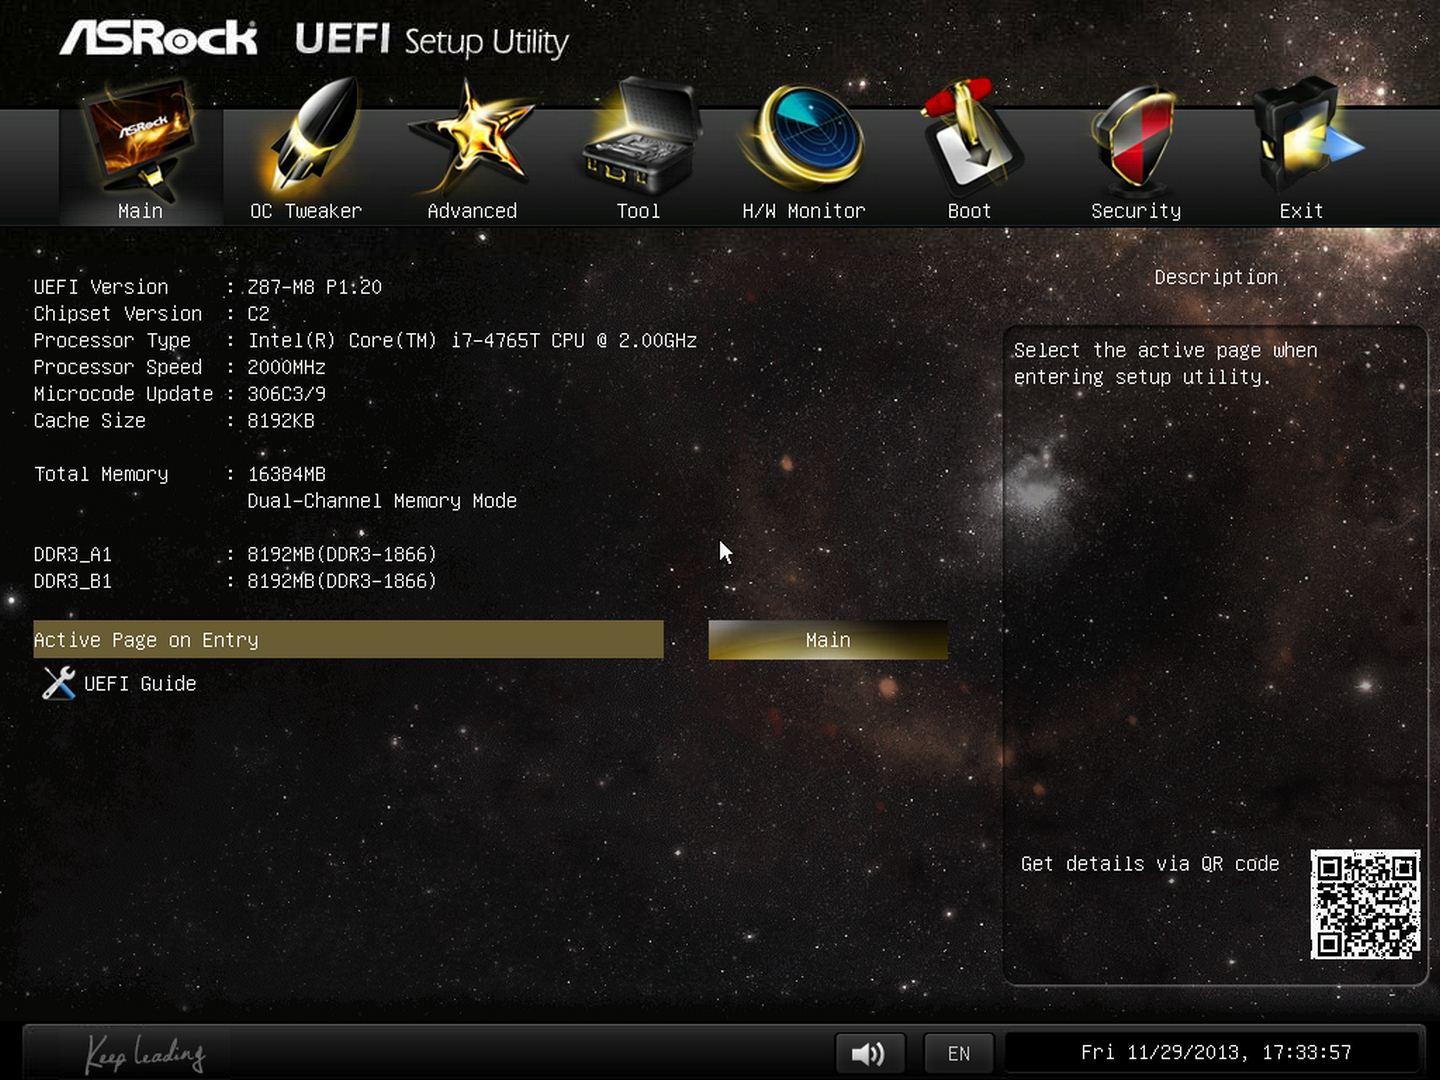
The first page of the BIOS lists several important numbers of the motherboard – the name, the BIOS revision, the CPU installed, the memory installed, and all associated speeds. This should be the staple entry screen in any BIOS, but ASRock are missing CPU temperatures, voltages and fan speeds. Ideally I would like the motherboard name, CPU name and CPU temperature persistent across each BIOS menu, perhaps on the bottom bar where there is space in the ASRock BIOS.
ASRock offers an option on this page to select the default page of entry, which for overclockers or users adjusting fan controls may help. There is also a UEFI Guide which runs a slow slideshow of all the BIOS features.
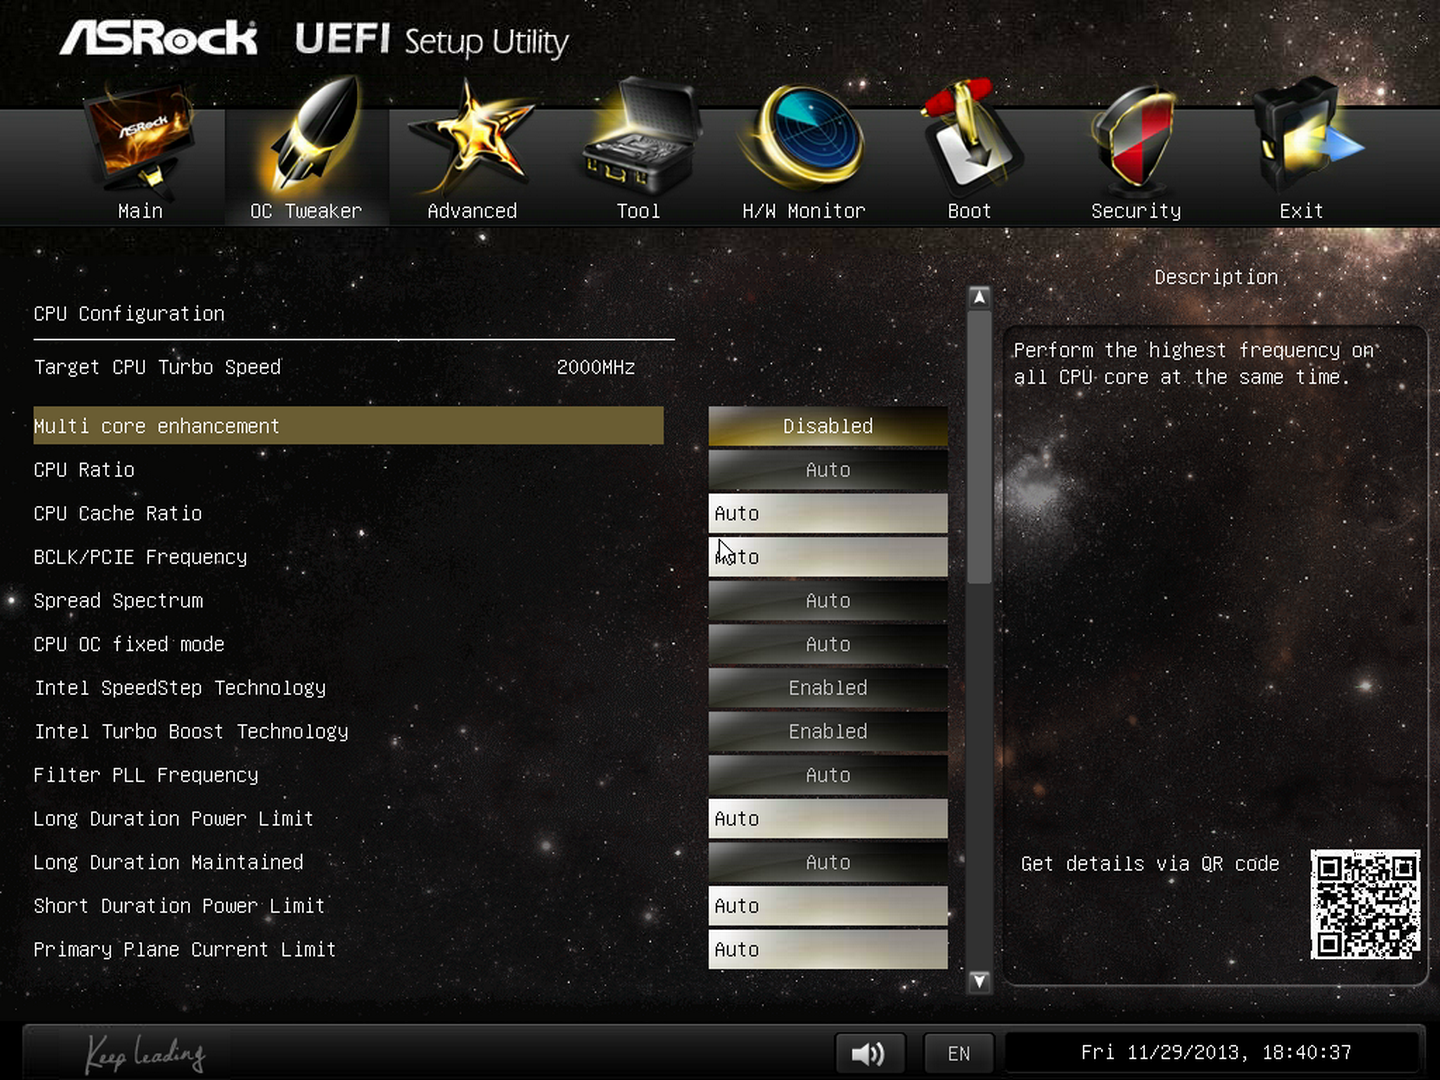
The OC Tweaker tab provides users with overclock options, with enough to keep most enthusiasts happy. The M8 has the MultiCore Enhancement option set to disabled by default, so any user who wants extra multi-threaded performance without overclocking in any serious fashion can enable this.
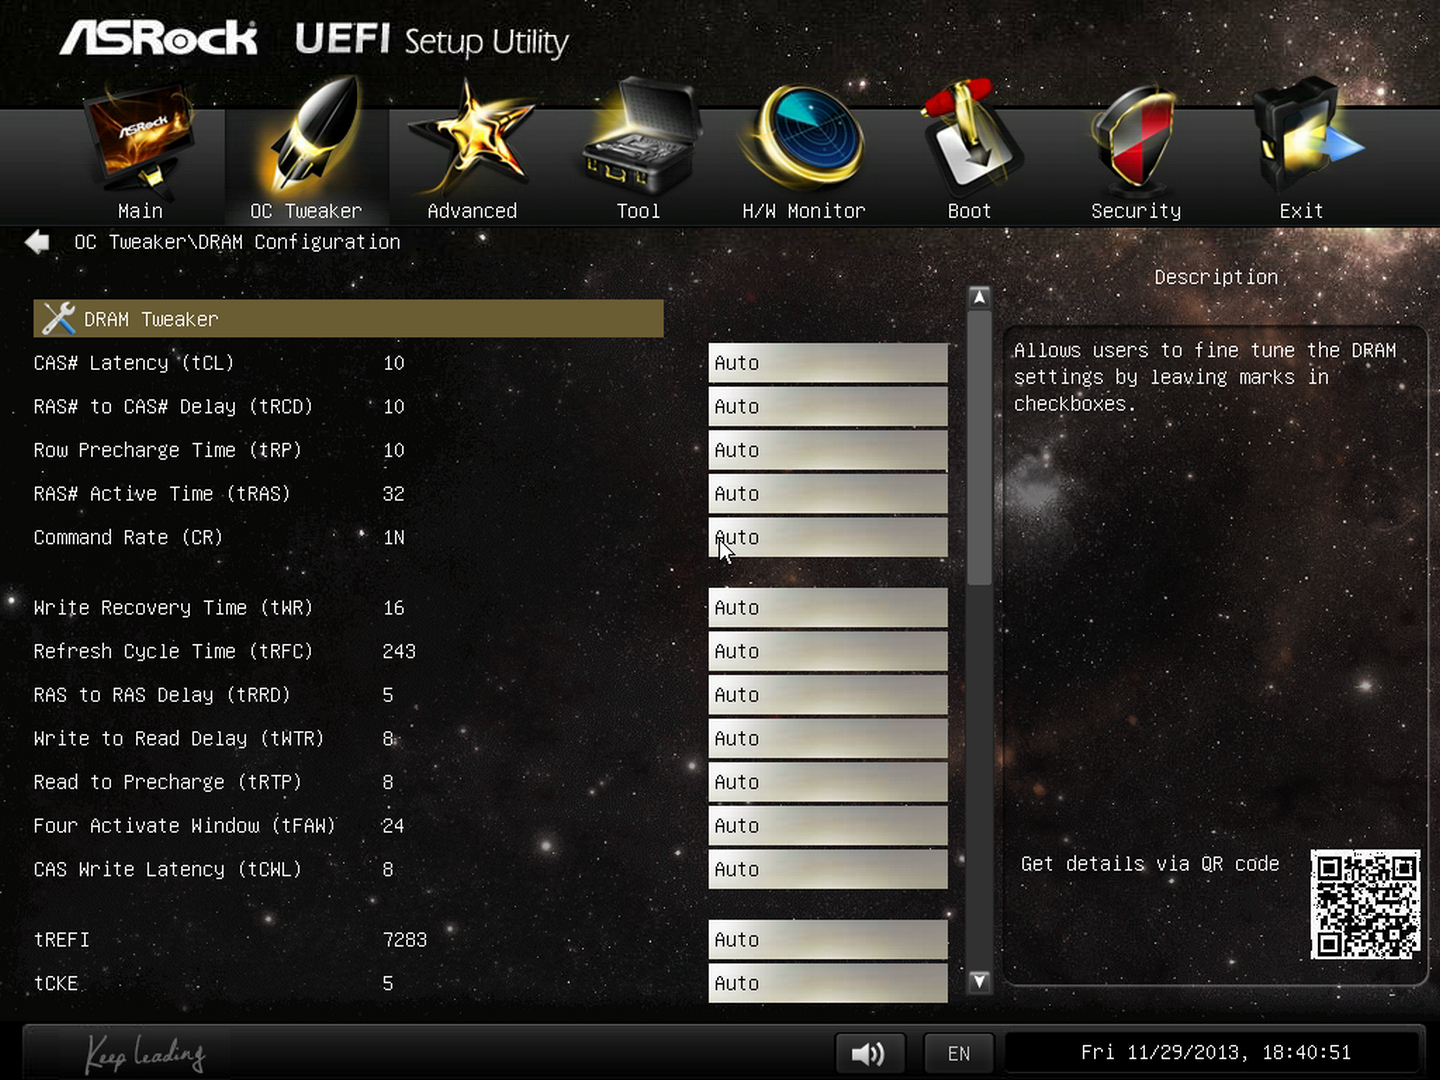
The OC Tweaker gives control of the CPU voltages, load lines, cache voltages, multipliers, and control of the FIVR (Fully Integrated Voltage Regulator). In the DRAM settings users can control all the major options as well as fine tuning options in the DRAM tweaker:
Aside from the usual CPU and controller configuration pages in the ‘Advanced’ tab, ASRock likes to put a lot of their extra features into the ‘Tool’ tab:
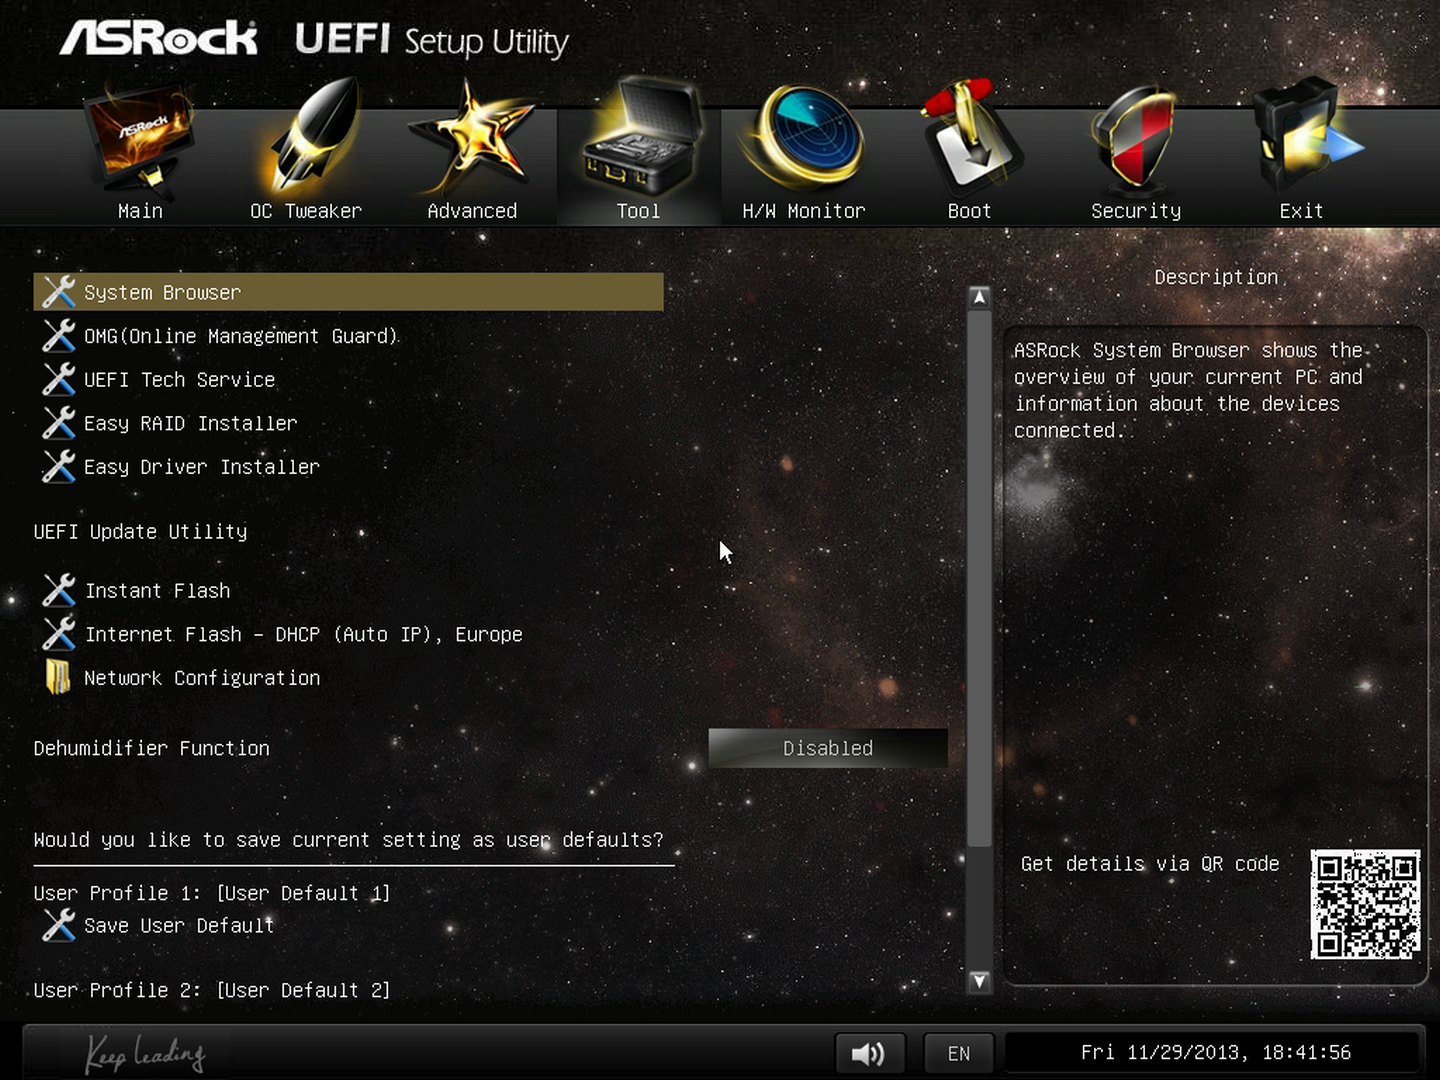
One feature I like especially is the System Browser that shows an image of the motherboard as well as all the detected components. This is useful for when one stick of memory is not being detected or issues with USB/SATA devices:

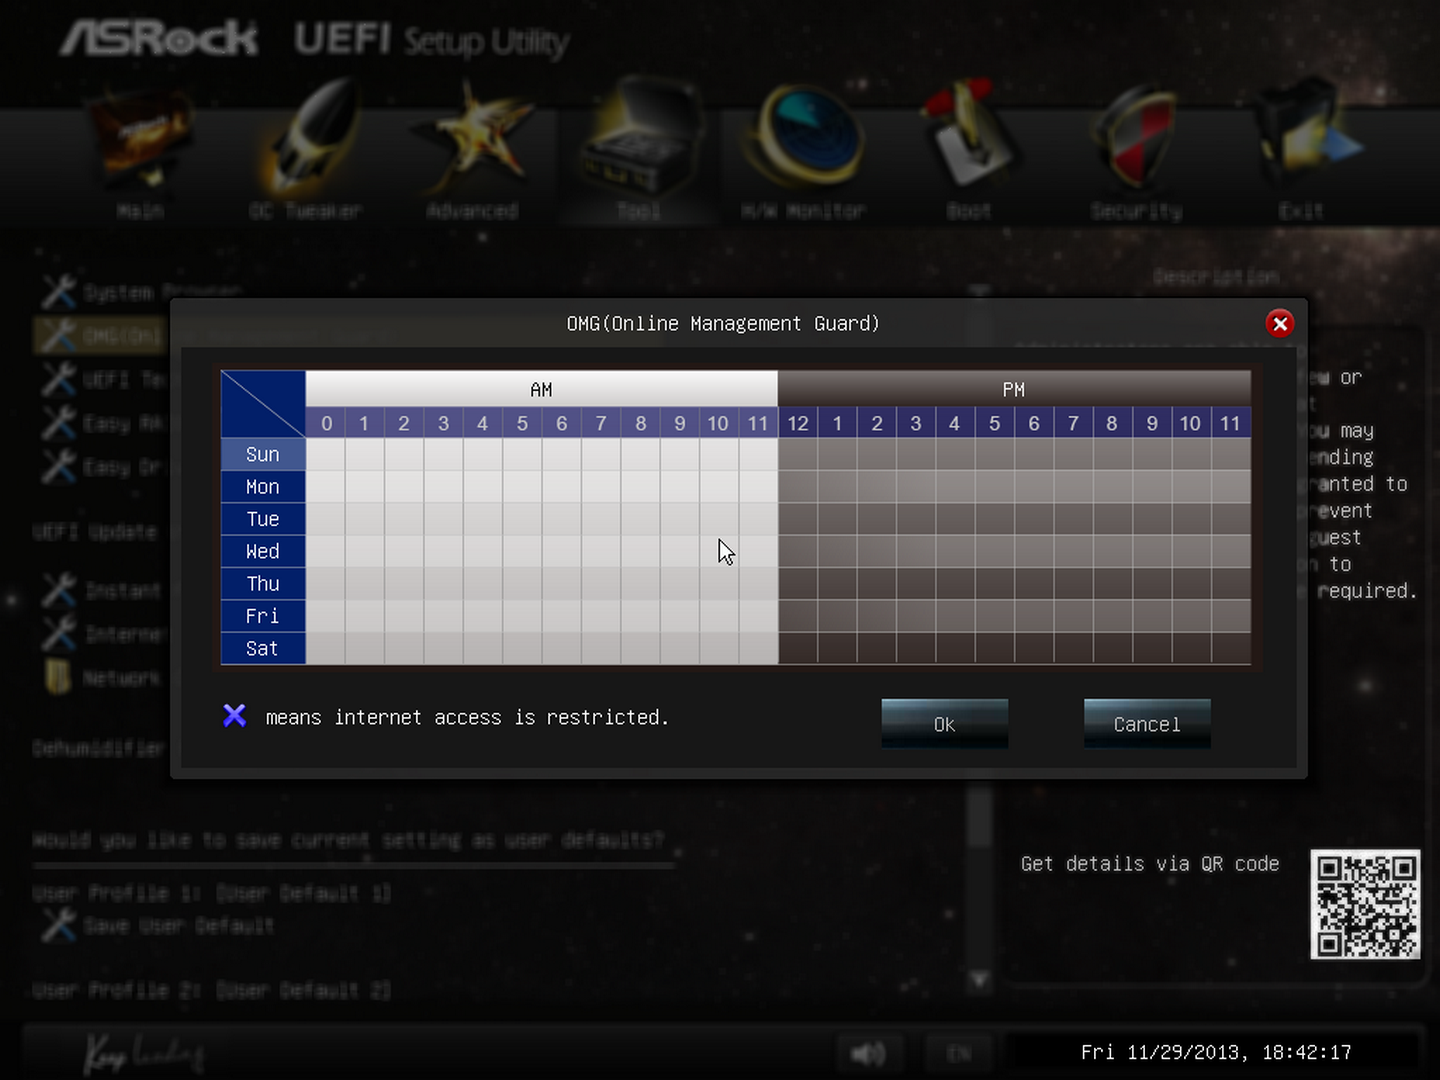
Perhaps a small oddity in ASRock BIOSes is the OMG option, standing for ‘Online Management Guard’. This is an hour-by-hour selection of when to disable the network ports, designed for users with small children. However the options can be bypassed by loading up the BIOS and adjusting, or forcing a Clear_CMOS.
Something new for Z87 was the UEFI Tech Service option in the BIOS. Users with an Ethernet network connection can send error reports direct to ASRock from within the BIOS (or using the included software). I would assume that this also takes a snapshot of BIOS information such that ASRock can find certain issues that may not be obvious to the user.

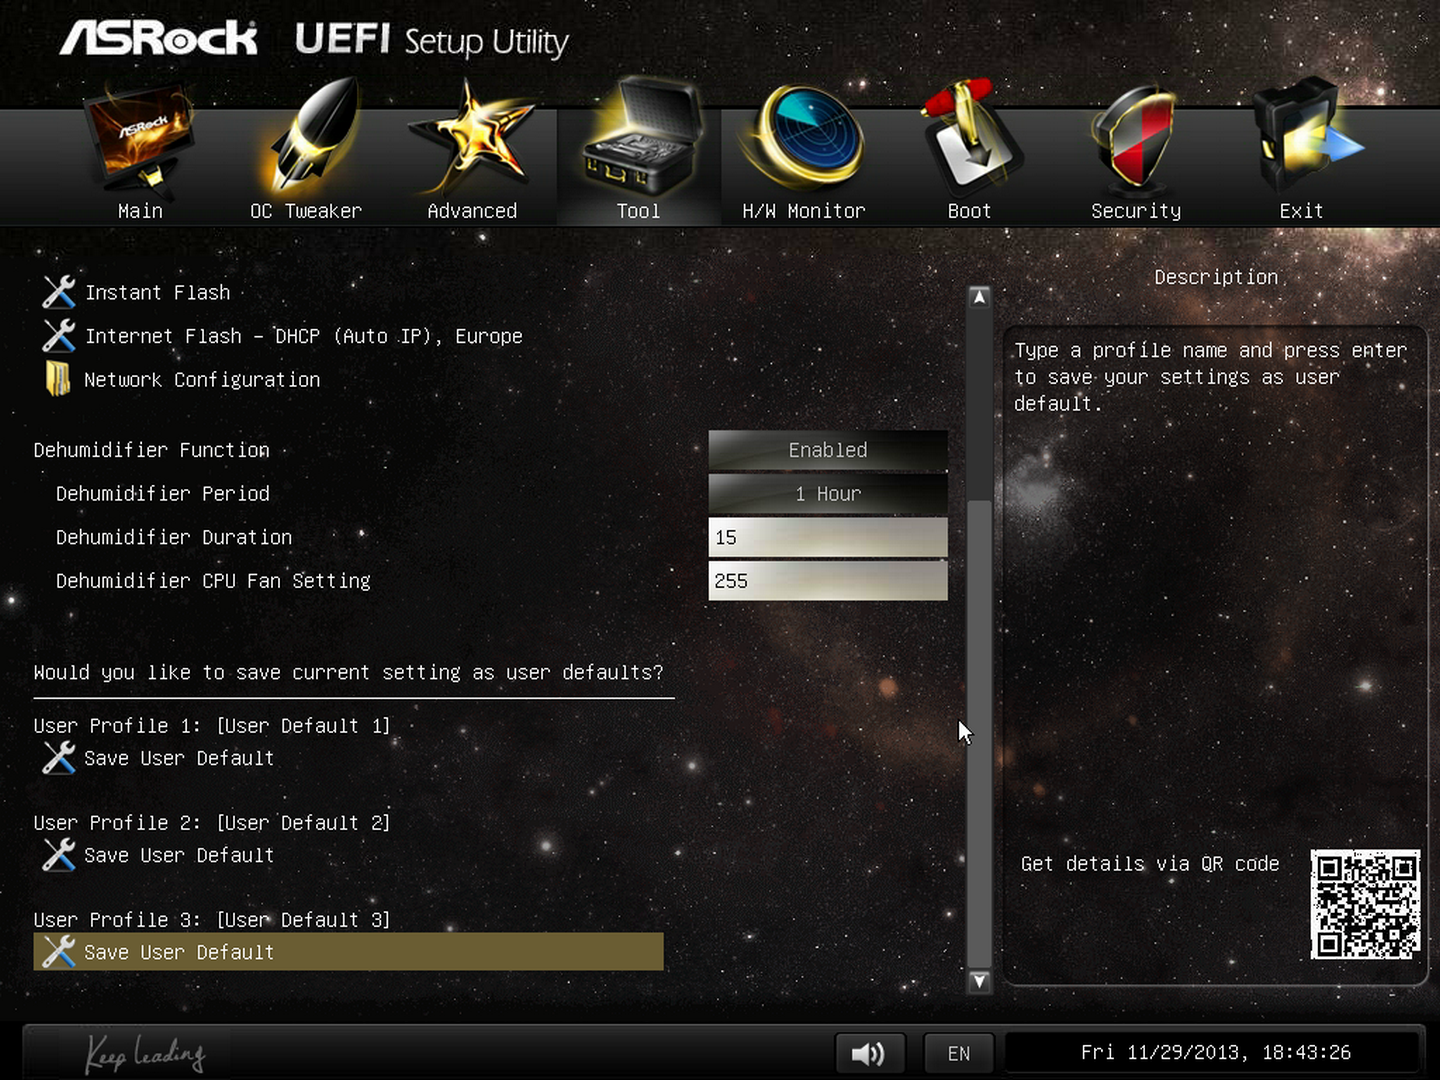
The ‘Tool’ menu allows users to update the BIOS via the internet from within the BIOS itself, which is a feature we have seen from ASRock on previous platforms. The final option to note in this menu is the return of the Dehumidifier function, which keeps the fans spinning after the motherboard is turned off in an effort to equalize the temperature within the case and the ambient temperature. In climates with high humidity, this may help with condensation forming when the temperature outside the case drops, causing a rapid cooling inside the case and condensation to form (think condensation on the inside of a house when it is cold outside).
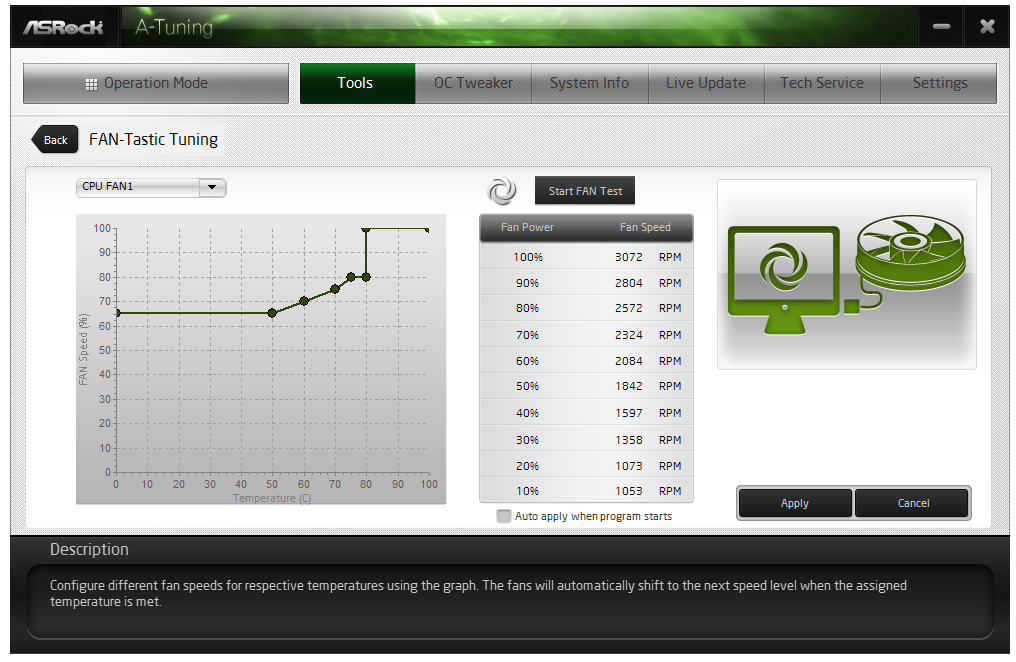
Despite there being only three fan headers on the motherboard, the hardware monitor tab gives users options to provide multi-point fan profiles for each header:
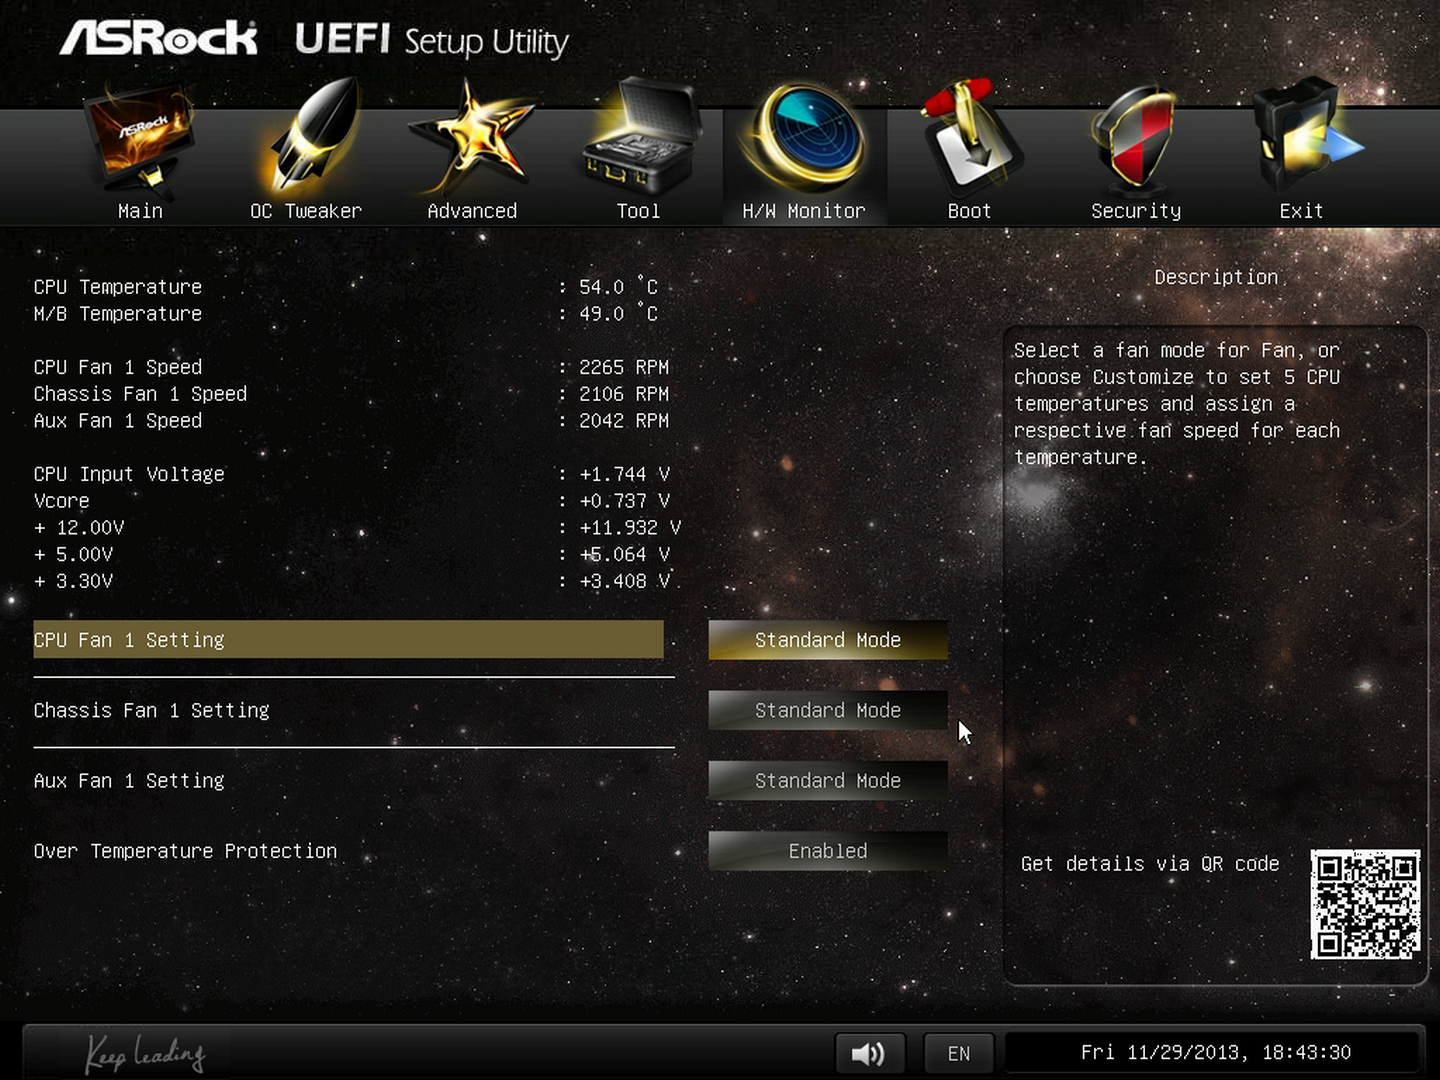
At this point in time I think MSI have the best graphical representation of fan controls in the BIOS, but ASRock have a good multi-point fan option. Despite this, fan controls in the OS are where most manufacturers focus their efforts because that is what more people end up using.


ASRock Z87-M8 Software
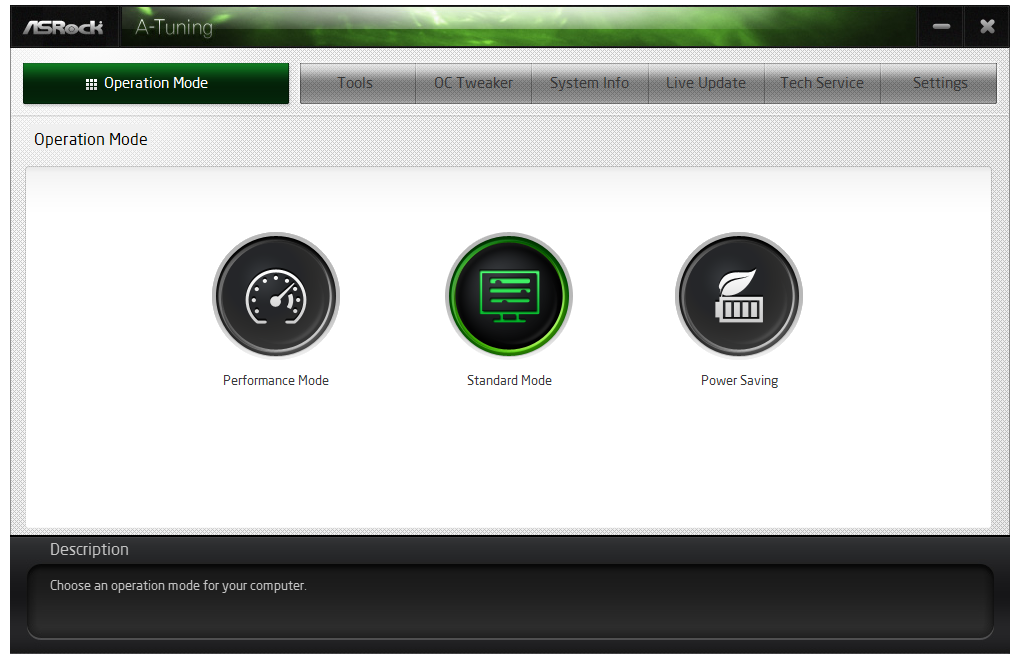
The principles of ASRock software took a small shift with Z87: ASRock placed most of their tools into one interface called A-Tuning. This includes the overclocking options for the OS, fan controls (with fan tester), XFast RAM, System Browser and their Dehumidifier function. The interface is clean and polished for the most part, as we examined in the Z87 Extreme6 review. The automatic overclocking options are still ‘Power Saving’ mode (slow ramp over 8 seconds of sustained load to the multi-threaded turbo multiplier), ‘Standard’, ‘Performance Mode’ (highest turbo bin at any load) and automatic overclocking.

Other software such as XFast RAM and XFast LAN still have their own software utilities as they are licensed versions of retail software.
One update that ASRock are now putting into their software package is a three-month license to XSplit, software to help stream games online in conjunction with twitch or other services. This has a $24.95 value when purchased separately, and is now bundled with all ASRock gaming motherboards. No doubt ASRock got an awesome deal on buying 10000+ (or more) licenses, and it will be hard to determine exactly what extra cost this would mean to the end user. For XSplit it is almost a win-win: sell some licenses, and if the user likes it, they will continue to pay for it.


Something like the ASRock M8 can be difficult to benchmark. Ultimately what benchmark results we get will essentially be dependent on the hardware a user adds in, and what we have placed in the build will be different to what any other user will do. Also, there is almost no cross correlation from previous reviews for heat/noise, as Dustin was our case reviewer and I have no other starting point. Nonetheless, I have repeated the majority of my usual benchmarks in the system, as well as tried to copy Dustin’s benchmark routine for comparison points. Our test setup is as follows:
Test Setup
| ASRock M8 Barebones Build | ||
| Component | Price | |
| Chassis | ASRock M8 | $550 |
| CPU | Intel i7-4765T 4C/8T 35W 2.0 GHz (3.0 GHz Turbo) | $400 |
| Motherboard | ASRock Z87-M8 | |
| Memory | G.Skill SO-DIMM DDR3-1866 C9 1.35V 2x8 GB Kit | $160 |
| GPU | MSI HD7950 Twin Frozr II | $320 |
| Power Supply | ASRock M8 450W Bronze made by FSP | |
| SSD | OCZ Vertex 3 480GB | $485 |
| Storage | Toshiba 750GB 2.5" HDD | $67 |
| ODD | ASRock M8 | |
|
|
||
| Total | $1982 | |
Many thanks to...
We must thank the following companies for kindly providing hardware for our test bed:
Thank you to ASRock for providing the M8 review sample.
Thank you to Intel for providing the i7-4765T CPU used in this review.
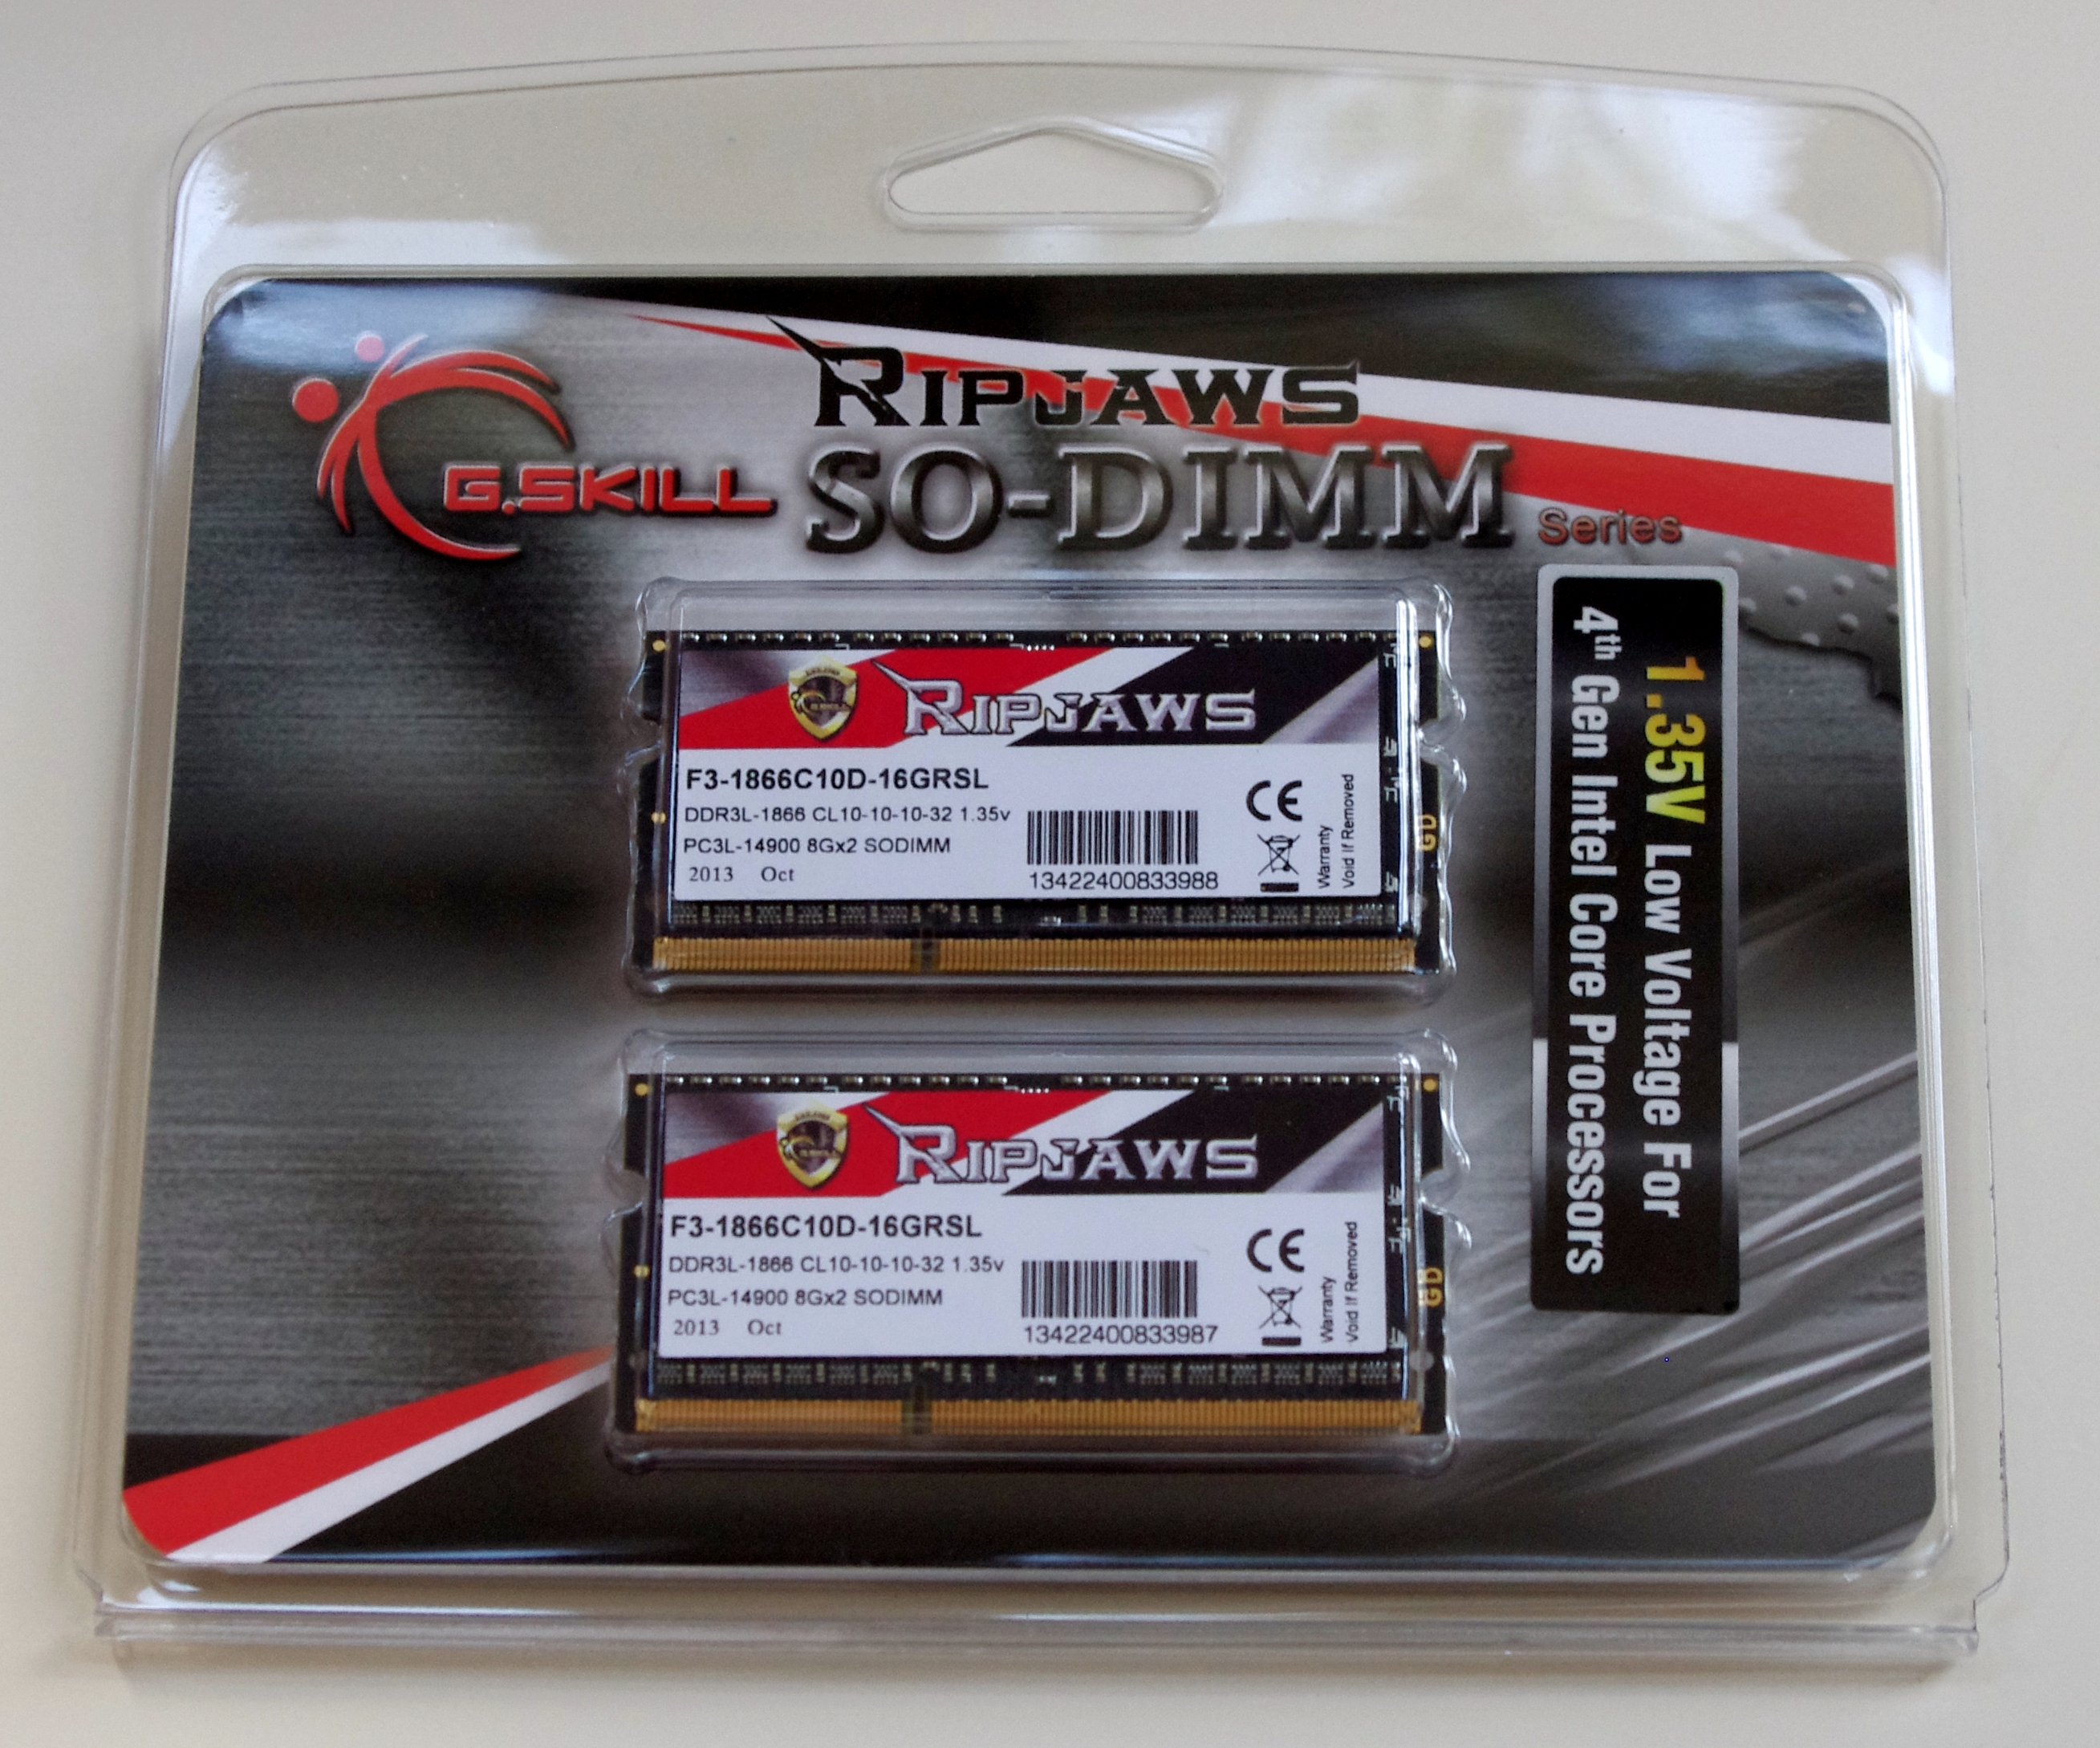
Thank you to G.Skill for providing the Ripjaws SO-DIMM 1866 C9 memory kit for this review.
A note on the G.Skill memory kit – up until the opportunity to review the ASRock M8, I was under the impression that SO-DIMM memory kits, for the most part, were set at DDR3-1600 CAS 9 at the high end. Around the same time, G.Skill launched their Ripjaws SO-DIMM memory range, featuring 8GB modules at speeds higher than 1600 C9. These were at 1866 C10 (Performance Index rise from 178 to 187), and the two 2x8 GB modules are currently on sale for $160.
Power Consumption
| Power Consumption | |
| Long Idle | 55 W |
| Idle | 44 W |
| OCCT | 83 W |
| Metro | 242 W |
Despite using a 200W TDP graphics card and a 35W TDP CPU, the total system draw under Metro is 242W – more than adequate for the 450W bronze power supply used. The limiting factor it would seem is temperatures, at which point the system would not be able to exhaust enough heat.
Temperatures
| Temperatures | ||
| CPU | GPU | |
| Idle | 35 ºC | 35 ºC |
| OCCT CPU Load | 60 ºC | 36 ºC |
| Furmark | 42 ºC | 76 ºC |
While under load, it was clear when the GPU was being stressed from the top of the case – it became warm to touch, almost uncomfortable if held for a long time. Although I would be satisfied with these temperatures in the long term – no game stresses the system as much as Furmark.
Windows 7 POST Time
Different motherboards have different POST sequences before an operating system is initialized. A lot of this is dependent on the board itself, and POST boot time is determined by the controllers on board (and the sequence of how those extras are organized). As part of our testing, we are now going to look at the POST Boot Time - this is the time from pressing the ON button on the computer to when Windows 7 starts loading. (We discount Windows loading as it is highly variable given Windows specific features.) These results are subject to human error, so please allow +/- 1 second in these results.
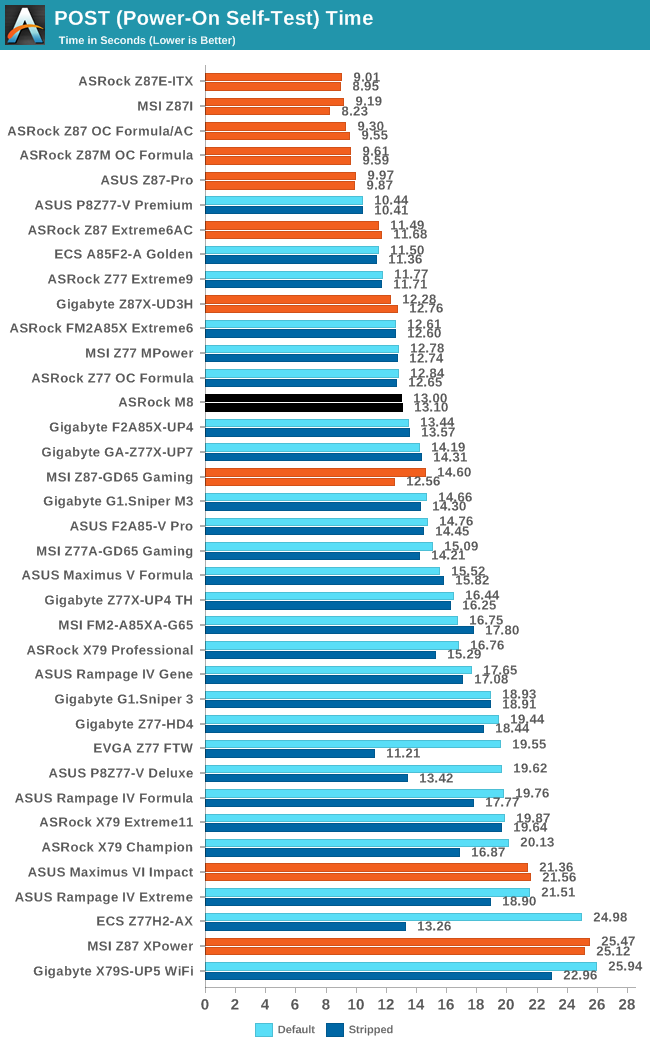
At 13 seconds the M8 is not a slouch, but not the speediest boot up sequence we have had for Z87. There's still some margin to go for a sub 10-second POST.
Rightmark Audio Analyzer 6.2.5
In part due to reader requests, we are pleased to include Rightmark Audio Analyzer results in our benchmark suite. The premise behind Rightmark:AA is to test the input and output of the audio system to determine noise levels, range, harmonic distortion, stereo crosstalk and so forth. Rightmark:AA should indicate how well the sound system is built and isolated from electrical interference (either internally or externally). For this test we connect the Line Out to the Line In using a short six inch 3.5mm to 3.5mm high-quality jack, turn the OS speaker volume to 100%, and run the Rightmark default test suite at 192 kHz, 24-bit. The OS is tuned to 192 kHz/24-bit input and output, and the Line-In volume is adjusted until we have the best RMAA value in the mini-pretest. We look specifically at the Dynamic Range of the audio codec used on board, as well as the Total Harmonic Distortion + Noise.
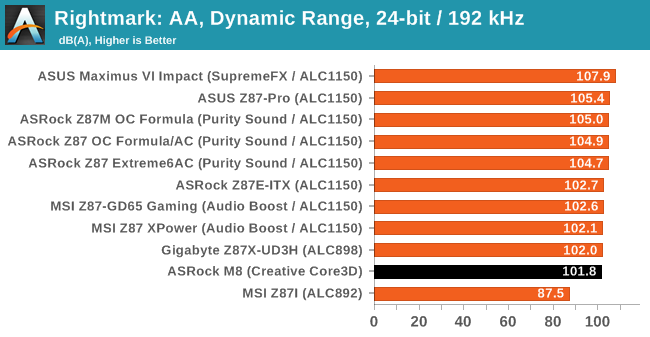
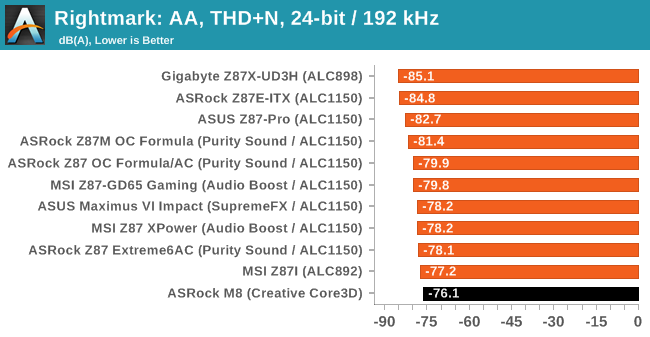
Despite using a Creative audio codec on the motherboard, the final results are bottom of our small pile - dynamic range seems alright enough, but THD+N needs a rethink.
USB Backup
For this benchmark, we run CrystalDiskMark to determine the ideal sequential read and write speeds for the USB port using our 240 GB OCZ Vertex3 SSD with a SATA 6 Gbps to USB 3.0 converter. Then we transfer a set size of files from the SSD to the USB drive using DiskBench, which monitors the time taken to transfer. The files transferred are a 1.52 GB set of 2867 files across 320 folders – 95% of these files are small typical website files, and the rest (90% of the size) are the videos used in the WinRAR test. In an update to pre-Z87 testing, we also run MaxCPU to load up one of the threads during the test which improves general performance up to 15% by causing all the internal pathways to run at full speed.
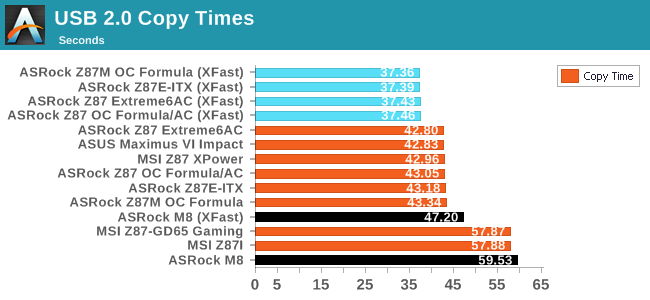
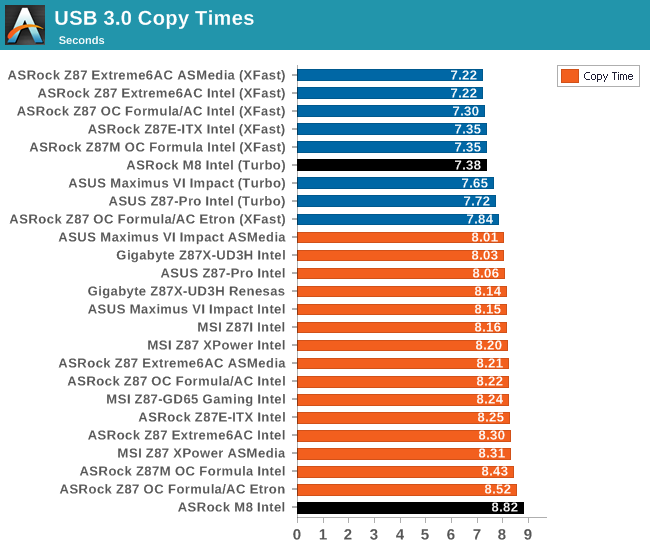
If anything our USB transfer speeds are pretty much in the gutter - USB 2.0 had issues in peak throughput, leading to the worst XFast timing we have seen, and basic USB 3.0 performance is likewise pretty poor.
DPC Latency
Deferred Procedure Call latency is a way in which Windows handles interrupt servicing. In order to wait for a processor to acknowledge the request, the system will queue all interrupt requests by priority. Critical interrupts will be handled as soon as possible, whereas lesser priority requests, such as audio, will be further down the line. So if the audio device requires data, it will have to wait until the request is processed before the buffer is filled. If the device drivers of higher priority components in a system are poorly implemented, this can cause delays in request scheduling and process time, resulting in an empty audio buffer – this leads to characteristic audible pauses, pops and clicks. Having a bigger buffer and correctly implemented system drivers obviously helps in this regard. The DPC latency checker measures how much time is processing DPCs from driver invocation – the lower the value will result in better audio transfer at smaller buffer sizes. Results are measured in microseconds and taken as the peak latency while cycling through a series of short HD videos - under 500 microseconds usually gets the green light, but the lower the better.

ASRock does really well in our DPC Latency test, being the best Z87 motherboard we have tested so far. It magically comes under the 145-150 microsecond barrier we had been seeing up until this point.
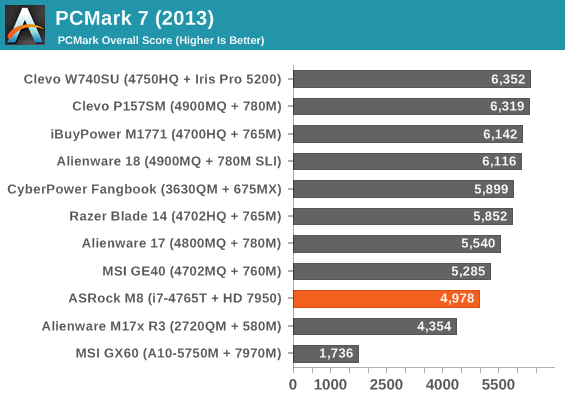
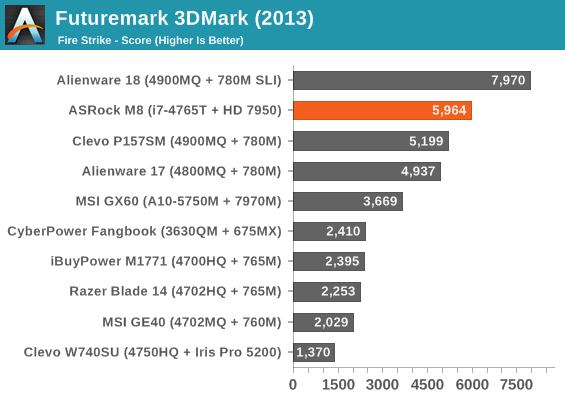
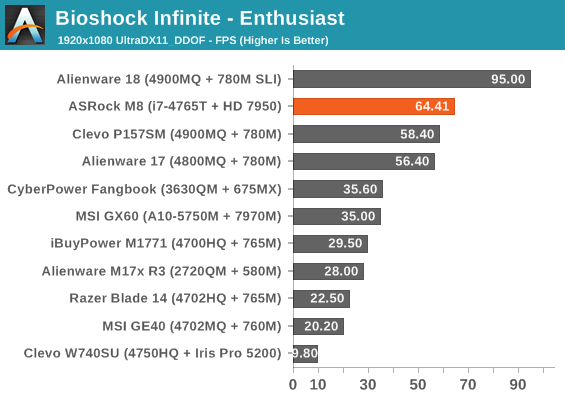
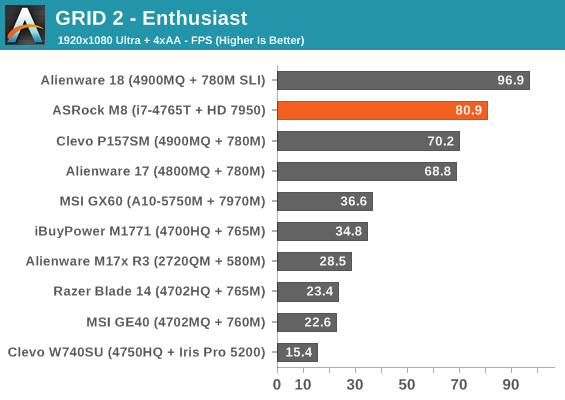
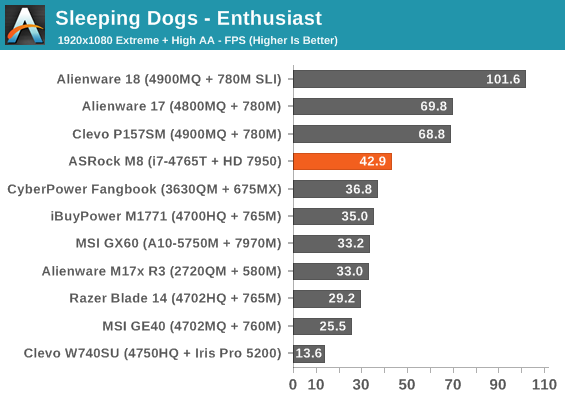
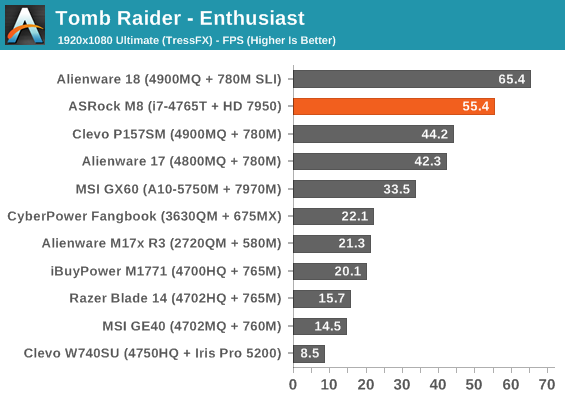
Due to the high end level of the systems that Dustin has benchmarked, our M8 configuration does not appear to fair too well on some of the synthetics – however frame rates in modern games are more than applicable and should systematically beat any console title if settings were equilibrated between the systems. For the price difference, one would hope so! Given that these are all tested against laptops, we see that while our low powered CPU may not be as fast as we had liked, the gaming frame rates are still at the high end.
PCMark 7
3DMark Fire Strike
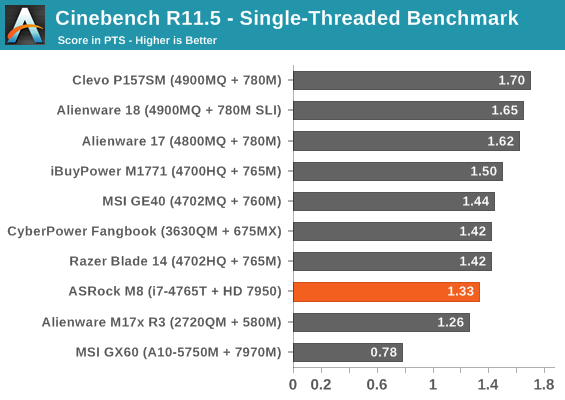
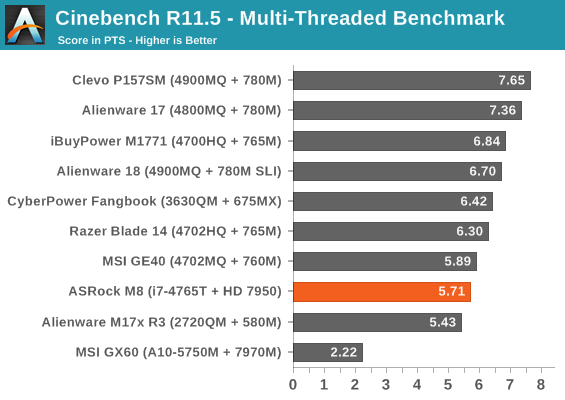
Cinebench R11.5
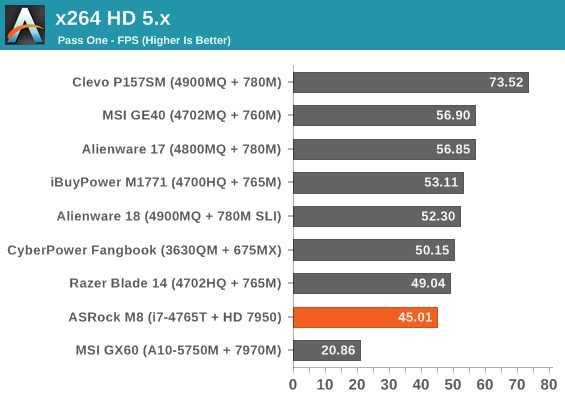
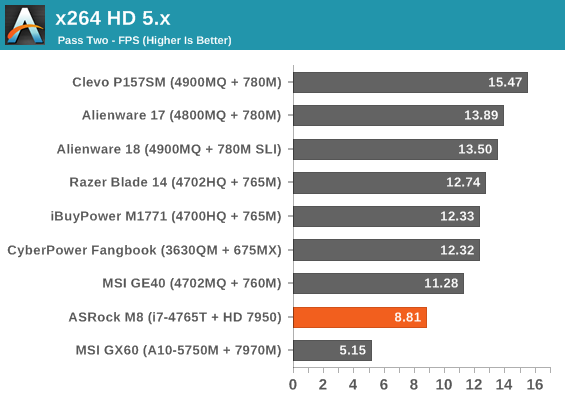
x264 5.0 HD Benchmark
Bioshock Infinite
Grid 2
Sleeping Dogs
Tomb Raider
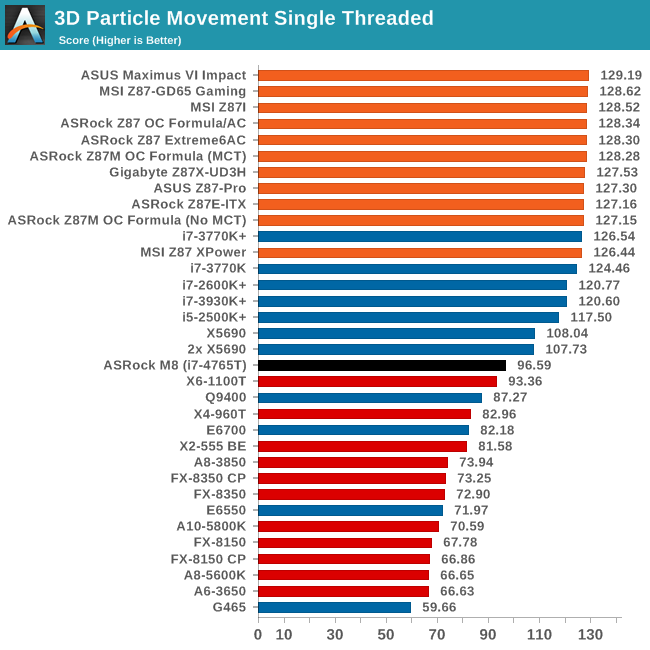
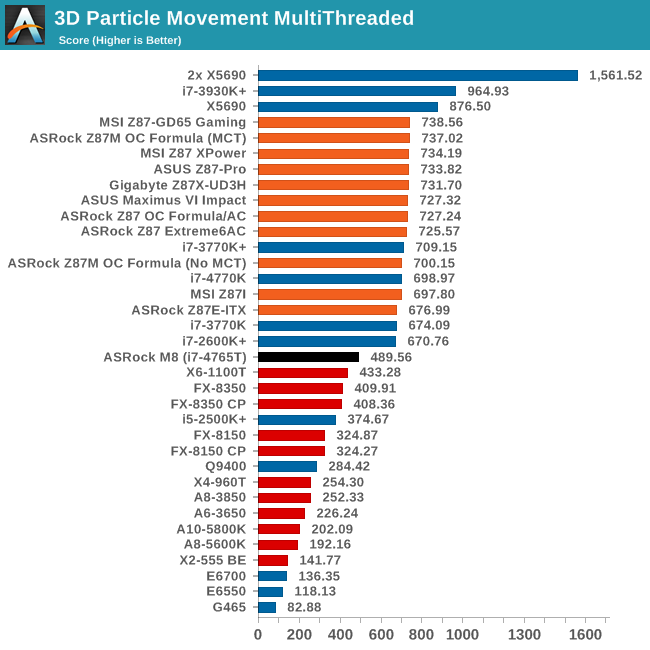
Because it can be difficult to benchmark a barebones, due to our choice in hardware overriding any performance results, I wanted to run my usual CPU benchmark suite to at least indicate where a CPU such as the i7-4765T would perform, given its lower CPU MHz base (2.0 GHz) but highly multithreaded nature. The CPU itself performs well, and outstretches almost all the AMD CPUs in every benchmark, sometimes being eclipsed by the FX-8350 in specific workloads.
Point Calculations - 3D Movement Algorithm Test
The algorithms in 3DPM employ both uniform random number generation or normal distribution random number generation, and vary in various amounts of trigonometric operations, conditional statements, generation and rejection, fused operations, etc. The benchmark runs through six algorithms for a specified number of particles and steps, and calculates the speed of each algorithm, then sums them all for a final score. This is an example of a real world situation that a computational scientist may find themselves in, rather than a pure synthetic benchmark. The benchmark is also parallel between particles simulated, and we test the single thread performance as well as the multi-threaded performance.
Compression - WinRAR 4.2
With 64-bit WinRAR, we compress the set of files used in the USB speed tests. WinRAR x64 3.93 attempts to use multithreading when possible, and provides as a good test for when a system has variable threaded load. WinRAR 4.2 does this a lot better! If a system has multiple speeds to invoke at different loading, the switching between those speeds will determine how well the system will do.
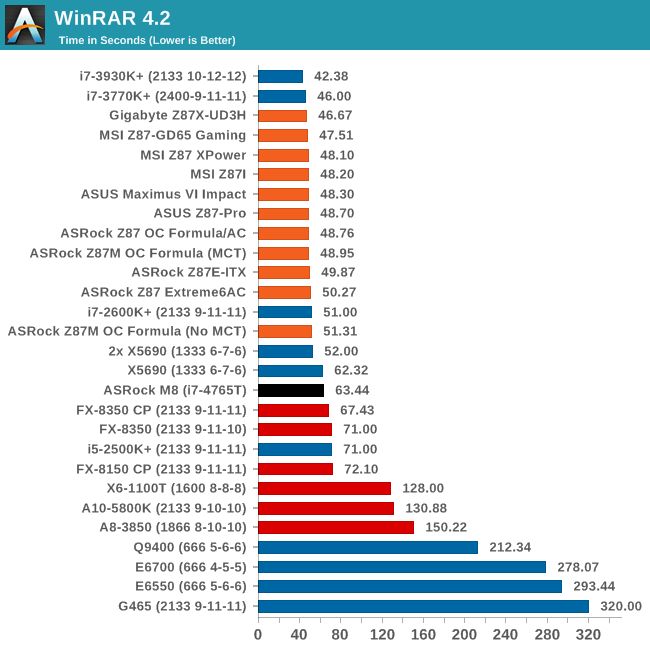
Image Manipulation - FastStone Image Viewer 4.2
FastStone Image Viewer is a free piece of software I have been using for quite a few years now. It allows quick viewing of flat images, as well as resizing, changing color depth, adding simple text or simple filters. It also has a bulk image conversion tool, which we use here. The software currently operates only in single-thread mode, which should change in later versions of the software. For this test, we convert a series of 170 files, of various resolutions, dimensions and types (of a total size of 163MB), all to the .gif format of 640x480 dimensions.

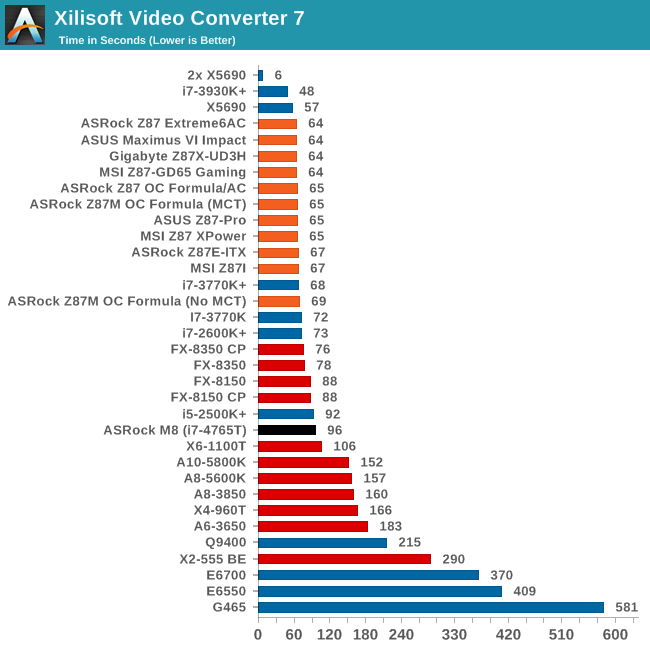
Video Conversion - Xilisoft Video Converter 7
With XVC, users can convert any type of normal video to any compatible format for smartphones, tablets and other devices. By default, it uses all available threads on the system, and in the presence of appropriate graphics cards, can utilize CUDA for NVIDIA GPUs as well as AMD WinAPP for AMD GPUs. For this test, we use a set of 33 HD videos, each lasting 30 seconds, and convert them from 1080p to an iPod H.264 video format using just the CPU. The time taken to convert these videos gives us our result.
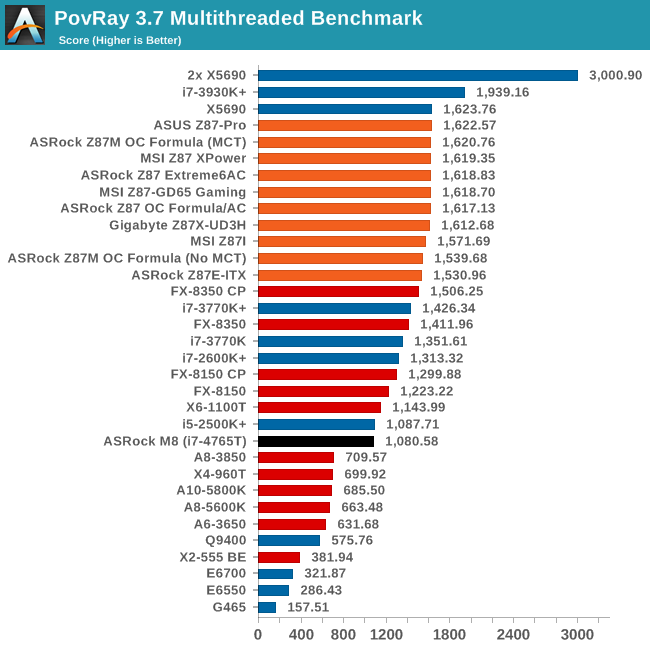
Rendering – PovRay 3.7
The Persistence of Vision RayTracer, or PovRay, is a freeware package for as the name suggests, ray tracing. It is a pure renderer, rather than modeling software, but the latest beta version contains a handy benchmark for stressing all processing threads on a platform. We have been using this test in motherboard reviews to test memory stability at various CPU speeds to good effect – if it passes the test, the IMC in the CPU is stable for a given CPU speed. As a CPU test, it runs for approximately 2-3 minutes on high end platforms.
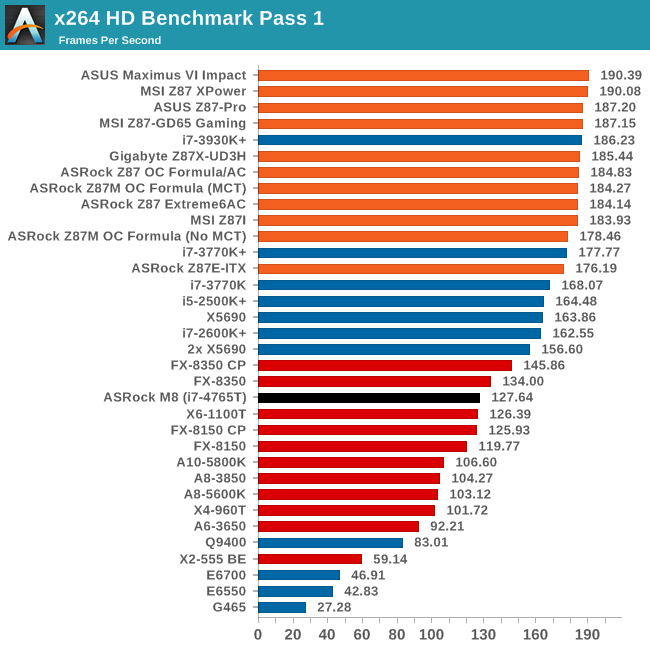
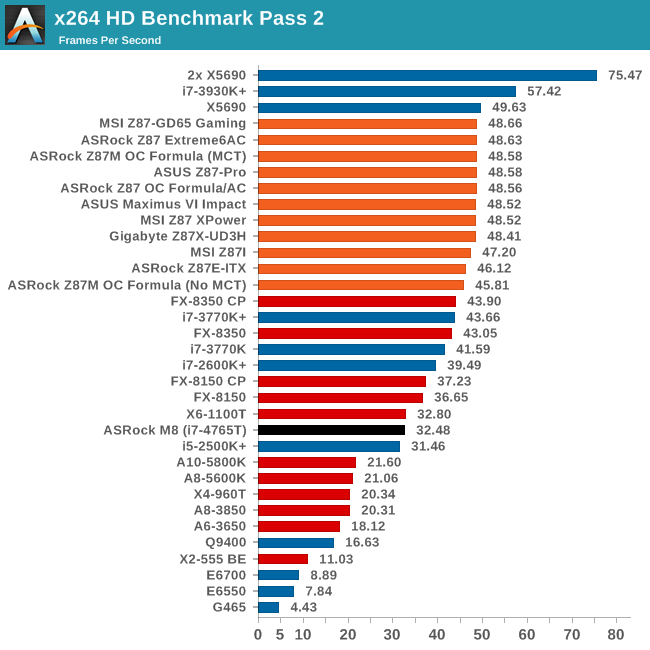
Video Conversion - x264 HD Benchmark
The x264 HD Benchmark uses a common HD encoding tool to process an HD MPEG2 source at 1280x720 at 3963 Kbps. This test represents a standardized result which can be compared across other reviews, and is dependent on both CPU power and memory speed. The benchmark performs a 2-pass encode, and the results shown are the average of each pass performed four times.
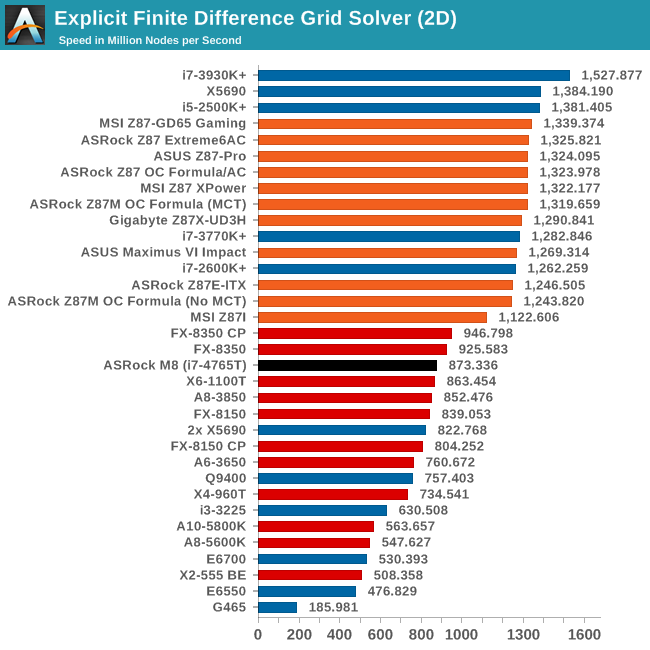
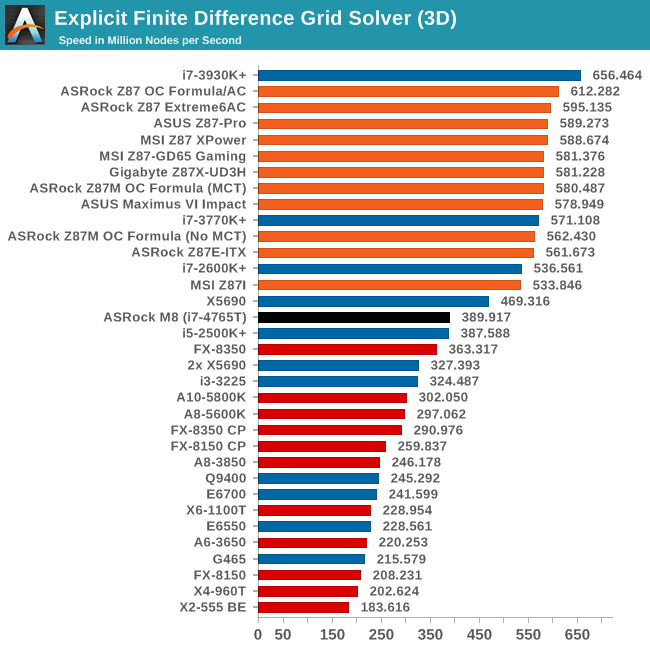
Grid Solvers - Explicit Finite Difference
For any grid of regular nodes, the simplest way to calculate the next time step is to use the values of those around it. This makes for easy mathematics and parallel simulation, as each node calculated is only dependent on the previous time step, not the nodes around it on the current calculated time step. By choosing a regular grid, we reduce the levels of memory access required for irregular grids. We test both 2D and 3D explicit finite difference simulations with 2n nodes in each dimension, using OpenMP as the threading operator in single precision. The grid is isotropic and the boundary conditions are sinks. Values are floating point, with memory cache sizes and speeds playing a part in the overall score.
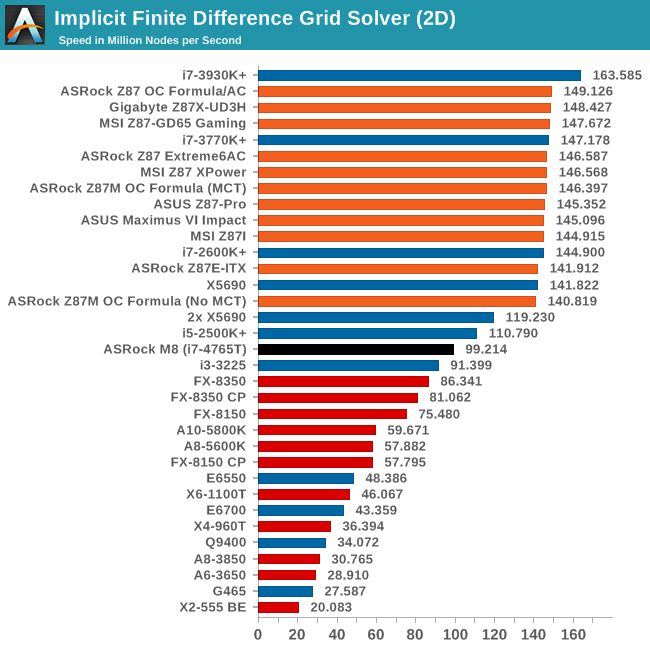
Grid Solvers - Implicit Finite Difference + Alternating Direction Implicit Method
The implicit method takes a different approach to the explicit method – instead of considering one unknown in the new time step to be calculated from known elements in the previous time step, we consider that an old point can influence several new points by way of simultaneous equations. This adds to the complexity of the simulation – the grid of nodes is solved as a series of rows and columns rather than points, reducing the parallel nature of the simulation by a dimension and drastically increasing the memory requirements of each thread. The upside, as noted above, is the less stringent stability rules related to time steps and grid spacing. For this we simulate a 2D grid of 2n nodes in each dimension, using OpenMP in single precision. Again our grid is isotropic with the boundaries acting as sinks. Values are floating point, with memory cache sizes and speeds playing a part in the overall score.
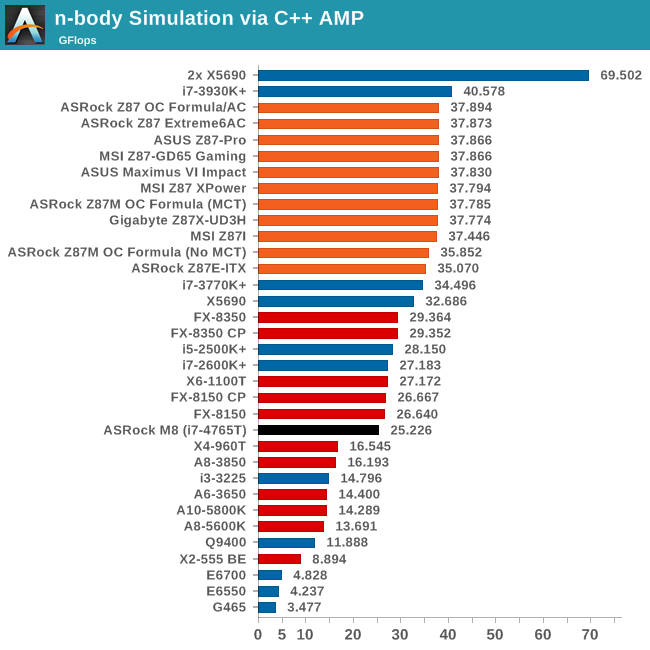
Point Calculations - n-Body Simulation
When a series of heavy mass elements are in space, they interact with each other through the force of gravity. Thus when a star cluster forms, the interaction of every large mass with every other large mass defines the speed at which these elements approach each other. When dealing with millions and billions of stars on such a large scale, the movement of each of these stars can be simulated through the physical theorems that describe the interactions. The benchmark detects whether the processor is SSE2 or SSE4 capable, and implements the relative code. We run a simulation of 10240 particles of equal mass - the output for this code is in terms of GFLOPs, and the result recorded was the peak GFLOPs value.
ASRock M8 Conclusions: Recommended Steam Box Alternative
Small form factor systems that pack a punch is one of the ways this industry is moving forward. We only have to look at modern consoles and prebuilt systems like the Mac Pro to realize that people want everything smaller with no compromise in performance. Obviously going small means potential heat issues, and then everything centers on keeping the system cool, but also quiet. There is no point in having the world’s smallest computer and making it sound like a jet engine. Of course there are attempts underway to make the PC-you-play-next-to a thing of the past, with streaming from one device to another so heat and noise are no longer part of the equation (this means the realm of big boxes might come back). Nevertheless, there is and always will be a market for the box under the monitor/TV, and the ASRock M8 provides a small form factor system that can be as mobile as you like.
A lot of the buzz around the ASRock M8 will be the industrial design, and the fact that BMW’s design team had their inputs. I want to push that to one side, and take the system as it is – something elegant to look at that is easy to use and that provide sufficient power if a user wants to put the hardware together in order to do so. Using an 8-series platform means that small and large Haswell CPUs can take part, from the 15/25/35W parts all the way up to the full fat i7-4770K, although the 4-phase non-heatsinked solution might be cause for concern if a user wants to overclock. The 450W power supply is plenty for any GPU up to ASRock’s recommended 200W maximum, even though we topped out at ~250W at the wall under a GPU heavy load, meaning that I think that this PSU would handle 300W graphics cards – the only issue then would be heat removal.

In terms of air movement, the system allows a bottom to top air flow, giving the CPU cooling priority over the GPU. This could create issues if the system is placed standing up on a carpet, although the usual place for a console might be next to the TV providing the visuals on a TV stand, or this is the system that at a LAN would end up on the desk next to the gamer. The mobility is going to be one of the main draws of the ASRock M8 – the handles are built into the chassis and are sturdy enough to carry with one hand. Cases like the Bitfenix Prodigy are double the width and have flexible handles – the ASRock M8 solution is a step above this and even more so over handle solutions like the Lian Li TU-200/TU-100. The lock mechanism helps keep the magnetized side panels on, although using a generic lock system might not be the best thing for LAN events whereby some of the people at the event would have a similar locking device.
For hardware specifications, the front panel providing four USB 3.0 ports and a side loading ODD should be plenty, along with the fold out audio and card reader at the bottom. On the inside the motherboard has space for five storage devices whereas the case has room for four – this would allow a nice SSD boot drive and three storage 2.5” drives as necessary allowing the size of the case to not be a hindrance to storage. The motherboard comes with a dual band 2T2R 802.11ac WiFi module and Creative Sound Core3D which match the higher end for the M8 design (some users would point out that Core3D might not be ideal for them), and thankfully due to the nature of the case putting all the hardware in is actually very easy. The only issue I would like to point out is that the ODD color does not match the insides of the case, something which might want to be rectified. On the software side, ASRock bundle their usual BIOS/software combination along with a three month license of XSplit for game streaming. They missed out on an opportunity to do something unique on the M8 in this regard.
The price might remain as the final sticking point. $550 for what could be purchased for $350 (albeit a bit bigger and not as aesthetically pleasing perhaps) might seem a bit of an excessive jump, although I doubt $350 would get something this size and powerful. Take a look at the Tiki which Anand used as part of the GTX Titan release – it came on a granite base and cost a pretty penny. By comparison, the ASRock M8 is a good deal.
The best way to sum up the ASRock M8 is from the gift perspective: buying it will never put your machine on the top of the performance pile, but it does offer something different if you wanted to splash out on a case that remains mobile, or are building a system for a loved one and wanted an out-of-the-box solution that looks awesome.
I started this review mentioning Steam Box and then set about testing a $2000 solution, although removing some of the expensive items it could easily reduce down to sub-$1300 device that would play any Windows and Linux game with comparative ease. I tend to chop and change my PC a lot (I keep bouncing between small and super large every six to twelve months), but for my brother this would be perfect: he games, he goes to LANs, and he needs a bit of power. It would make a nice Christmas present for sure.
After all is said and done, the ASRock M8 is a very nicely built barebones that offers the opportunity to build a mobile gaming platform that should stand the test of time as well as providing nice aesthetics and industrial design. The price might not appeal to most in the bang-for-buck stakes, but ultimately that is not the real point of the M8 – power and size with design. For this, I would like to give the ASRock M8 an AnandTech Silver Award.

ASRock M8: AnandTech Editors’ Choice Silver Award
At AnandTech our rating system goes Platinum, Gold, Silver, and Recommended: Should ASRock release a future version with perhaps another couple of VRMs and a heatsink, it might have been considered for a higher award. I would very much look forward to an X79 platform (or Haswell-E) like this in the future. The main issue there would be heat removal, but I am sure some clever people might be able to figure that one out. Add in some Thunderbolt, Intel NICs, SATA Express – the list could go on to make the system future proof.


