Original Link: https://www.anandtech.com/show/6144/asus-p8z77v-premium-review-a-bentley-among-motherboards
ASUS P8Z77-V Premium Review: A Bentley Among Motherboards
by Ian Cutress on August 13, 2012 10:30 AM EST- Posted in
- Motherboards
- Asus
- Z77
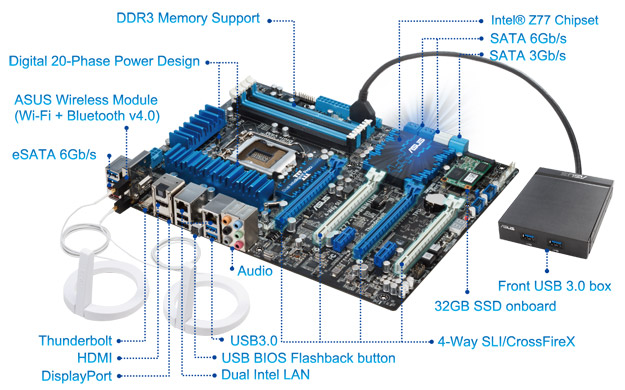
In the car industry, there is a large variety of cars to choose from - both the cheap and the expensive will get you from A to B, but in various amounts of luxury, with different engines and features under the hood. In comparison the motherboard industry, we have nothing like this - products are built to specifications and have to remain price competitive. Very rarely do we get a price competitive motherboard with a ton of features that also stretches the wallet in the same way a luxury car might do. For this analogy, we have the P8Z77-V Premium from ASUS to review, which comes in at $450 MSRP, but features Thunderbolt connectivity, dual Intel NIC, an onboard 32GB mSATA SSD, a PLX chip for 4-way PCIe devices, onboard WiFi, Bluetooth, and extra SATA/USB ports.
ASUS P8Z77-V Premium Overview
For our first PEX 8747 board, heads will turn when the price is mentioned. The ASUS P8Z77-V Premium comes in at a staggering $450 USD. That amount of money could pay for an ultra-low end Z77 motherboard and an i7-3770K all on its own! So why does a board in such a platform cost so much? If our pockets were this deep, then Sandy Bridge-E is only around the corner and a consideration.
The way ASUS are justifying the cost is through the sheer amount of functionality added to the Premium. The Premium enjoys the following additions to the basic chipset:
- Dual Intel NIC, one Server Grade (82579V), one normal (82583)
- mSATA port with 32GB LiteOn mSATA SSD
- PLX PEX 8747 for x8/x8/x8/x8 PCIe 3.0 operation
- Trusted Platform Module
- Included Dual Band (2.4 GHz/5 GHz) WiFi and Bluetooth v4.0 module, with antenna
- Thunderbolt Port
- A total of 12 SATA ports, including a SATA 6 Gbps Marvell 9230 controller for four capable ASUS SSD Caching ports
- Included USB 3.0 Front box
- iNetwork Control
- Fan XPert II Sofware
- ASUS Premium Service (for North American customers)
No other Z77 motherboard on the market offers such a package. We have the option of using IGP or multi-PCIe setups, SSD caching with the 32GB SSD onboard to help, dual Intel grade NICs but also WiFi, Thunderbolt connectivity for displays and storage, as well as extra SATA ports and USB 3.0 front box functionality. That is a lot of extra, and hence with it comes a lot of price. Through this review, we will determine just how well these features add up.
In terms of the overview, the ASUS P8Z77-V Premium does come with MultiCore Enhancement by default, which allows the processor to run at the maximum Turbo bin at any load, giving extra MHz under full loading situations (video conversion) and thus better performance. With IO, the addition of the Thunderbolt port allows any TB device to leave our USB testing suite in the dust, and the standard IO is not too bad either.
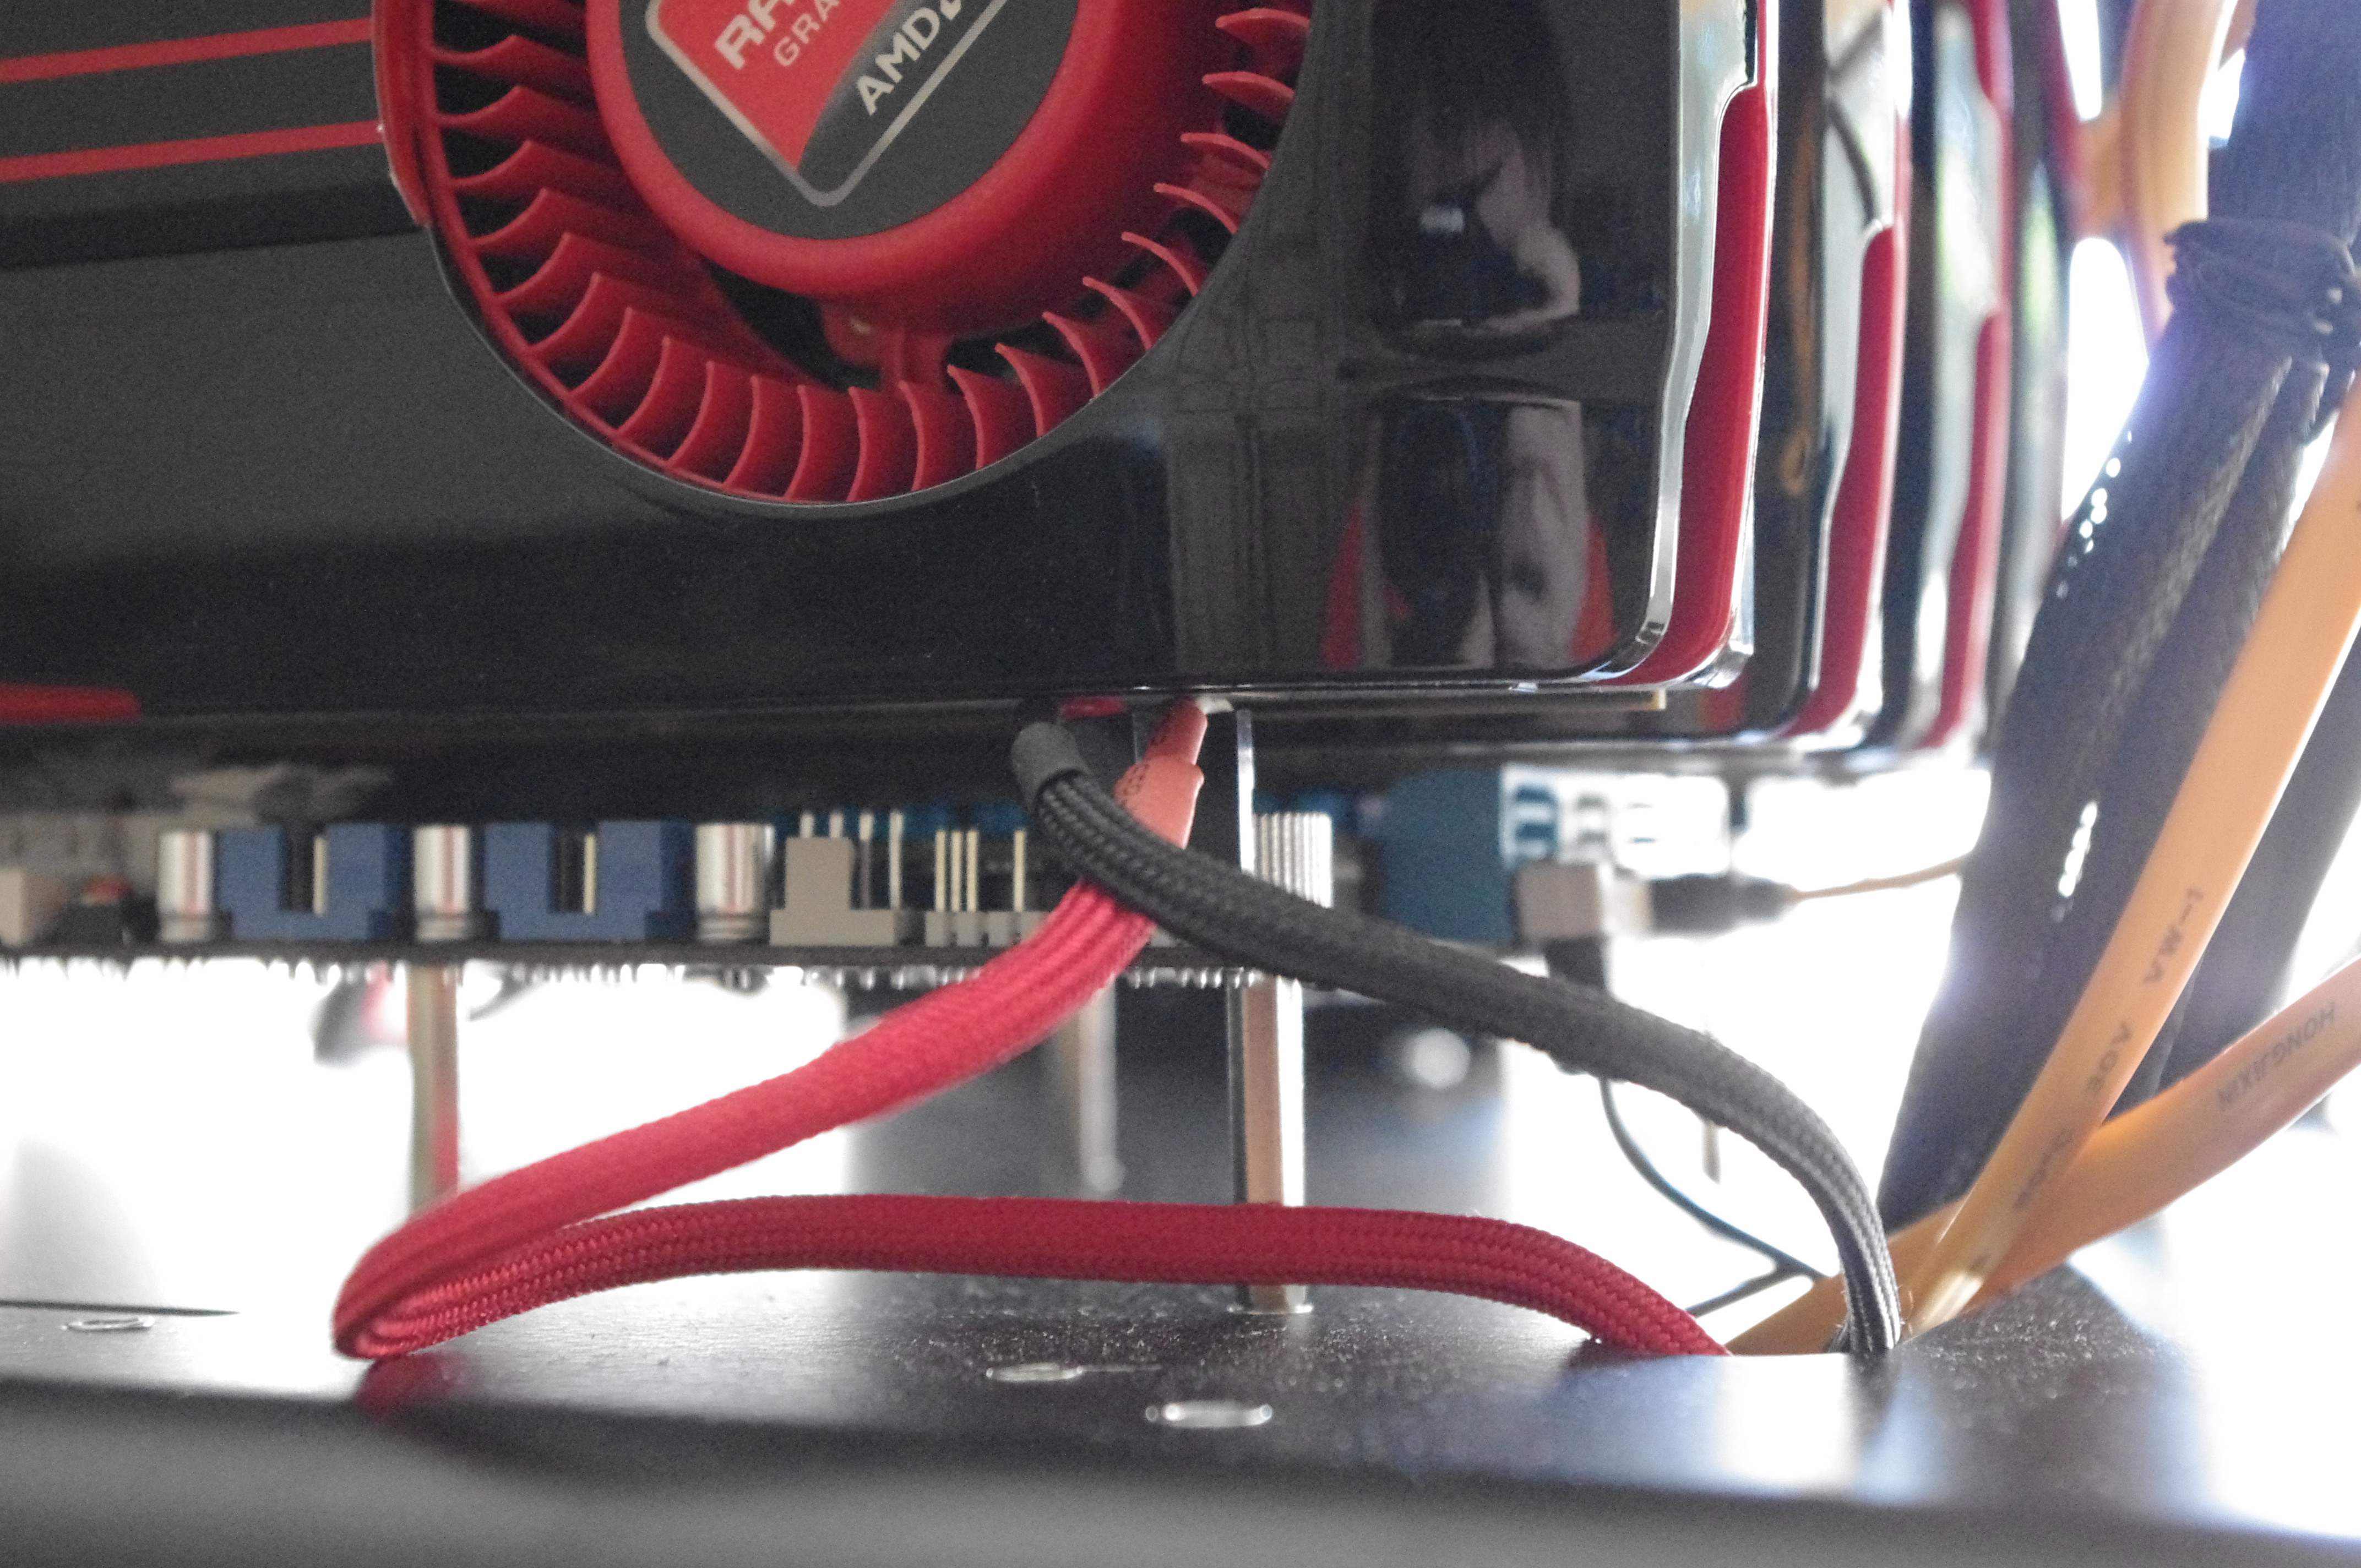
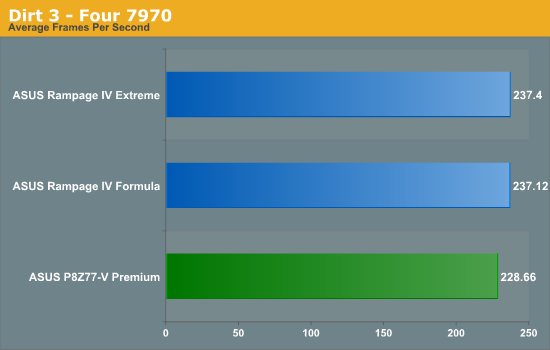
Gaming wise was a little different – the inclusion of the PEX 8747 chip means that single GPU performance is slightly down on non-PEX 8747 motherboards due to extra routing, but with four 7970s at 2560x1440 and all the trimmings, we hit 229 FPS in Dirt 3.
Visual Inspection
For a motherboard that has all this functionality, it is a small victory that ASUS have managed to fit it all into a normal ATX sized motherboard rather than the E-ATX form factor. Our first focus is the socket area, which has on two sides a very substantial pair of heatsinks covering the power delivery. Compared some other boards at a similar price range, these heatsinks are not connected via a heatpipe to each other, like the P8Z77-V Deluxe. This could show that ASUS are confident in their cooling solution for their high end channel boards.
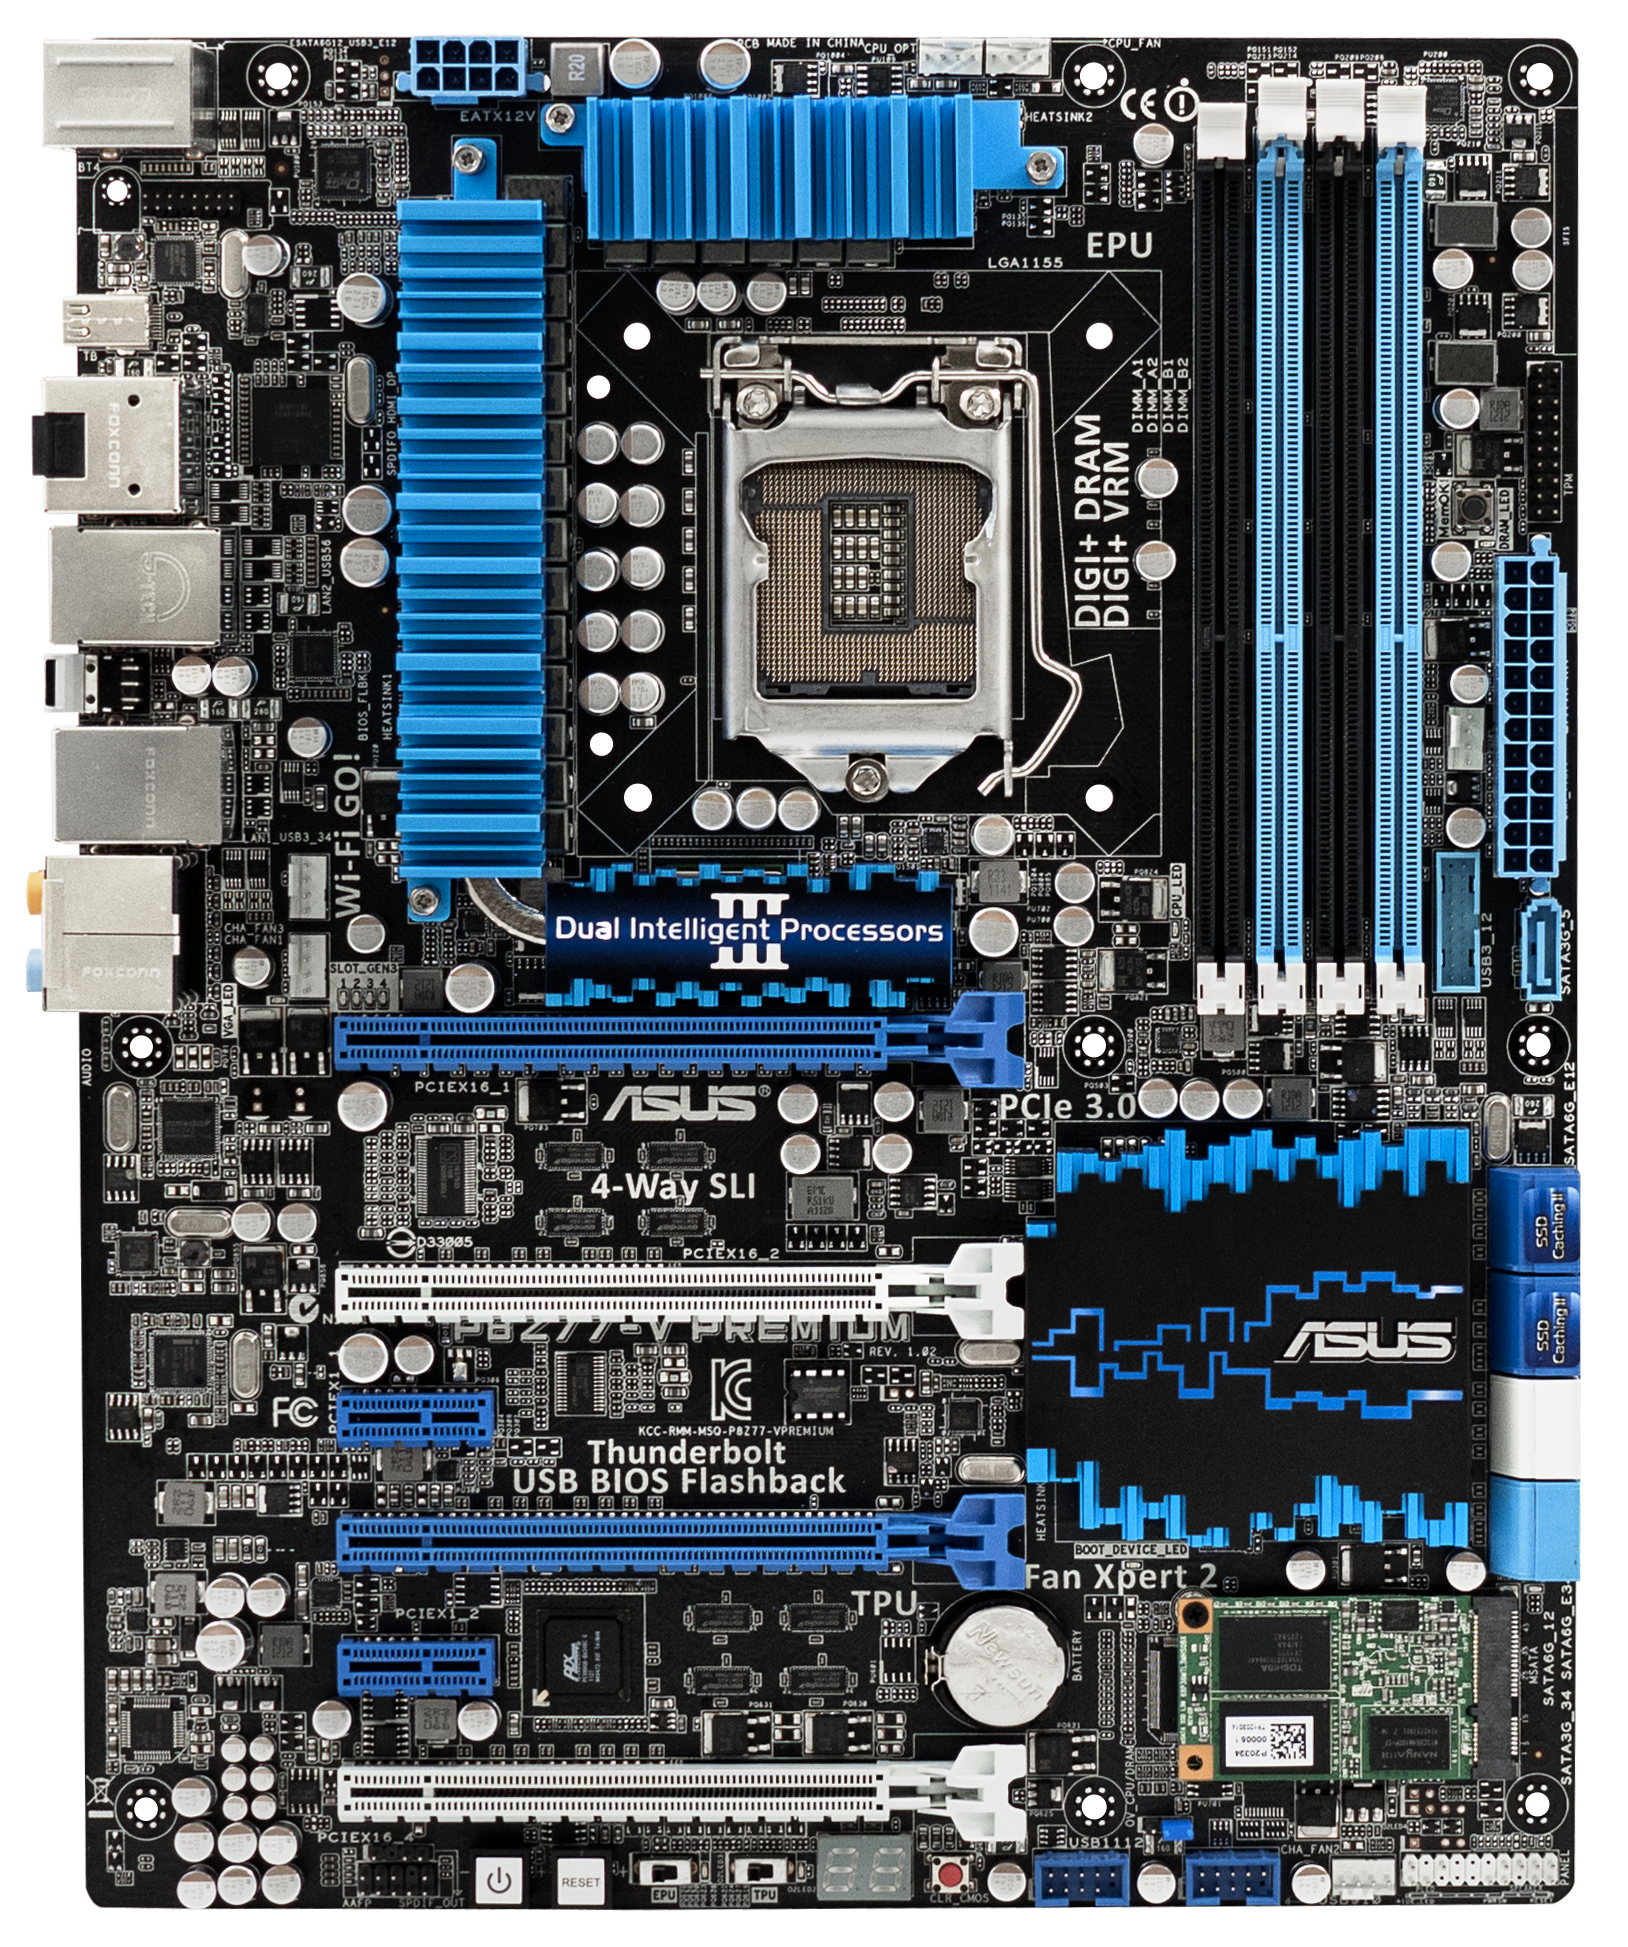
The socket area has five 4-pin fan headers nearby for use by CPU coolers – two north of the top heatpipe, two next to the bottom of the IO panel, and another by the 24-pin ATX power connector. The other 4-pin fan header on board is located on the bottom near the front panel connectors.
The P8Z77-V Premium uses a single 8-pin 12V CPU power connector for CPU power, and also has ASUS’ single ended memory latch design for the DIMMs. Down the right hand side we have the TPM header, a MemOK button (in case memory settings are too tight), the 24-pin ATX power connector, a USB 3.0 header and a single SATA 3 Gbps port pointing out of the board. I used this single SATA 3 Gbps (powered from the chipset) for my primary disk, such that I would always know where it was connected.
The SATA ports are color coded – the top four in dark blue come from a Marvell 9230 controller (so SATA 6 Gbps) and are used for the ASUS SSD Caching II. Underneath this are the two SATA 6 Gbps from the chipset in white, and then two SATA 3 Gbps from the chipset in light blue. Next to this is the chipset heatsink, which is large to cover the chipset, but also both the Marvell SATA controllers. It should be noted for the Marvell controller uses an x2 PCIe interconnect rather than an x1 – this allows the use of multiple SSDs to be used in the caching system. The setup also allows multiple caching scenarios (SSD + mechanical and another SSD + mechanical) and stacked SSD caching, which is something ASUS has implemented due to the request of users. This is all adjustable via a simple GUI provided as part of AI Suite.
Our mSATA port comes below the chipset heatsink and the SATA ports. This is a single mSATA 3 Gbps from the chipset to power a 32GB LiteOn SSD. ASUS calls this their ‘Complete System Boosting Solution’. While it is nice to have an extra 32GB SSD as part of the system build, ASUS expect the primary focus will be with the SSD caching – users having a mechanical hard drive and using the onboard SSD as a smart cache. My perception on the other hand is that if a user is laying down $450 for a motherboard, chances are they can buy a fully blown SATA 6 Gbps SSD as an OS drive. This leaves the 32GB SSD as either storage, somewhere to offload the pagefile, or as an OS drive itself – note that 32GB is below the recommended amount for Windows 7 64-bit.
On the bottom of the board, ASUS have gone for the additional extras rather than the standard swathe of USB 2.0 headers. While we do get two of the USB 2.0 headers, we also have a 4-pin fan header, a ClearCMOS header, a two-digit debug, TPU and EPU switches, power and reset buttons, and an onboard audio header. Users deciding to equip the Premium with double-sized GPU at the bottom will come up against one issue, particularly with the USB headers and the front panel:
My two power and reset connectors ended up propping the GPU above the height of the other GPUs, leading to less than ideal contact with the PCIe pins in the bottom fourth slot.
The PCIe layout starts with the PLX PEX 8747 chip hiding behind a small heatsink connected to one of the power delivery heatsinks. This sends the 32 electrical PCIe 3.0 lanes from the PLX to the blue PCIe slots at 16 a piece. In getting to these blue slots, the lanes can be switched such that eight of the sixteen go to the white slots, leading to x8/x8/x8/x8 peak bandwidth through each of the slots. Users of three GPUs can decide to go x8/x8/x16/- or x16/-/x8/x8, depending of if those bottom panel headers are of importance.
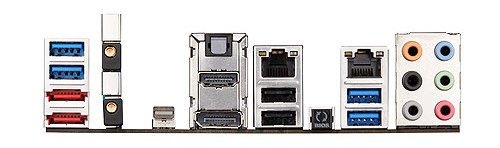
Due to a couple of features that ASUS use, the IO panel does not look as substantial as previous iterations – however part of this is due to including a Thunderbolt controller, the WiFi module, and USB BIOS Flashback. From left to right, we have two USB 3.0 in blue (chipset), two eSATA 6 Gbps (ASMedia), a dual band WiFi and Bluetooth v4.0 module, a Thunderbolt port, HDMI output, DisplayPort output, SPDIF output, dual Intel GbE, two USB 2.0 (black), two USB 3.0 (blue), the USB BIOS Flashback button, and standard audio jacks.
The Thunderbolt port is limited to its current location of the PCB due to the tracing on board, which is limited to less than an inch from the controller, compared to USB tracing which can be longer than 10 inches. Perhaps ASUS in the future can organize the USB BIOS Flashback button (and perhaps ROG Connect) above this Thunderbolt port in order to increase the available real estate on the back panel.


Board Features
| ASUS P8Z77-V Premium | |
| Price | Link |
| Size | ATX |
| CPU Interface | LGA-1155 |
| Chipset | Intel Z77 |
| Memory Slots |
Four DIMMs, Supporting up to 32GB DDR3 1066-2800 MHz, Non-ECC |
| Video Outputs |
HDMI DisplayPort Thunderbolt |
| Onboard LAN |
Intel 82579V Intel 82583 |
| Onboard Audio | Realtek ALC898 |
| Expansion Slots |
2 x PCIe 3.0 x16 (x8 when slots underneath are occupied) 2 x PCIe 3.0 x8 2 x PCIe 2.0 x1 |
| Onboard SATA/RAID |
2 x SATA 6 Gbps (Intel), Supports RAID 0, 1, 5, 10 3 x SATA 3 Gbps (Intel), Supports RAID 0, 1, 5, 10 1 x mSATA 3Gbps (Intel) with 32GB SSD 4 x SATA 6 Gbps (Marvell 9230), Supports RAID 0, 1, 10 2 x eSATA 6 Gbps (ASMedia) |
| USB |
4 x USB 3.0 (Intel) [2 back panel, 2 onboard] 2 x USB 3.0 (ASMedia) [2 back panel] 6 x USB 2.0 (Intel) [2 back panel, 4 onboard] |
| Onboard |
6 x SATA 6 Gbps 3 x SATA 3 Gbps 1 x USB 3.0 Header 2 x USB 2.0 Headers 1 x mSATA Connector 6 x Fan Headers 1 x SPDIF Out Header 1 x MemOK! Button 1 x TPU Switch 1 x EPU Switch Power/Reset Buttons Clear CMOS Button CPU/DRAM Overvoltage Jumpers |
| Power Connectors |
1 x 24-pin ATX Power Connector 1 x 8-pin CPU Power Connector |
| Fan Headers |
1 x CPU Fan Header (4-pin) 1 x CPU-OPT Fan Header (4-pin) 4 x CHA Fan Headers (4-pin) |
| IO Panel |
1 x Thunderbolt Port 1 x DisplayPort 1 x HDMI 2 x eSATA 6 Gbps 2 x Intel GbE 4 x USB 3.0 2 x USB 2.0 1 x Optical SPDIF Out 1 x Dual Band WiFi/Bluetooth 1 x USB BIOS Flashback Button Audio Jacks |
| Warranty Period | 3 Years |
| Product Page | Link |
As specified in the overview, we have a wealth of additional functionality on the P8Z77-V Premium. Here are my estimates for the BOM costs of individual parts and features:
- Dual Intel NIC ($20 combined)
- 32GB LiteOn mSATA SSD ($60)
- PLX PEX 8747 ($40)
- WiFi and Bluetooth module ($40)
- Thunderbolt ($40)
- Marvell controller for 4 extra SATA ports / SSD Caching ($20)
- Included USB 3.0 Front box ($20)
- iNetwork Control ($15)
- Fan Xpert II Software (comparable $50 controller would not give similar options)
- USB 3.0 Boost + Specific ASMedia controller ($15)
- ASUS Premium Service (for North American customers) (??)
Totaling these up (please note, these are my own interpretations) would come to $320 – a sizable sum which would pay for three low cost Z77 boards by itself! Removing these would come to $130, or the price of the P8Z77-V LX. A lot of research and development goes into many of these features (such as the Marvell controllers have x2 PCIe interconnect, or the research/development to put the WiFi module onto the backplane as a card rather than an x1 addition) which we cannot quantify. This puts the Premium at good value for the features it provides.
So as long as the user can use the above options, then this would make the Premium a good buy (assuming all else is equal). Otherwise, we come up against the luxury car scenario. Nevertheless, ASUS tell me that during the first three months of the X79 release, the Rampage IV Extreme was their best selling X79 board, despite being the most expensive and having a range of included features that many of the users on the board would not consider using. Therefore, despite what common sense from a reviewer's perspective may believe, expensive boards can sell well.
One other point to note is the lack of additional PCIe power supplied to the motherboard. Typically on products using two or more GPUs we see an extra power connector which supplies extra power to the PCIe slots. Each PCIe slot should get up to 75W from various power sources, which means that ASUS are confident in pulling at least 300W from the 24-pin ATX power connector. The usual response to having additional power connectors is to help with grounding or in overclocked situations. However, I feel it would be useful for any 4-GPU configuration. So it is odd not to have included something like a SATA power connector for more PCIe juice.
ASUS P8Z77-V Premium BIOS
The ASUS graphical BIOS interface is now steadfast in a reviewers mind. It utilizes a dual system of an ‘EZ’ (that is ee-zee rather than the British ee-zed) mode and an advanced mode to tailor the options to the type of user. When a user enters the BIOS, the EZ mode should be presented.
The EZ mode screen is a single interface which contains key valuable information – the name of the motherboard, the version of the BIOS, the CPU model and speed, the memory size and speed, temperatures, voltages, fan speeds, system modes and a boot priority. This is all key information that any system builder, or problem solver, would love the instant we get into the BIOS, so kudos to ASUS for providing this interface. Within the scope of the graphical BIOS, it would be possible to include innovative ways to display this data.
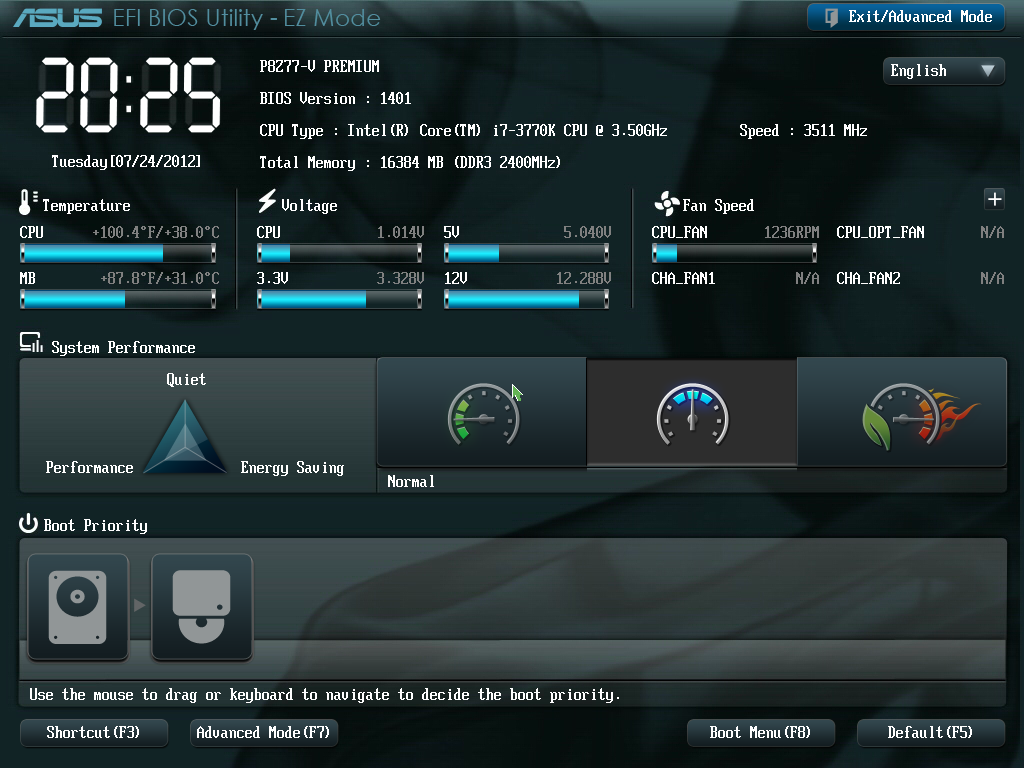
The EZ mode screen allows users to select one of three performance modes - energy saving, normal, or boost. The boost function performs the OC Tuner or 'Fast' overclock settings, as described in the Overclocking section. In addition we have the boot priority menu, were users can slide the device of their choice as first boot device. The Boot Menu allows users to boot from a specific device for just that boot (useful for reviewers installing new OS from USB stick), and the shortcut/Advanced options will take a user to the Advanced Mode menus.
The Advanced Mode menus are more akin to the typical BIOS interface that prevailed before Sandy Bridge and the P67 chipset. With the ASUS P8Z77-V Premium, the first screen in this mode has some more data related to the system, but the main point of the advanced mode is the overclocking section, AI Tweaker:
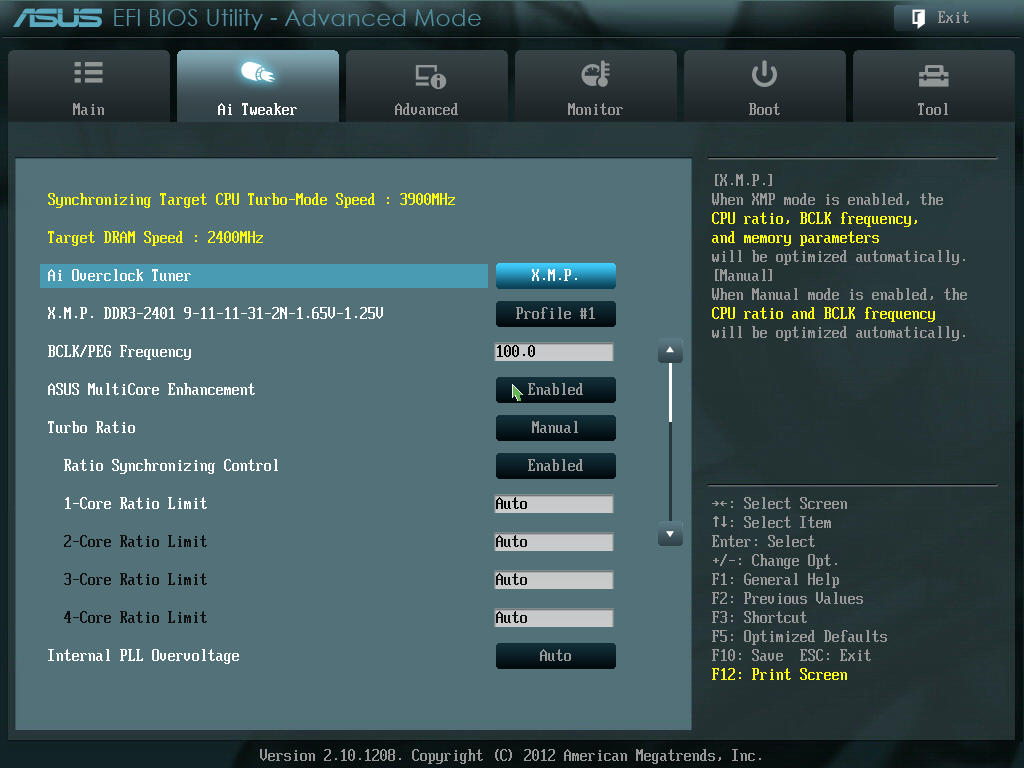
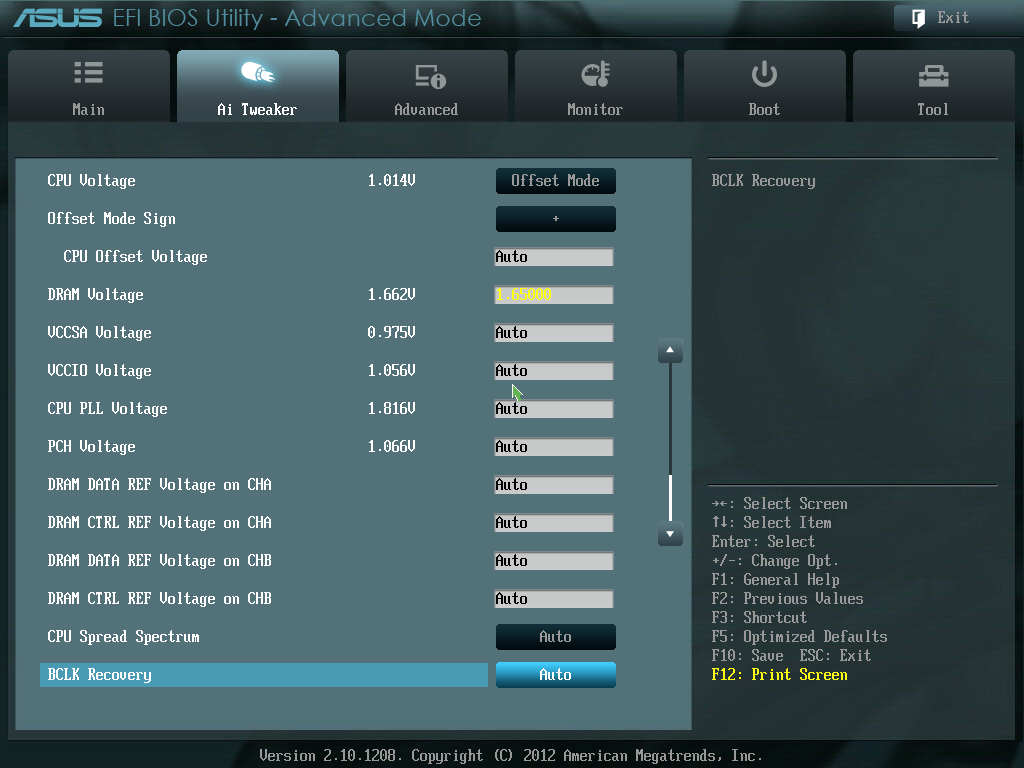
As you can see in the images above, we have selected XMP, which causes MultiCore Enhancement to be enabled. This MultiCore Enhancement option lets the processor use the top turbo mode of the processor at all times, giving (at stock) a small performance boost under heavily multithreaded workloads.
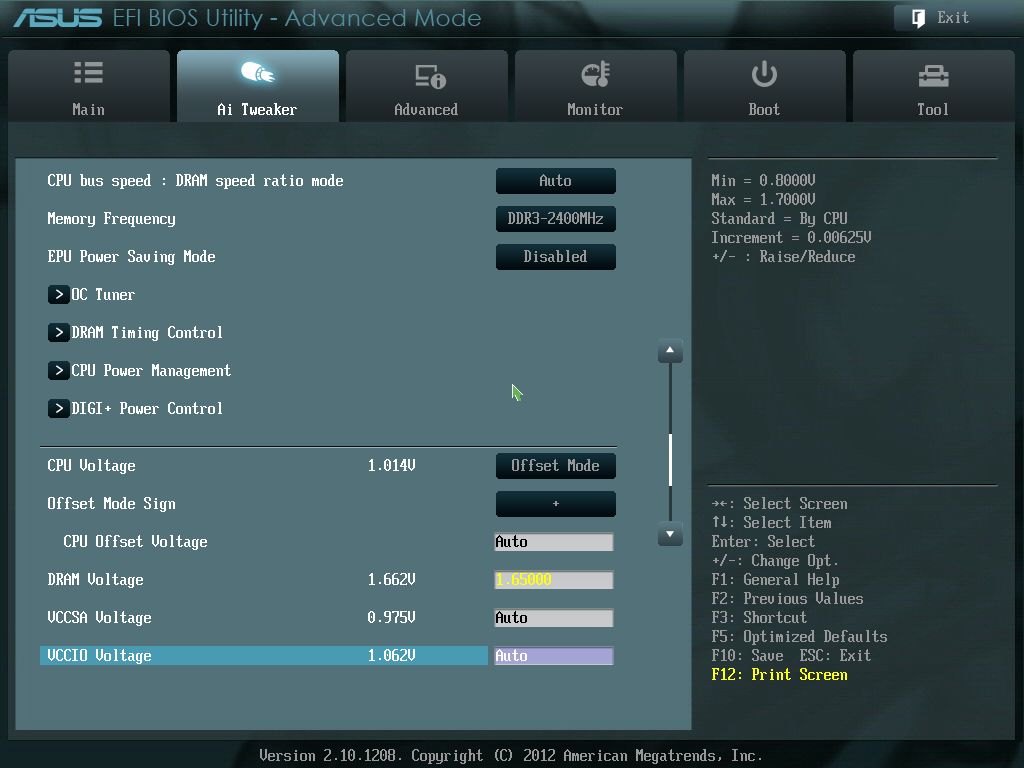
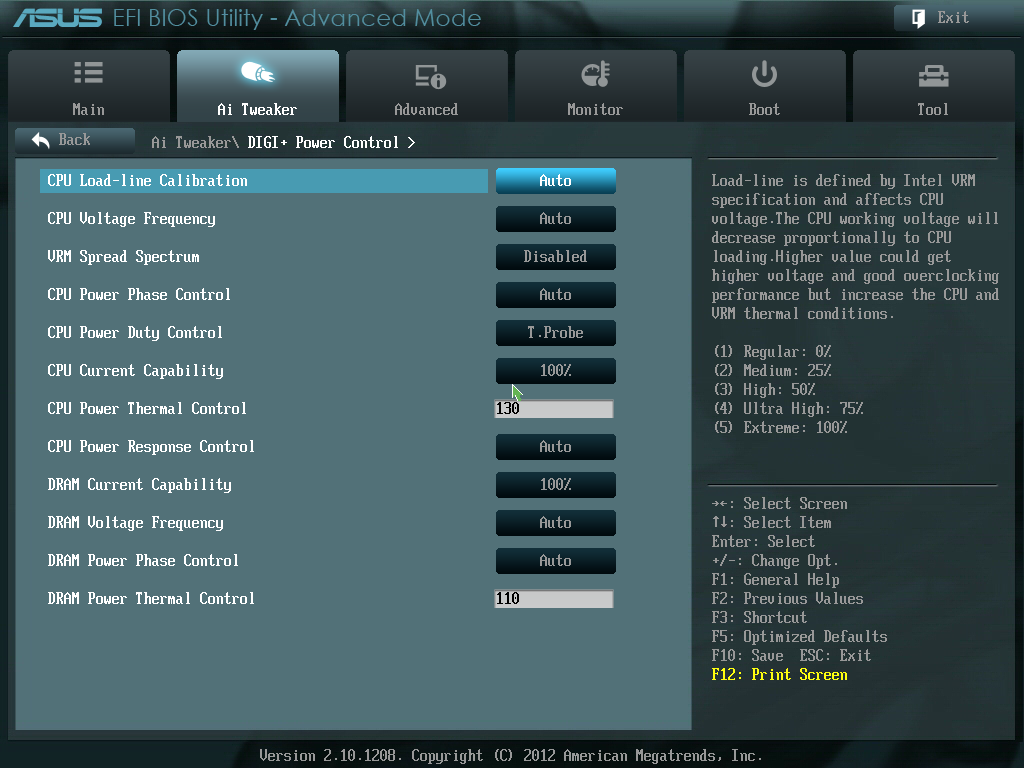
AI Tweaker contains all the main tools for normal overclocking - the CPU multiplier is adjustable (1-Core Ratio Limit option), as well as the memory and the voltages. In order to change the load line calibration, navigate to the DIGI+ Power Control Menu:
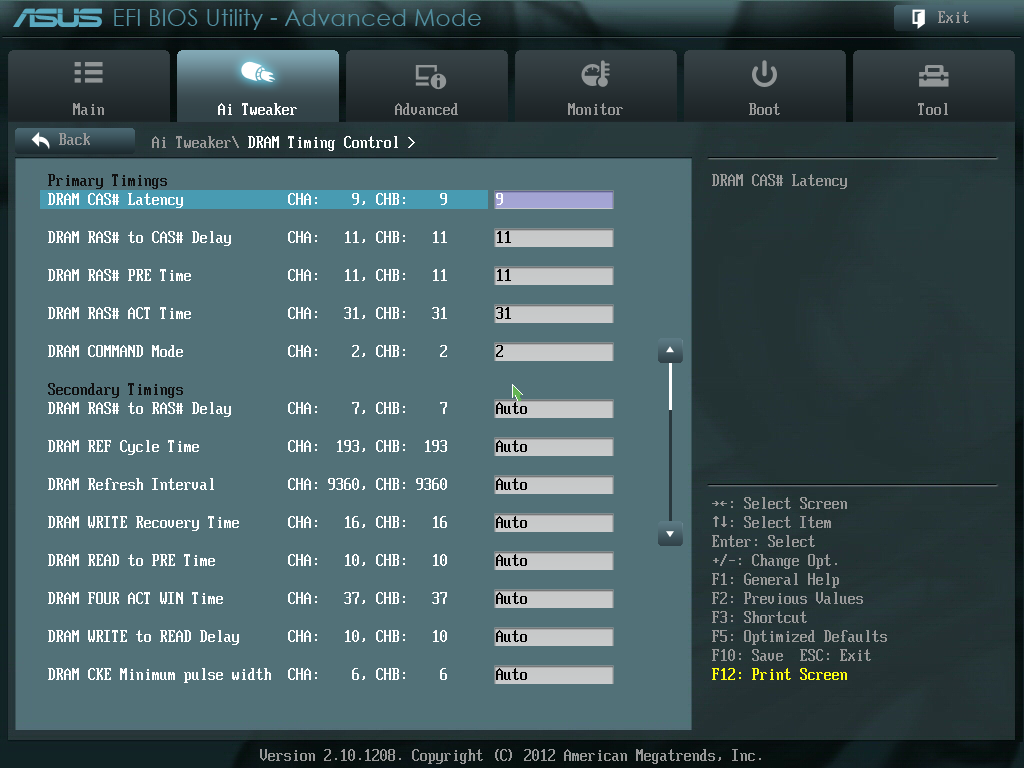
Memory timings can also be adjusted through the DRAM Timing Control menu:
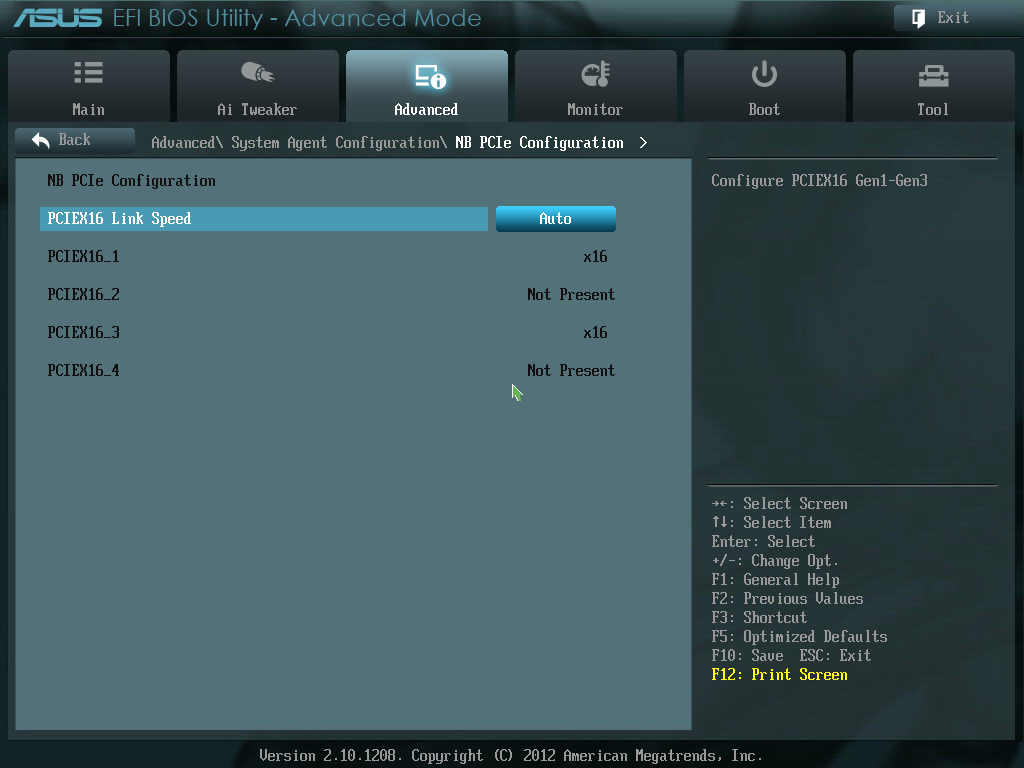
Users can double check to see how the GPU lanes are configured on their multi-GPU setups by navigating to Advanced -> System Agent Configuration -> NB PCIe Configuration:
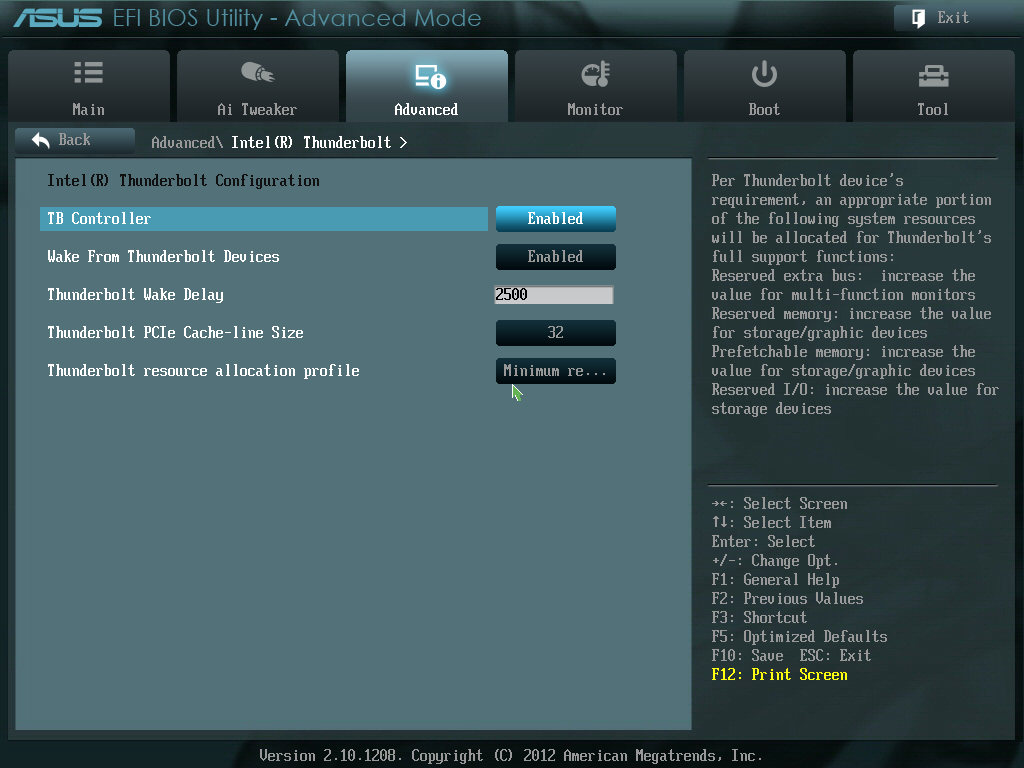
The Thunderbolt options for the Premium also have their own menu. I did notice that in the beta release BIOS I had with this board compared to the BIOS we are using for this review (1401) that some of these options are different. However, with the 1401 BIOS, ASUS give various options related to the TB port and explanations with them:
Always of note on an ASUS motherboard is the depth of the fan controls that are available. In the BIOS, we have the in-depth options for the fans in the form of Q-Control, which gives either preset profiles or manual adjustment in terms of percentages of fan power and temperatures - something which other motherboards sometimes refuse to do. All the fan headers are controllable through the BIOS. However, with the graphical BIOS being what it is, I would like to see some sort of graphical representation of the fan speeds (similar to that done in the OS) and gradients.
ASUS also offer a BIOS Flash Utility in the BIOS, for users wishing to download the latest BIOS via USB stick on a different machine. The ASUS P8Z77-V Premium also supports USB BIOS Flashback, where users can update the BIOS without the need for a CPU, a video card or memory.


ASUS P8Z77-V Premium Software
The software ASUS produces, much like their BIOS, is some of the best available in the motherboard arena today. Where some other companies offer no software at all for things like fan support and overclocking, or perhaps the company may have a simple monitoring tool, ASUS goes the whole way to ensure that almost everything that has a control that the user would be concerned about is available to select in the software.
The heart of the software comes from AI Suite. This bit of software acts as the central hub for all other ASUS software features, which means that it is a very simple installation when it comes off the CD.
The install CD is quick and painless - one click of 'InstAll' will get you all the drivers needed, and if a user selects to customize their install, it allows selection and de-selection of various software features (anti-virus et al.).

AI Suite

AI Suite starts as a simple bar with buttons for the software tools, monitoring and updates, as well as a tuning button to allow the software to perform overclocking. As part of our reviews of the P8Z77-V Pro and the P8Z77-V Deluxe, we have covered most of this software, including:
TurboV Evo: Overclocking tools.
DIGI+ Power Control: Adjusting power delivery to the system.
EPU: Energy saving functionality.
Fax Xpert 2: Fan control and management.
Probe II: Monitoring temperatures, voltages and fan speeds.
Sensor Recorder: Time comparison charts for Probe II.
AI Charger+: Fast USB 3.0 charging for BC 1.1 compliant devices.
USB Charger+: Fast charging while in sleep, hibernate or shutdown.
USB 3.0 Boost: Increased USB 3.0 speed.
Network iControl: Manual control over network priorities.
ASUS SSD Caching II: SSD Caching using ASUS technology and Marvell controllers.
Here are the key features:
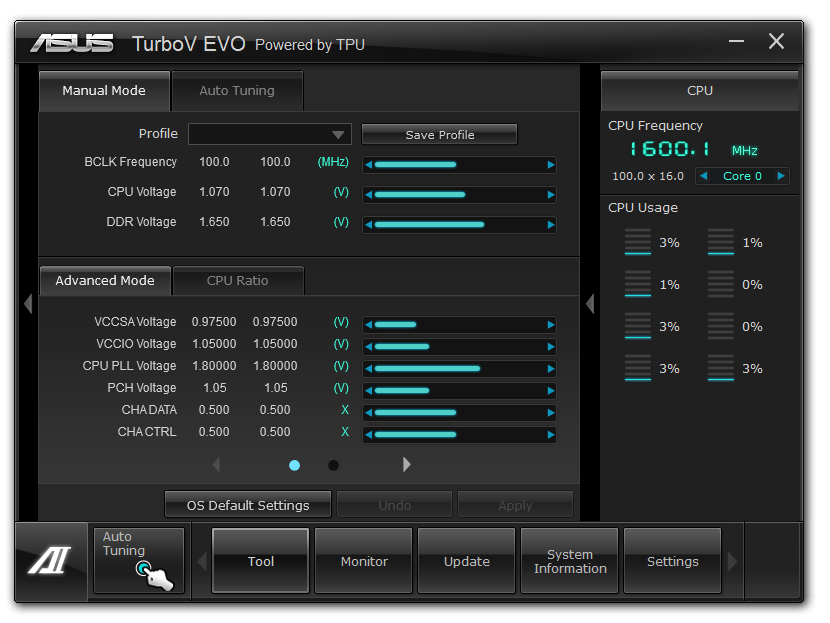
TurboV Evo
The overclocking heart of AI Suite is TurboV Evo, which allows users to adjust the voltages and BCLK of the system in real time. I typically use this software to find basic OS limits, and then attempt to boot into OS at that speed to give a little headroom.
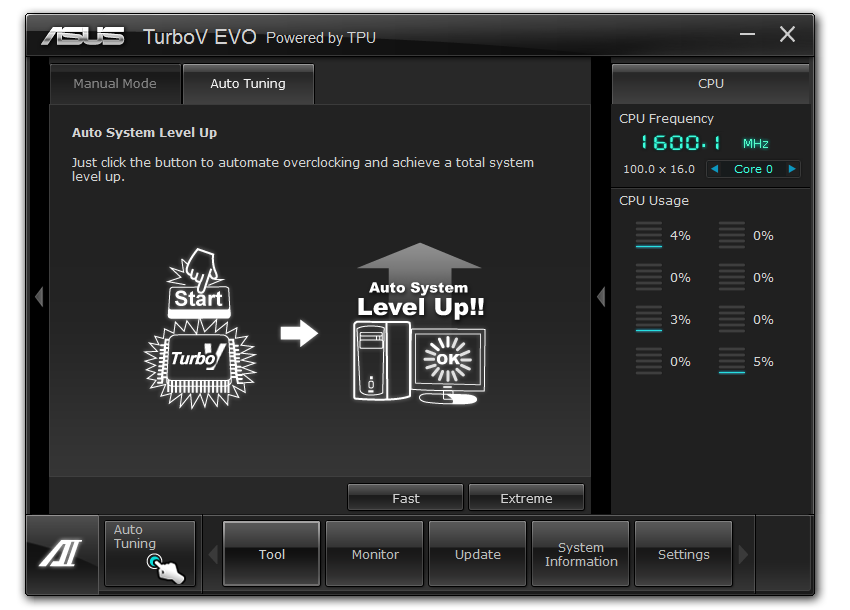
Part of TurboV Evo is the Auto Tuning section, which gives users two choices for automatic overclocks - Fast and Extreme. Both of these are covered in the Overclocking part of the P8Z77-V Premium section of this review.
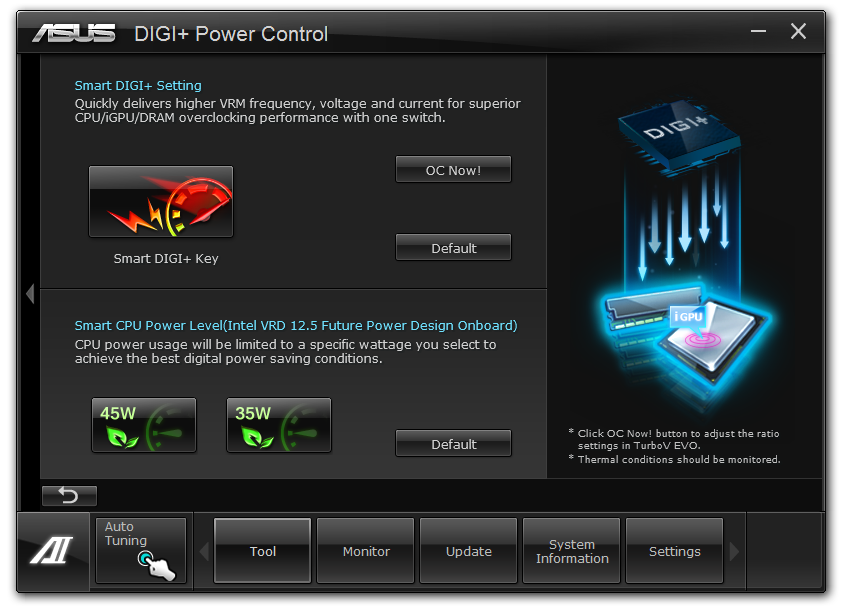
DIGI+ Power Control
One of the features that ASUS likes to advertise as part of their motherboard range is the ability for the user to adjust how the power delivery responds to load. These options help maintain constant voltage under busy periods (useful for stability testing and overclocks), or can be used to reduce the power usage of the motherboard and increase life expectancy. Along with the BIOS controls, ASUS also offers software tools in AI Suite to perform these operations.
.png)
Fan XPert 2
In order to separate itself from the rest of the motherboard manufacturers, ASUS does like to parade their fan technology. By using upgraded fan controllers on board, a combination of hardware and clever software allows ASUS to control their fans like no other. From the software perspective, we have Fan Xpert 2.
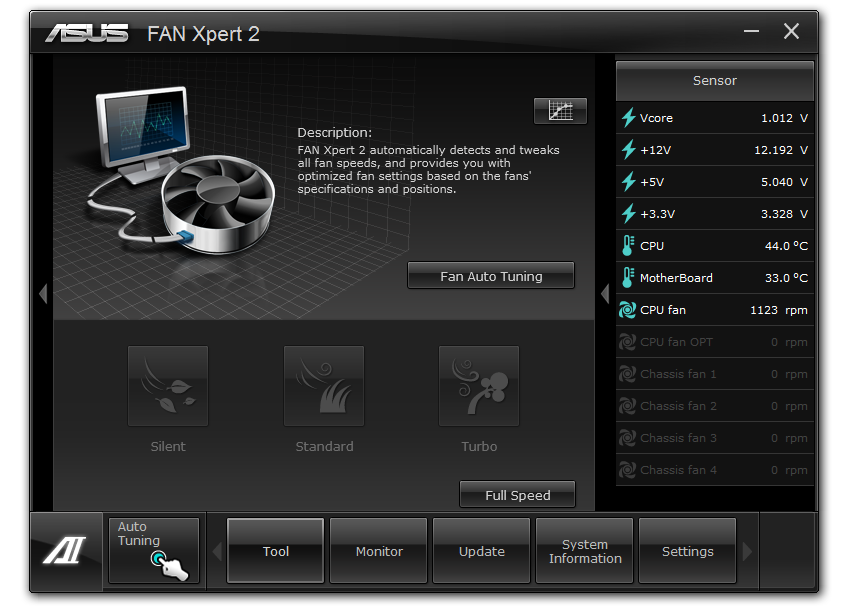
Fan Xpert will auto tune the fans, giving each one a power vs. RPM curve (as fans do not linearly increase in speed with applied power). The user can then adjust a multi-point power against temperature curve for each of the fans in the system. In my case, I like to have my fans run as quiet as possible when idle and during videos, and as fast as they can during gaming.


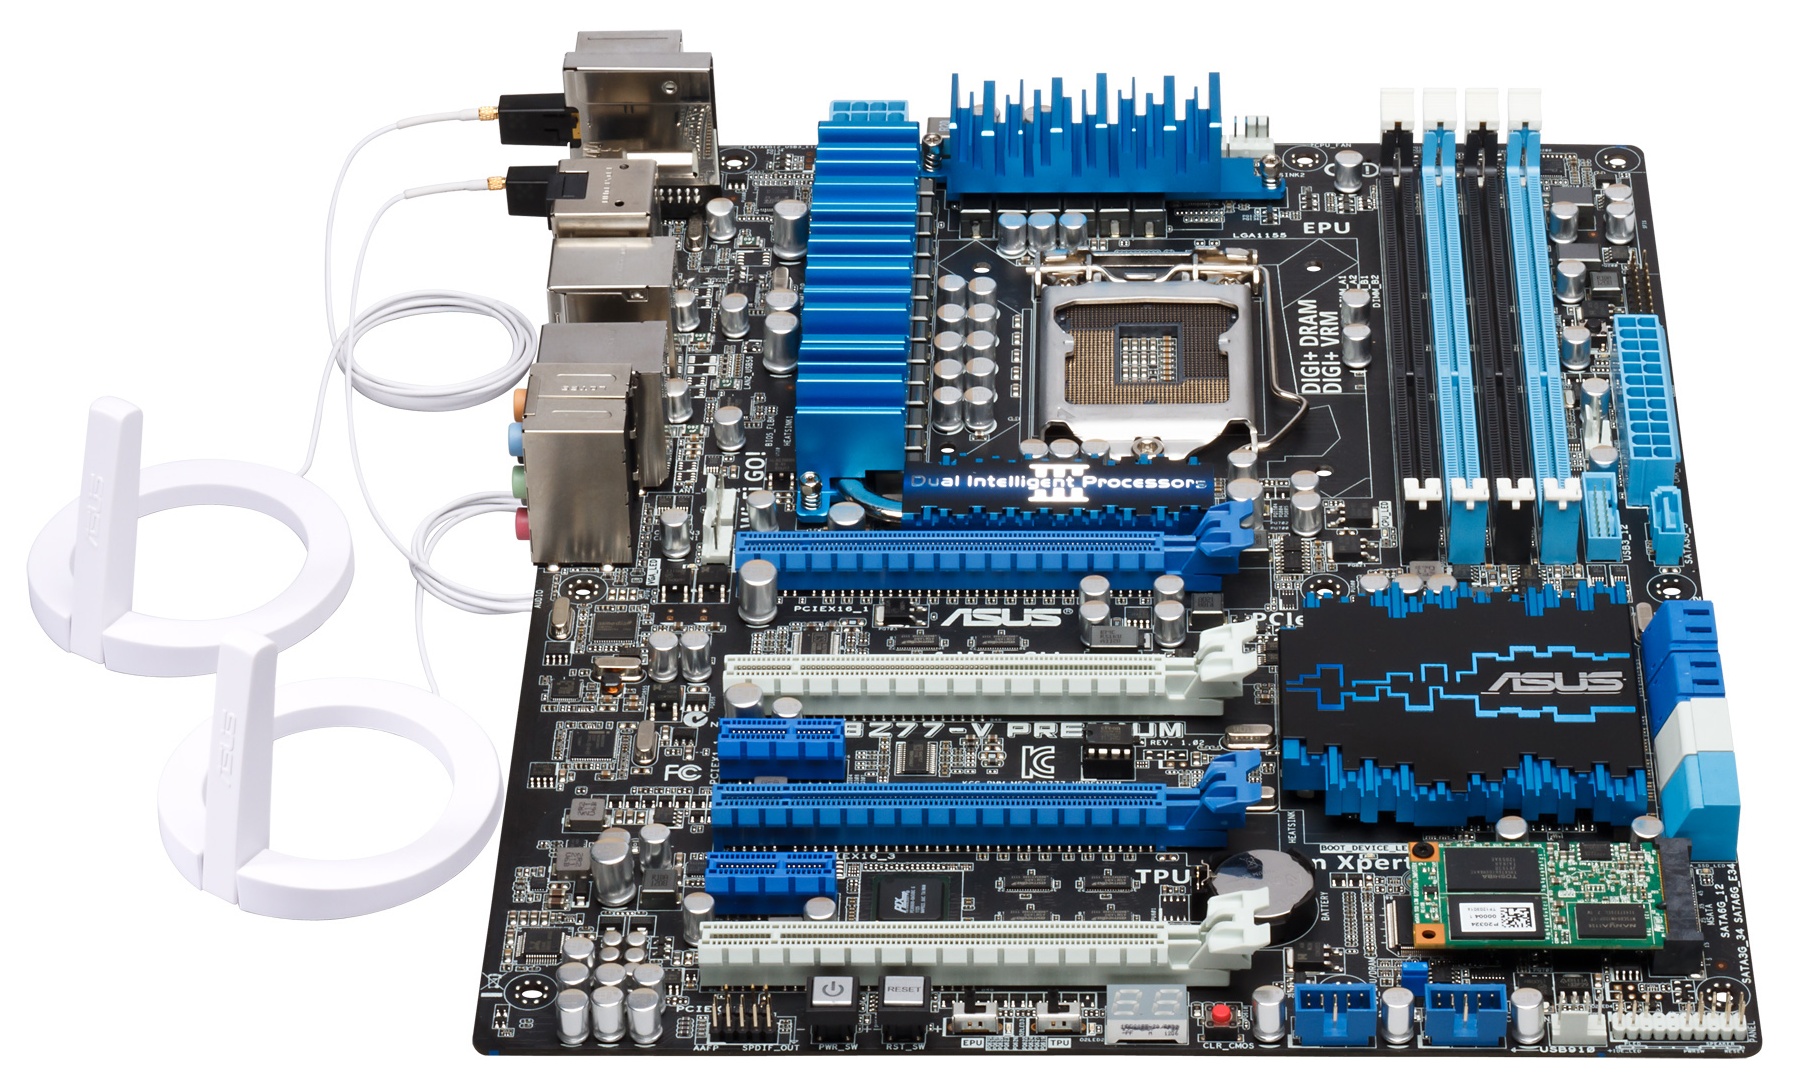
ASUS P8Z77-V Premium In The Box
Being ASUS’ top channel SKU, bonuses in the box are expected to be numerous and beneficial – perhaps even better than the package supplied by the P8Z77-V Deluxe. ASUS definitely do deliver:
IO Shield
Driver CD
User Guide
WiFi User Guide
Six SATA Cables
2-way SLI Flexi-Bridge
3-way SLI Rigid Bridge
4-way SLI Rigid Bridge
Two magnetic WiFi antenna
WiFi Go! Card
USB 3.0 Front Box
Q-Connectors

That is a lot of extra in the box. The WiFi module should be installed before the CPU is installed due to the way it screws into the motherboard, and the antennas are designed to magnetize to the outside of the PC case. The USB 3.0 front box is a great addition, one that should be included in most non-mITX packages, and as expected we get several SLI bridges in what is a multi-GPU focused motherboard.
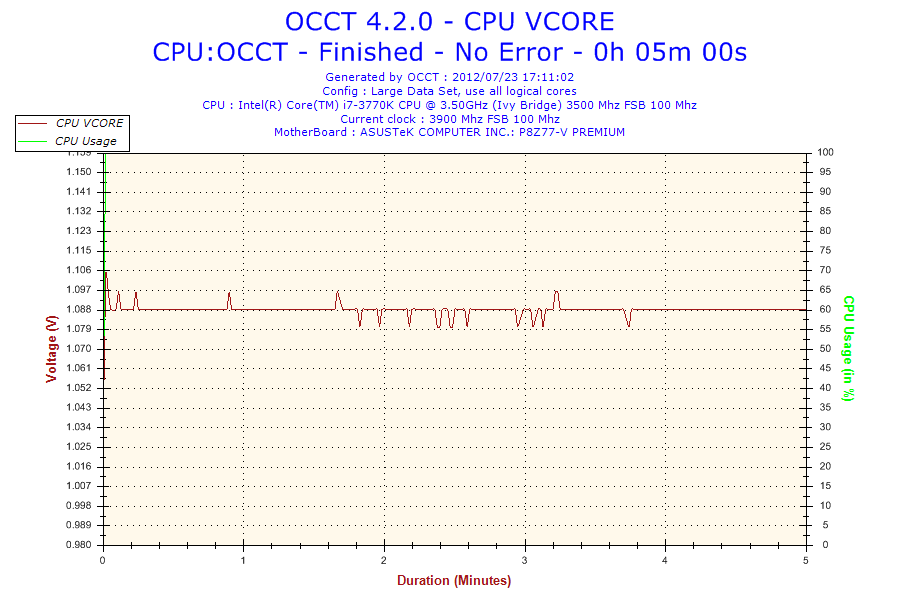
Voltage Readings
After my first publication of OCCT voltage readings, a few readers responded with a more in-depth reasoning behind some of the results we were seeing. With this in mind, I would like to re-describe what we are doing with this test, and how it comes about.
Much of what an enthusiast overclocker does is monitor CPU temperature and voltage. Whatever settings a user places in the BIOS or OS is at the mercy of the motherboard - in terms of actually setting the values and reporting the values back. As an enthusiast, we have to rely on what readings we get back, and hope that motherboard manufacturers are being honest with their readings.
Take CPU voltage. What we as a user see in CPU-Z or OCCT is a time-averaged value that hides voltage ripple (if any) for power delivery. It is very easy for a motherboard manufacturer to hide this value, or to disregard slight deviations and report a constant value to the user. The CPU voltage reading can be taken at a variety of places on the power plane, which can vary between motherboards and manufacturers, meaning that each reading is essentially not comparable with the other. Nevertheless, as an enthusiast, we will constantly compare value A with value B.
Whether or not I can achieve 4.7 GHz with 1.175 volts on a particular board is inconsequential - your motherboard may perhaps produce the same result with a reading at 1.200 volts. The only way to test the actual value is with consistent methodology is via an oscilloscope connected to similar points on each board. This may sound like taking an OCCT reading is therefore redundant.
However, motherboards have settings relating to load line calibration. As load is applied to the CPU, the voltage across the processor decreases (VDroop). Load Line calibration essentially attempts to control this level of droop, by increasing voltage when voltage drops are detected away from a fixed value. Manufacturers have different ideas on how to modify LLC with respect to load, or whether the level of modification should be controlled by the user. Some manufacturers offer the option at a variety of levels, such that overclockers can be sure of the applied setting (even if it increases peak voltage, as explained by AnandTech in 2007).
By doing a full load OCCT test, we are essentially determining both how aggressive the motherboard is reporting the CPU voltage under load and how aggressive load line calibration is performing (from the point of view of the user without an oscilloscope or DVM). If someone has one of the motherboards we have tested and you have a different one, variations in load voltage should describe the offset you may require for overclock comparisons.
| Reported Load Voltage / V | |
| ASRock Fatal1ty Z77 Professional | 0.956 |
| ASRock Z77 Extreme4 | 1.050-1.058 |
| ASRock Z77 Extreme6 | 1.040-1.048 |
| ASUS P8Z77-V Deluxe | 1.085 |
| ASUS P8Z77-V Pro | 1.090 |
| ASUS P8Z77-V Premium | 1.088 |
| Biostar TZ77XE4 | 1.036 |
| Gigabyte Z77X-UD5H | 1.067 |
| Gigabyte Z77X-UD3H | 1.067 |
| MSI Z77A-GD65 | 1.020 |
ASUS P8Z77-V Premium Overclocking
Note: Ivy Bridge does not overclock like Sandy Bridge. For a detailed report on the effect of voltage on Ivy Bridge (and thus temperatures and power draw), please read Undervolting and Overclocking on Ivy Bridge.
Experience with ASUS P8Z77-V Premium
Overclocking with the P8Z77-V Premium was as straightforward as any other ASUS motherboard. In terms of automatic overclocking, we have two options in AI Suite – Fast and Extreme. The TPU switch and OC Tuner option in the BIOS both perform the ‘Fast’ option equivalent. The Extreme setting performs automatic stress testing in order to raise both the multiplier of the CPU and the BCLK to get the best overclock based on cooling and environment.
Manual overclocking was a little mixed - the way that ASUS performs the overclock is to apply the settings after the POST, which means that a user is almost always guaranteed to get into the BIOS. However, for the most part of our overclock testing, the system would go straight through into our testing, and would seem stable during the first couple of minutes in our testing before producing a memory error if the voltage is not sufficient. Nonetheless, we did get a competitive result for our overclocking.
One note I should point out – after seven weeks of dull and dreary weather here in the UK, during testing of this motherboard we ended up with bright sunshine, causing ambient temperatures to raise from 15°C to 25°C, and humidity to also rise. As a result, overclocking on this system hit its peak earlier than in other environments. Unfortunately it is not common for residential properties in the UK to have air conditioning either, so we had to make do with an additional pair of powerful Delta fans to aid cooling.
Methodology:
Our standard overclocking methodology is as follows. We select the automatic overclock options and test for stability with PovRay and OCCT to simulate high-end workloads. These stability tests aim to catch any immediate causes for memory or CPU errors.
For manual overclocks, based on the information gathered from previous testing, starts off at a nominal voltage and CPU multiplier, and the multiplier is increased until the stability tests are failed. The CPU voltage is increased gradually until the stability tests are passed, and the process repeated until the motherboard reduces the multiplier automatically (due to safety protocol) or the CPU temperature reaches a stupidly high level (100ºC+).
Our test bed is not in a case, which should push overclocks higher with fresher (cooler) air. We also are using Intel's All-in-one Liquid Cooler with its stock fan. This is a 120mm radiator liquid cooler, designed to mimic a medium-to-high end air cooler.
Automatic Overclock:
The two options for the automatic overclocking are found in AI Suite – either Fast, which applies a fixed overclock series of settings, or Extreme, which uses stress testing and sensors to find the best overclock with respect to the local environment. Here are our results.
At the Fast setting, the CPU was raised to the 41x multiplier and 103 MHz BCLK, giving an overall overclock to 4223 MHz. In the OS, this showed an OCCT load voltage of 1.128 volts, and peak temperatures during PovRay of 76°C and OCCT of 78°C.
At the Extreme setting, the CPU was raised to the 45x multiplier and 103 MHz BCLK, giving an overall overclock of 4635 MHz. In the OS, this showed an OCCT load voltage of 1.296 volts, and peak temperatures during PovRay of 98°C and OCCT of 102°C.
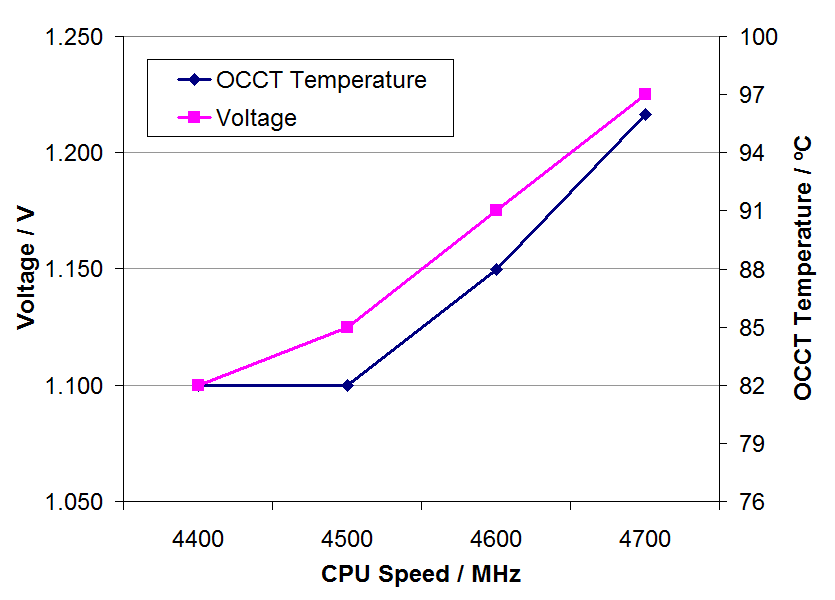
Manual Overclock:
Manual overclocks were performed purely by entering the BIOS and adjusting values. With the AI Overclock Tuner mode set to ‘Manual’, the main options being changed were the 1-core Ratio Limit and the CPU voltage set to a fixed value. Load Line Calibrations were left on Automatic. Here are our results.
Starting at the 44x multiplier and 1.100 volts set in the BIOS, the system showed an OCCT load voltage of 1.112 volts, and peak temperatures of 79°C during PovRay and 82° in OCCT were observed.
At the 45x multiplier, the minimum voltage stable was 1.125 volts set in the BIOS, which showed an OCCT load voltage of 1.128 volts. Peak temperatures of 80°C in PovRay and 82° in OCCT were observed.
At the 46x multiplier, the minimum voltage stable was 1.175 volts set in the BIOS, which showed an OCCT load voltage of 1.176 volts. Peak temperatures of 85°C in PovRay and 88° in OCCT were observed.
At the 47x multiplier, the minimum voltage stable was 1.225 volts set in the BIOS, which showed an OCCT load voltage of 1.232 volts. Peak temperatures of 93°C in PovRay and 96° in OCCT were observed.
At the 48x multiplier, a BIOS voltage of 1.275 volts was not stable in the OS, giving memory errors in PovRay and showing 98°C peak temperature during the initial PovRay running.
Many thanks to...
We must thank the following companies for kindly donating hardware for our test bed:
OCZ for donating the Power Supply and USB testing SSD
Micron for donating our SATA testing SSD
G.Skill for donating our memory kits
ASUS for donating AMD GPUs and some IO testing kit
and ECS for donating NVIDIA GPUs
Test Setup
| Processor |
Intel Core i7-3770K ES 4 Cores, 8 Threads, 3.5 GHz (3.9 GHz Turbo) |
| Motherboards |
ASRock Z77 Extreme4 ASRock Z77 Extreme6 ASRock Fatal1ty Z77 Professional ASUS P8Z77-V Pro ASUS P8Z77-V Deluxe ASUS P8Z77-V Premium Biostar TZ77XE4 Gigabyte GA-Z77X-UD3H Gigabyte GA-Z77X-UD5H Gigabyte GA-Z77MX-D3H MSI Z77A-GD65 |
| Memory | G.Skill F3-19200CL9Q-16GBZMD |
| Power Supply | OCZ 1250W Gold ZX Series |
| Cooling | Intel All-in-One Liquid Cooler |
| Hard Drive | Micron RealSSD C300 256GB |
| Optical Drive | LG GH22NS50 |
| Case | Open Test Bed - CoolerMaster Lab V1.0 |
| Operating System | Windows 7 64-bit |
| SATA Testing | Micron RealSSD C300 256GB |
| Thunderbolt Testing | LaCie Little Big 240GB |
| USB 2/3 Testing | OCZ Vertex 3 240GB with SATA->USB Adaptor |
Power Consumption
Power consumption was tested on the system as a whole with a wall meter connected to the OCZ 1250W power supply, while in a dual 7970 GPU configuration. This power supply is Gold rated, and as I am in the UK on a 230-240 V supply, leads to ~75% efficiency > 50W, and 90%+ efficiency at 250W, which is suitable for both idle and multi-GPU loading. This method of power reading allows us to compare the power management of the UEFI and the board to supply components with power under load, and includes typical PSU losses due to efficiency. These are the real world values that consumers may expect from a typical system (minus the monitor) using this motherboard.
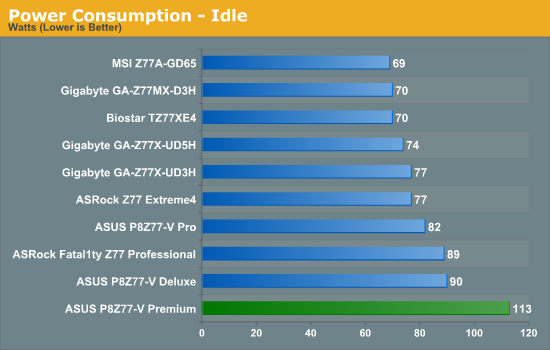
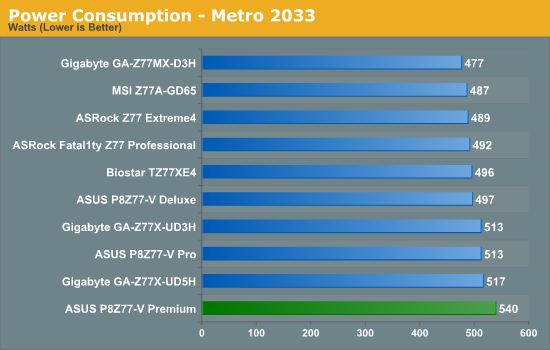
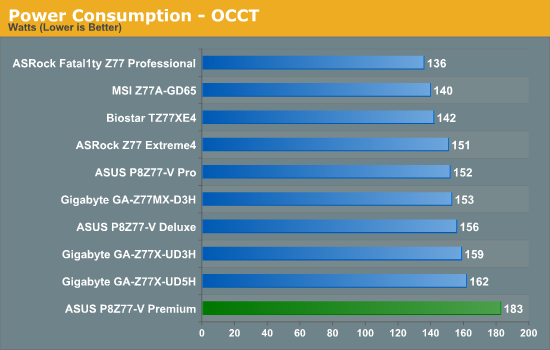
Power consumption on the Premium is markedly higher than any other Z77 motherboard we have tested. This is attributed presumably to the extra controllers on board - the PLX 8747 and the Thunderbolt controller perhaps being the culprits if they are unable to power gate themselves down, as well as the mSATA SSD. The ASUS P8Z77-V Premium also features an enhanced power phase system to maintain stability, which may be another factor.
Note: In our future PLX 8747 review, we find that these power results are a common sight on PLX 8747 motherboards.
POST Time
Different motherboards have different POST sequences before an operating system is initialized. A lot of this is dependent on the board itself, and POST boot time is determined by the controllers on board (and the sequence of how those extras are organized). As part of our testing, we are now going to look at the POST Boot Time - this is the time from pressing the ON button on the computer to when Windows starts loading. (We discount Windows loading as it is highly variable given Windows specific features.) These results are subject to human error, so please allow +/- 1 second in these results.
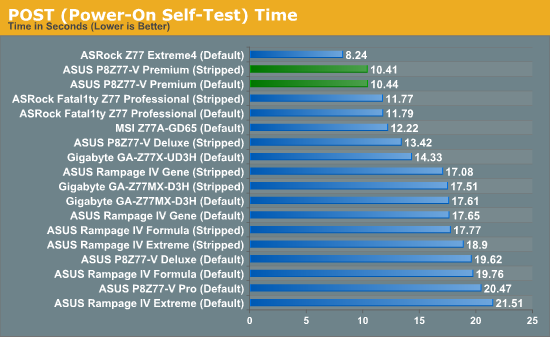
I am not sure exactly what ASUS has done with the Premium, but the boot times are excellent compared to other Z77 motherboards. Only a single ASRock motherboard we have tested gives better boot times at default.
Update: It turns out ASUS has moved from a legacy ROM format to a CAP format in their BIOS system - this allows for quicker booting. This is being rolled out on their X79 and Z77 range as we speak, and should be ready for Windows 8 as well.
Overclock Comparison
Here at AnandTech we want to provide quick and easy ways to determine if a board is good for you (with in-depth analysis of course). So here is a quick round up of our overclocking results. Overclocks are tested for stability with PovRay and OCCT - while these may not be the most strenuous of stability tests, it does offer a quick check for memory errors under high load (and also balances testing time with getting the next board on for review!).
|
CPU Speed (MHz) |
Voltage (Volts) |
PovRay Peak Temp (ºC) |
OCCT Peak Temp (ºC) |
Notes | |
|
ASRock Fatal1ty Z77 Professional |
4700 | 1.200 | 89 | 89 | PLL Overvoltage enabled |
|
ASRock Z77 Extreme4 |
4700 | 1.175 | 86 | 86 | LLC Level 1 |
|
ASRock Z77 Extreme6 |
4700 | 1.175 | 81 | 82 | LLC Level 1 |
|
ASUS P8Z77-V Deluxe |
4700 | 1.225 | 89 | 84 | PLL Overvoltage enabled |
|
ASUS P8Z77-V Pro |
4700 | 1.200 | 83 | 86 | PLL Overvoltage enabled |
|
ASUS P8Z77-V Premium* |
4700 | 1.225 | 93 | 96 | *High Ambients |
|
Biostar TZ77XE4 |
4700 | 1.180 | 84 | 85 | None |
|
Gigabyte Z77X-UD5H |
4700 | 1.225 | 88 | 88 | LLC Extreme |
|
Gigabyte Z77X-UD3H |
4700 | 1.200 | 82 | 86 | LLC Extreme |
|
Gigabyte Z77MX-D3H |
4700 | 1.200 | 80 | 84 | LLC Extreme |
|
MSI Z77A-GD65 |
4700 | 1.250 | 90 | - | PLL Overvoltage enabled |
USB Speed
For this benchmark, we run CrystalDiskMark to determine the ideal sequential read and write speeds for the USB port using our 240 GB OCZ Vertex3 SSD with a SATA 6 Gbps to USB 3.0 converter. Then we transfer a set size of files from the SSD to the USB drive using DiskBench, which monitors the time taken to transfer. The files transferred are a 1.52 GB set of 2867 files across 320 folders – 95% of these files are small typical website files, and the rest (90% of the size) are the videos used in the Sorenson Squeeze test.
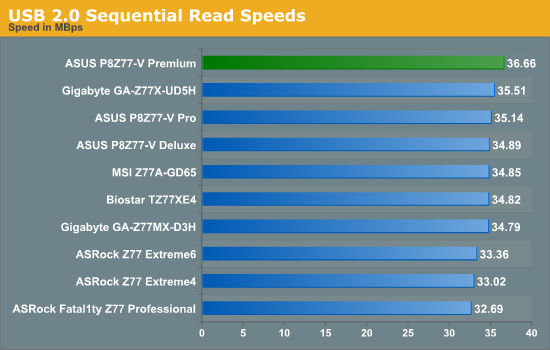
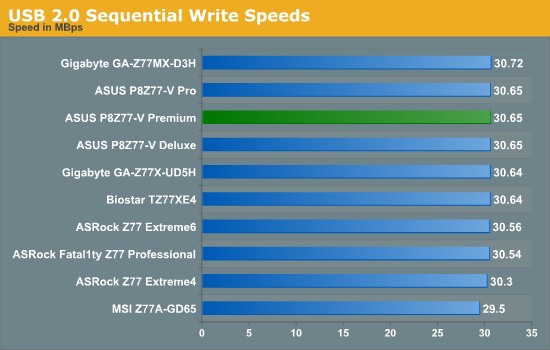
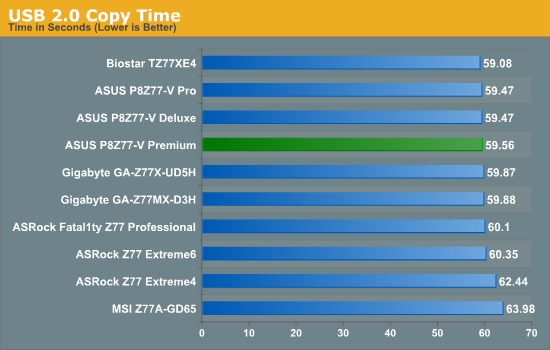
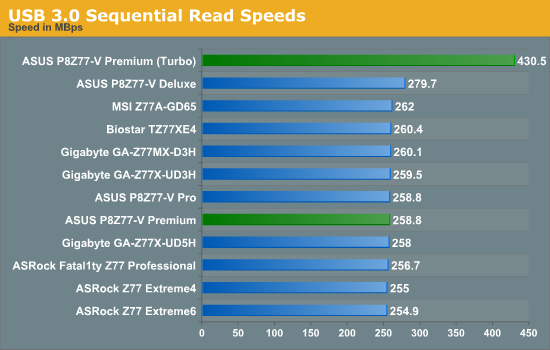
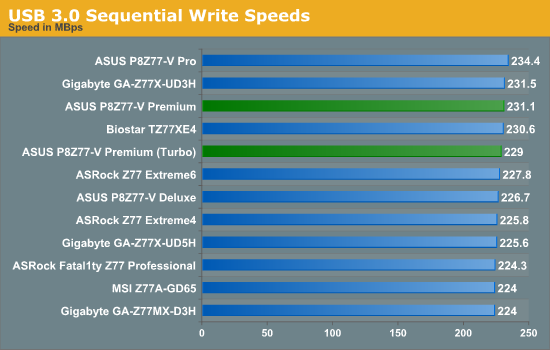
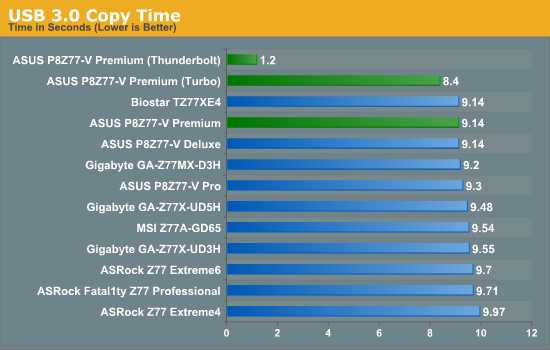
Our chipset USB testing shows the Premium in the top half of each of our graphs. Of particular note is the USB 3.0 copy test, where the Premium equals our best native USB 3.0 copy timings, and using ASUS' enhanced Turbo option on the native USB 3.0, we achieve even better performance. When attached to the ASMedia controller under UASP, the ASUS P8Z77-V Premium performs better than any other motherboard's default solution.
Also of note is our Thunderbolt result for our copy test, which comes in at 1.20 seconds. This result was erratic, sometimes going to three seconds or above. When we come to testing more Thunderbolt motherboards, we have a different copy test to probe differences between the implementations.
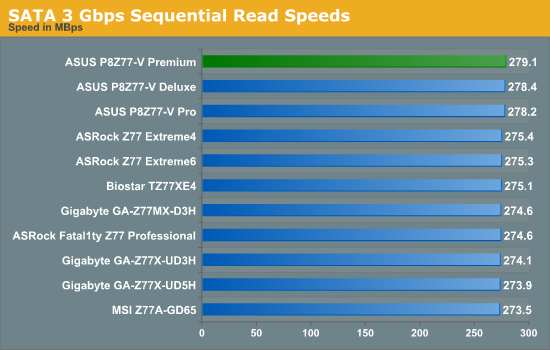
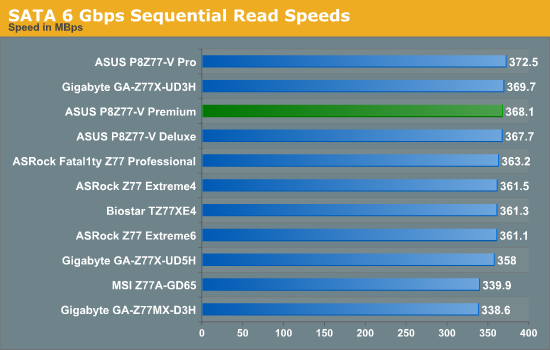
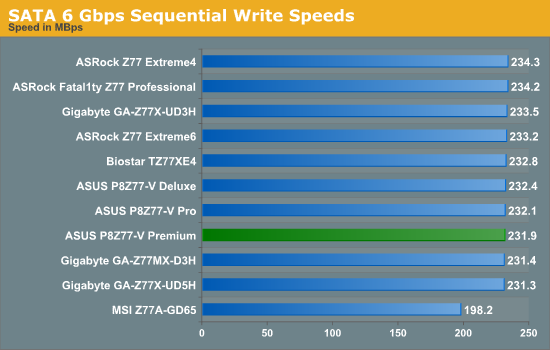
SATA Testing
We also use CrystalDiskMark for SATA port testing on a C300 drive. The sequential test (incompressible data) is run at the 5 x 1000 MB level. This test probes the efficiency of the data delivery system between the chipset and the drive, or in the case of additional SATA ports provided by a third party controller, the efficiency between the controller, the chipset and the drive.

DPC Latency
Deferred Procedure Call latency is a way in which Windows handles interrupt servicing. In order to wait for a processor to acknowledge the request, the system will queue all interrupt requests by priority. Critical interrupts will be handled as soon as possible, whereas lesser priority requests, such as audio, will be further down the line. So if the audio device requires data, it will have to wait until the request is processed before the buffer is filled. If the device drivers of higher priority components in a system are poorly implemented, this can cause delays in request scheduling and process time, resulting in an empty audio buffer – this leads to characteristic audible pauses, pops and clicks. Having a bigger buffer and correctly implemented system drivers obviously helps in this regard. The DPC latency checker measures how much time is processing DPCs from driver invocation – the lower the value will result in better audio transfer at smaller buffer sizes. Results are measured in microseconds and taken as the peak latency while cycling through a series of short HD videos - under 500 microseconds usually gets the green light, but the lower the better.
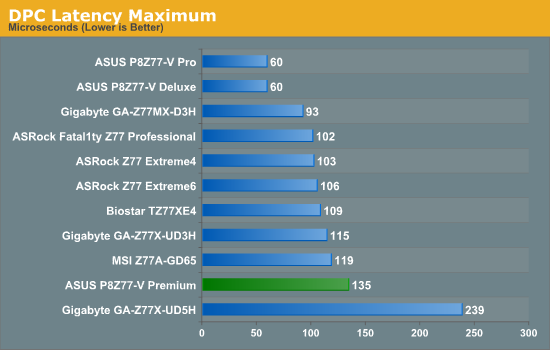
Surprisingly our ASUS P8Z77-V Premium DPC test comes in at one of the highest Z77 motherboard results, double the 60 microseconds of the ASUS P8Z77-V Pro. However, the result is still under 200 microseconds, which gives it an excellent rating.
3D Movement Algorithm Test
The algorithms in 3DPM employ both uniform random number generation or normal distribution random number generation, and vary in various amounts of trigonometric operations, conditional statements, generation and rejection, fused operations, etc. The benchmark runs through six algorithms for a specified number of particles and steps, and calculates the speed of each algorithm, then sums them all for a final score. This is an example of a real world situation that a computational scientist may find themselves in, rather than a pure synthetic benchmark. The benchmark is also parallel between particles simulated, and we test the single thread performance as well as the multi-threaded performance.

Despite all the Z77 motherboards being at the same CPU speed in our 3DPM single threaded test, the ASUS P8Z77-V Premium comes out on top with our two other ASUS motherboards.
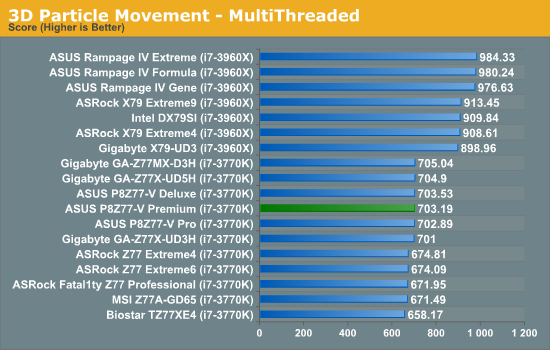
The ASUS P8Z77-V Premium benefits from MultiCore Enhancement in multithreaded testing, which allows the processor to remain at the top turbo bin (39x multiplier) during any load. This gives the Premium (and other ASUS/Gigabyte boards) an advantage in this testing.
WinRAR x64 3.93 - link
With 64-bit WinRAR, we compress the set of files used in the USB speed tests. WinRAR x64 3.93 attempts to use multithreading when possible, and provides as a good test for when a system has variable threaded load. If a system has multiple speeds to invoke at different loading, the switching between those speeds will determine how well the system will do.
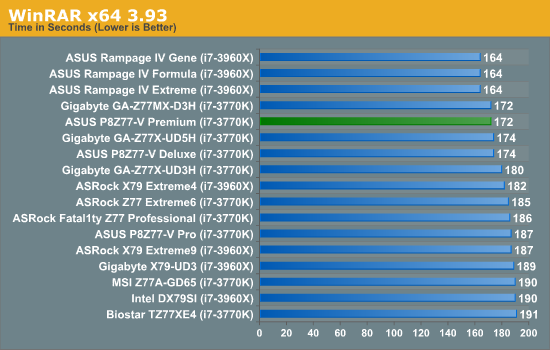
The MultiCore Enhancement of the Premium gives us the joint top Z77 score in our WinRAR test. However, the extra cores and MCE of the ASUS X79 Rampage boards still come out ahead.
FastStone Image Viewer 4.2 - link
FastStone Image Viewer is a free piece of software I have been using for quite a few years now. It allows quick viewing of flat images, as well as resizing, changing color depth, adding simple text or simple filters. It also has a bulk image conversion tool, which we use here. The software currently operates only in single-thread mode, which should change in later versions of the software. For this test, we convert a series of 170 files, of various resolutions, dimensions and types (of a total size of 163MB), all to the .gif format of 640x480 dimensions.

In line with our 3DPM testing, it seems like the ASUS P8Z77-V Deluxe and Premium both have a default algorithm that maintains higher multipliers during single threaded testing. As a result, we have a new top time in our FastStone testing with the Premium at 47 seconds.
Xilisoft Video Converter
With XVC, users can convert any type of normal video to any compatible format for smartphones, tablets and other devices. By default, it uses all available threads on the system, and in the presence of appropriate graphics cards, can utilize CUDA for NVIDIA GPUs as well as AMD APP for AMD GPUs. For this test, we use a set of 32 HD videos, each lasting 30 seconds, and convert them from 1080p to an iPod H.264 video format using just the CPU. The time taken to convert these videos gives us our result.
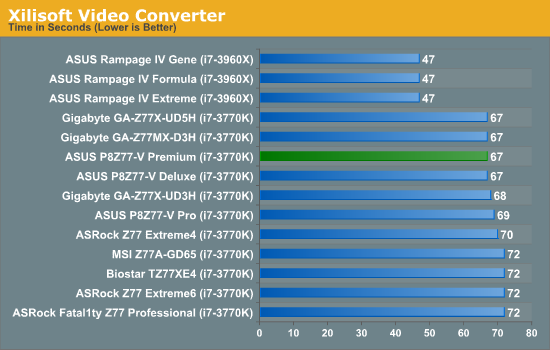
As XVC loves cores and MHz, the Premium and other MultiCore Enhancement boards do very well compared to other Z77 motherboards. X79 still reigns supreme by having more cores and higher memory bandwidth.
x264 HD Benchmark
The x264 HD Benchmark uses a common HD encoding tool to process an HD MPEG2 source at 1280x720 at 3963 Kbps. This test represents a standardized result which can be compared across other reviews, and is dependant on both CPU power and memory speed. The benchmark performs a 2-pass encode, and the results shown are the average of each pass performed four times.
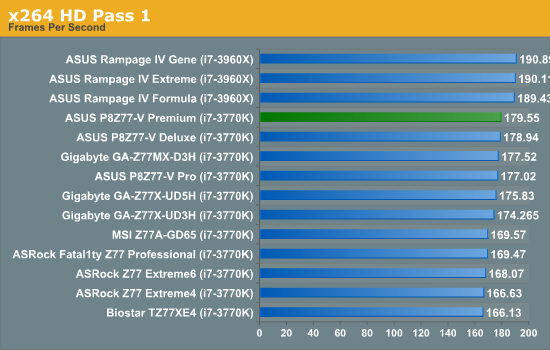
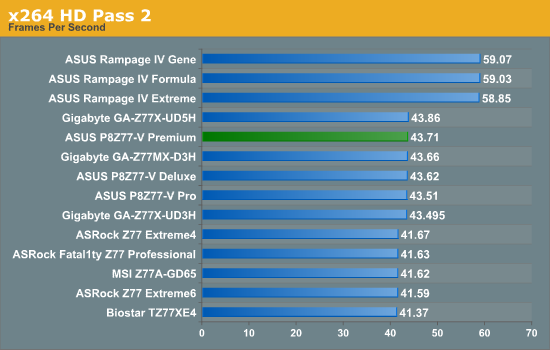
The Premium also comes top or near top in our x264 testing.
Gaming Benchmarks: A note on Multi GPU and PLX PEX 8747
In an upcoming review, we will go into detail regarding the PLX PEX 8747 chip on motherboards. This chip allows the manufacturers to adjust lane counts between PCIe slots, and increase bandwidth between PCIe slots at the expense of added latency to the CPU. Normally the Z77 chipset is limited to x8/x4/x4 in multi-GPU setups, but with the PLX chip this is expanded, such that x8/x8/x8/x8 in PCIe 3.0 is available. There is more under the hood than this, especially relative to performance, but it is important to note for this review and results where we are comparing many setups. Out of the boards we have tested, the configurations are below.
| PCIe Comparison Chart | ||||||
| Chipset | Motherboard | GPUs | GPU 1 | GPU 2 | GPU 3 | GPU 4 |
| X79 | Rampage IV F/E | 1 |
16x PCIe 2.0 from CPU |
|||
| X79 | Rampage IV F/E | 2 |
16x PCIe 2.0 from CPU |
16x PCIe 2.0 from CPU |
||
| X79 | Rampage IV F/E | 3 |
16x PCIe 2.0 from CPU |
16x PCIe 2.0 from CPU |
8x PCIe 2.0 from CPU |
|
| X79 | Rampage IV F/E | 4 |
16x PCIe 2.0 from CPU |
8x PCIe 2.0 from CPU |
8x PCIe 2.0 from CPU |
8x PCIe 2.0 from CPU |
| Z77 | Any | 1 |
16x PCIe 3.0 from CPU |
|||
| Z77 | Most | 2 |
8x PCIe 3.0 from CPU |
8x PCIe 3.0 from CPU |
||
| Z77 | Few | 2 |
16x PCIe 3.0 from CPU |
4x PCIe 2.0 from Z77 |
||
| Z77 |
Gigabyte Z77X-UD5H |
3 |
8x PCIe 3.0 from CPU |
4x PCIe 3.0 from CPU |
4x PCIe 3.0 from CPU |
|
| Z77 |
Biostar TZ77XE4 |
3 |
8x PCIe 3.0 from CPU |
8x PCIe 3.0 from CPU |
4x PCIe 2.0 from Z77 |
|
| Z77 |
ASUS P8Z77-V Premium |
3 |
16x PCIe 3.0 from PLX |
8x PCIe 3.0 from PLX |
8x PCIe 3.0 from PLX |
|
| Z77 |
ASUS P8Z77-V Premium |
4 |
8x PCIe 3.0 from PLX |
8x PCIe 3.0 from PLX |
8x PCIe 3.0 from PLX |
8x PCIe 3.0 from PLX |
In general:
PCIe 3.0 > PCIe 2.0
Lanes from CPU > Lanes from PLX > Lanes from Chipset
More lanes > Less lanes
Civilization V
Civilization V is a strategy video game that utilizes a significant number of the latest GPU features and software advances. Using the in-game benchmark, we run Civilization V at 2560x1440 with full graphical settings, similar to Ryan in his GPU testing functionality. Results reported by the benchmark are the total number of frames in sixty seconds, which we normalize to frames per second.
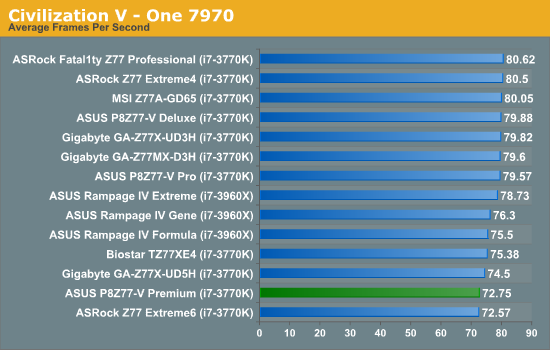
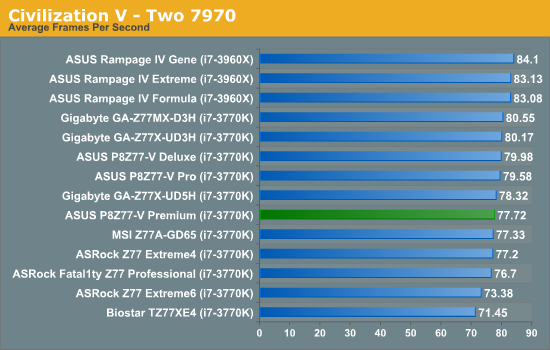
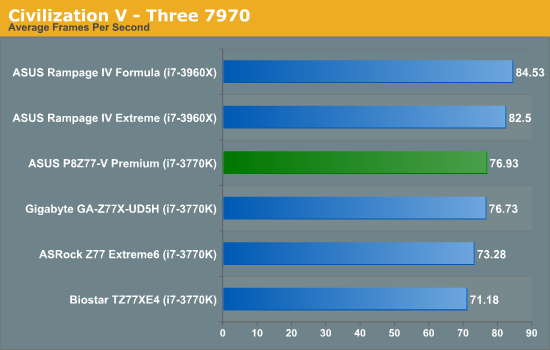
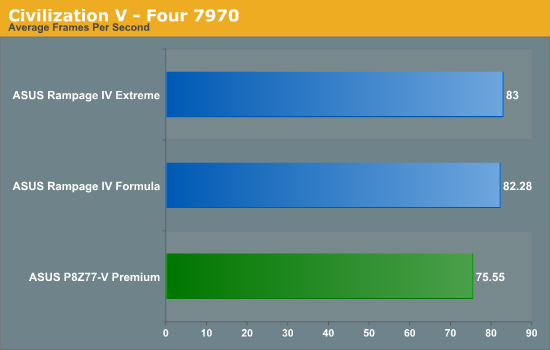
Civilization V is unfortunately a bad game to see scaling with our 7970 cards, especially as we are locked in with our drivers during our Z77 testing. At each test, the Premium scores above 70 FPS, but falls a little in single GPU testing compared to others hitting 80 FPS.
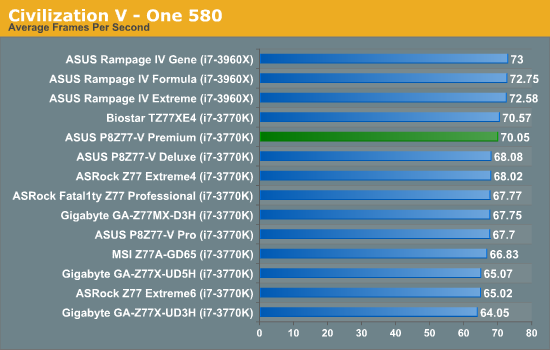
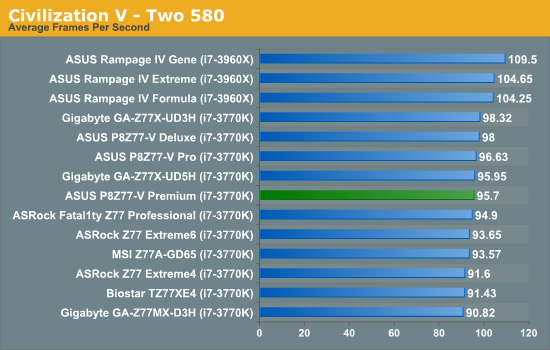
Civilization V scales a little bit better on NVIDIA cards, giving a near top Z77 result in single mode, but is middle of the pack in dual GPU mode.
Dirt 3
Dirt 3 is a rallying video game and the third in the Dirt series of the Colin McRae Rally series, developed and published by Codemasters. Using the in game benchmark, Dirt 3 is run at 2560x1440 with full graphical settings. Results are reported as the average frame rate across four runs.

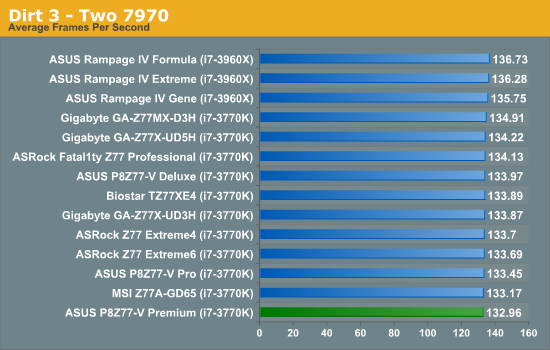
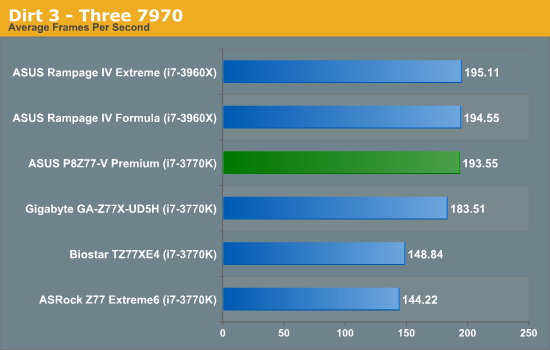
Dirt 3 loves GPU power, and it is not until we hit three GPUs where the difference in lane counts come into play. In our three-GPU testing, the Rampage IV Formula gets 194.55 FPS, the Premium is 193.55 FPS and the GA-Z77X-UD5H is 183.51 FPS. The latter two have similar CPU speeds but differ on lane count, giving the Premium an extra 10 FPS.
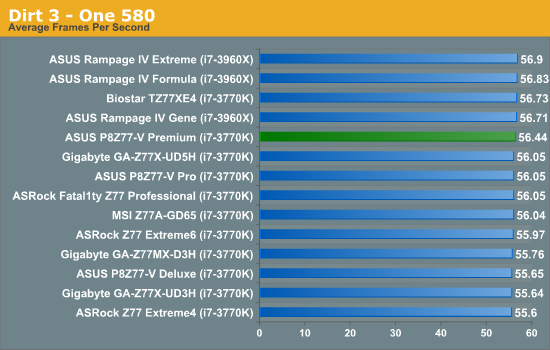
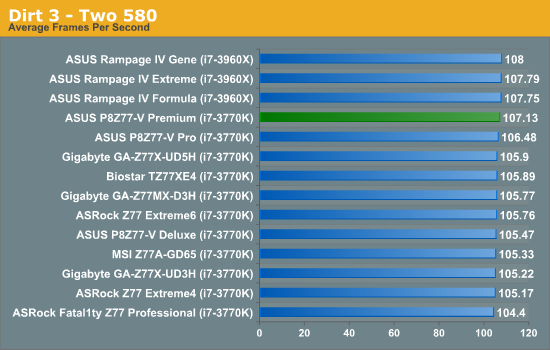
Not much to say for Dirt 3 + NVIDIA testing, all the motherboards perform roughly the same.
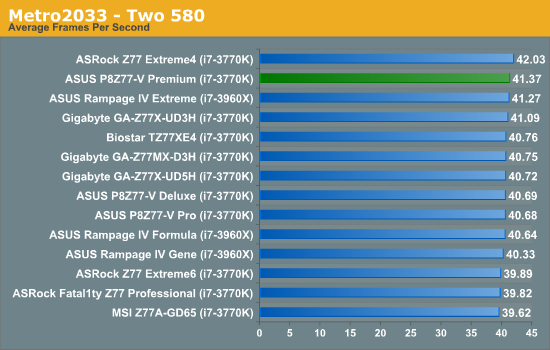
Metro2033
Metro2033 is a DX11 benchmark that challenges every system that tries to run it at any high-end settings. Developed by 4A Games and released in March 2010, we use the inbuilt DirectX 11 Frontline benchmark to test the hardware at 2560x1440 with full graphical settings. Results are given as the average frame rate from 4 runs.
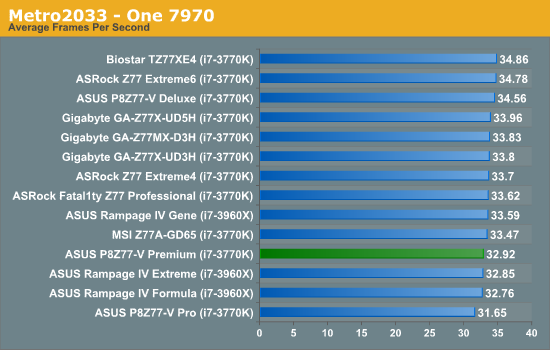
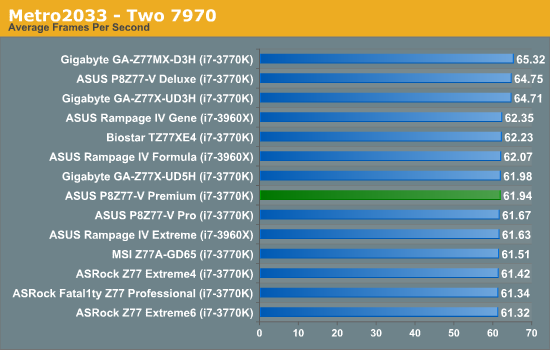
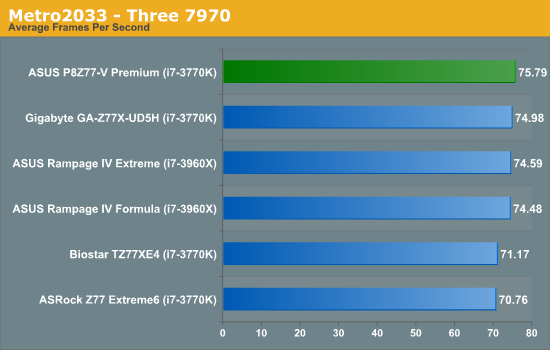
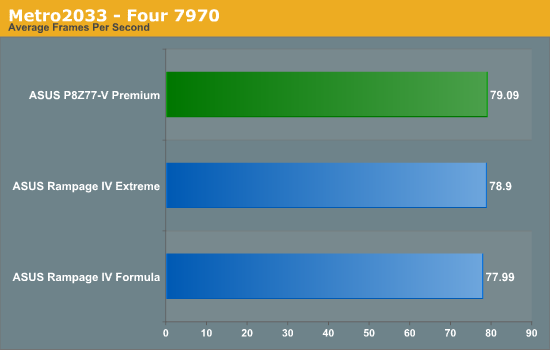
In Metro 2033 + AMD, all the motherboards perform similarly in single and dual GPU mode, but at tri-GPU mode the Premium takes almost a 1 FPS advantage over the nearest challenger.
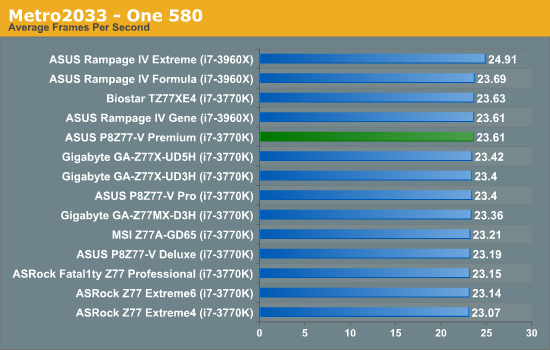
With Metro 2033 + NVIDIA, all the motherboards perform similarly in single and dual GPU.
Conclusion: P8Z77-V Premium
The striking feature regarding the ASUS P8Z77-V Premium, at least from my perspective, is the price. We very rarely see motherboards costing more than the CPU for a given range (Sandy Bridge-E top chip is $999, top motherboard costs <$600). However, the P8Z77-V Premium comes in at an MSRP of $450 US. That is a lot of green, and ASUS have attempted to match the cost with the feature set.
As specified in the review, we have a wealth of additional functionality on the P8Z77-V Premium. Here are my estimates for the costs of individual parts:
- Dual Intel NIC ($20 combined)
- 32GB LiteOn mSATA SSD ($60)
- PLX PEX 8747 ($40)
- WiFi and Bluetooth module ($40)
- Thunderbolt ($40)
- Marvell 9230 controller for 4 SATA 6 Gbps ports ($20)
- Included USB 3.0 Front box ($20)
- iNetwork Control ($15)
- Fan Xpert II Software (comparable $50 controller would not give similar options)
- USB 3.0 Boost + Specific ASMedia controller ($15)
- ASUS Premium Service (for North American customers) (??)
Totaling these up (please note, these are my own interpretations) would come to $320 – a sizable sum which would pay for three low cost Z77 boards by itself! Removing these would come to $130, or the rough price of the P8Z77-V LX. A lot of research and development goes into many of these features (such as the Marvell controllers have PCIe x2 interconnect, or the research/development to put the WiFi module onto the backplane as a card rather than an x1 addition) which we cannot quantify. This puts the Premium at good value for the features it provides.
All of this adds a cost to the production of the motherboard, which is passed on to the consumer. The question does become whether there exists a single consumer that can make use of all these, or whether ASUS should filter most of these features into specific individual SKUs. The other argument is that for a top end board, a user would like to have the option to be able to use everything. So as long as the user can use every single one of the above options, then this would make the Premium an excellent buy (assuming all else is equal). Otherwise, we come up against the Luxury car scenario. Nevertheless, ASUS tell me that during the first three months of the X79 release, the Rampage IV Extreme was their best selling X79 board, despite being the most expensive and having a range of included features that many of the users on the board would not consider using. Therefore, despite what common sense from a reviewer's perspective may believe, expensive boards can sell well.
In terms of performance, with the ASUS P8Z77-V Premium being the first motherboard we have tested with the PLX PEX 8747 chip, we were a little down-heartened when the initial single GPU results were in. However, it does seem to be on par with other boards using this chip, meaning that these motherboards strictly aim at the two or more GPU user. Having four high end AMD GPUs running in this board was great fun, until I put the fans on full. Using a single 2560x1440 monitor at the highest settings, we reached almost 230 FPS in Dirt3 in this setup.
In our throughput testing, ASUS pulls no punches in fully utilizing MultiCore Enhancement, resulting in the full turbo mode of the processor no matter what the loading. As a result, our CPU tests are in the top echelons. IO testing benefits from having a Thunderbolt port, in the sense that any Thunderbolt device will happily smash all our USB 3.0 testing. The Thunderbolt port also supports an extra DP monitor through the connection with an Ivy Bridge CPU.
Power consumption on the P8Z77-V Premium was a little higher than expected. This motherboard uses a 20-phase solution for the CPU power, which may contribute to the extra power draw (27W in Metro2033 over the ASUS P8Z77-V Pro). Though given the nature of the board, power draw is probably the least point of concern on a users mind.
The Premium does have an awesome POST time. In our testing, ASUS Z77 boards have typically scored around 18 seconds, and 15 when controllers are disabled. The Premium steams in at 10.44 seconds to finish the POST, cruising ahead of many ASRock motherboards. For a motherboard that has all this extra functionality, ASUS have played the tweaking game to make this an ultra fast startup board in our testing. This is reflected in the BIOS, which is easy to use for beginners and enthusiasts alike.
The lynchpin of the Premium comes down to the price. Yes, it is a good board and it works well, but when I review a motherboard I have to take into account the user base which coincides with the intended market. I highly doubt that a single user will ever utilize all the additional functionality listed above, which means that there will always be one extra bit of kit that the user does not need. This is despite ASUS informing me that their most feature rich and expensive X79 motherboard was their best X79 seller, even if the end users were not entirely the intended market.
That makes the Premium a very confusing motherboard for critics like me to recommend. Perhaps this calls in an analogy of high-end luxury model cars - while no-one would necessarily use the 6.0 liter V12 in a Maybach 62 to its fullest potential, or even the CD changer if they already have a music playing device, it is there if required. But should we be awarding the luxury cars for pushing the boundaries, or awarding the hot hatchbacks for being worthy of the bang-for-buck mentality?
The ASUS P8Z77-V Premium is an easy board to recommend if you are a multi PCIe device user, you have Thunderbolt devices, need dual Intel NICs as well as WiFi, and want to equip your system with SATA and USB 3.0 storage. The ASUS P8Z77-V Premium represents the all-in-one, top of the line solution.


